CNIC Domain Search
This Documentation covers the CNIC Domain Search Add-On for WHMCS.
Introduction
Welcome to the documentation for the new CNIC Domain Search add-on! This powerful tool provides your customers with a simple and user-friendly interface to check the availability of domains.
Key Features:
Easy Domain Availability Check: With just one click, your customers can quickly check the availability of domains.
Support for Premium Domains: The add-on enables support for Premium Domains.
Support for Aftermarket Domains: Explore the World of Aftermarket Domains.
Domain Name Suggestion Engine: A built-in suggestion engine provides helpful suggestions during searches, enhancing the user experience.
High-Speed API Availability Checks: The add-on connects to your configured ** All Supported Brands registrar module to perform high-speed API availability checks, ensuring fast and accurate results.
Single Page Application: The CNIC Search Engine is a single page application powered by the LitJS JavaScript library, providing a seamless and responsive user experience.
Flexible Search Filters: Users can filter searches by various categories, including price range, availability, premium, and aftermarket domain names.
Instant Search Results: The search results update instantly as users make changes in the input field, providing real-time feedback.
Bulk Domain Registration and Transfer: Our add-on supports bulk domain name registration and transfer through a convenient bulk input feature.
Direct URL Access: Users can access specific searches directly using URLs, allowing for the creation of dedicated landing pages for different tabs, such as Regular Search, Suggestions, Transfer Domain Names, and Whois.
Highly Customizable HTML Templates: Customize the look and feel of the search engine to match your unique requirements with our wide range of highly customizable HTML templates.
Search Logs: Stay informed about your customers’ search activities and their evolving needs by tracking the domains they search for.
Experience the power and versatility of CNIC Domain Search add-on, and empower your customers with an efficient and personalized domain search experience.
Requirements
In our system requirements, we recommend avoiding PHP versions that have reached their End of Life (EOL), as indicated in red on the PHP Supported Versions page.
To ensure compatibility with WHMCS, please follow these steps:
- Check the supported PHP versions for your desired WHMCS version using our WHMCS/PHP Matrix.
- Determine the required IonCube Loader version for your WHMCS version from the WHMCS/IonCube Loader Matrix.
- Identify the compatible MySQL version for your chosen WHMCS version using the WHMCS/MySQL Matrix.
Please note: We ensure compatibility with the latest WHMCS version and the maximum versions of the listed software dependencies. While our modules may still function with older PHP versions like PHP 7.4, we don’t provide support for them and cannot guarantee their continued compatibility. If you have questions or need assistance, please reach out to us.
Required Registrar Module: This add-on relies on the ** All Supported Brands as the domain lookup providers. You can download the necessary modules here. Please note that the WHMCS built-in ** All Supported Brands provider modules are not compatible with our Domain Search Add-On.
Live or Test Account: Configure one or more user accounts in the Registrar Module to enable seamless functionality.
URL Rewrite and Web Server Configuration: Enable URL Rewrite on your web server and apply one of the recommended URL rewrite solutions (refer to section 3 e) for detailed instructions).
Disable Captcha for Shopping Cart Checkout: This addon does not support captcha validation. Kindly disable System Settings > General Settings > Security > Captcha for Select forms uncheck Shopping Cart Checkout captcha validation.
Ensure that these requirements are met to enjoy the full capabilities of the CNIC Domain Search Add-On.
Installation / Upgrade
For a new installation, unzip the downloaded file and upload the content of the “install” folder to your WHMCS root directory.
Upgrading
When upgrading: Please make sure to back-up your existing CNIC bundle to prevent any data losses.
- Backup folders to a safe path
modules/registrars/ispapimodules/registrars/cnicmodules/addons/cnicdnsmodules/addons/cnicdomainimportmodules/addons/cnicmigrationmodules/addons/cnicssl_addonmodules/addons/cnicdomainsearchmodules/servers/cnicsslmodules/widgets/ispapi*.php // just delete these ones if presentmodules/widgets/hexonet_summary.php // just delete this one if presentmodules/addons/ispapidomaincheck (old domain search)resources/cnic
And then delete these folders from your WHMCS instance.
- Extract the zip archive into the root folder of your WHMCS instance. (Upgrade completed!
 )
)
IMPORTANT Ensure to read the Release Notes carefully before Upgrading! Our Release numbers follow semantic versioning and thus we follow the version syntax: MAJOR.MINOR.PATCH. Please ensure to backup your current version’s folder to have a fallback possibility you can use, just in case there’s something wrong with our new version.
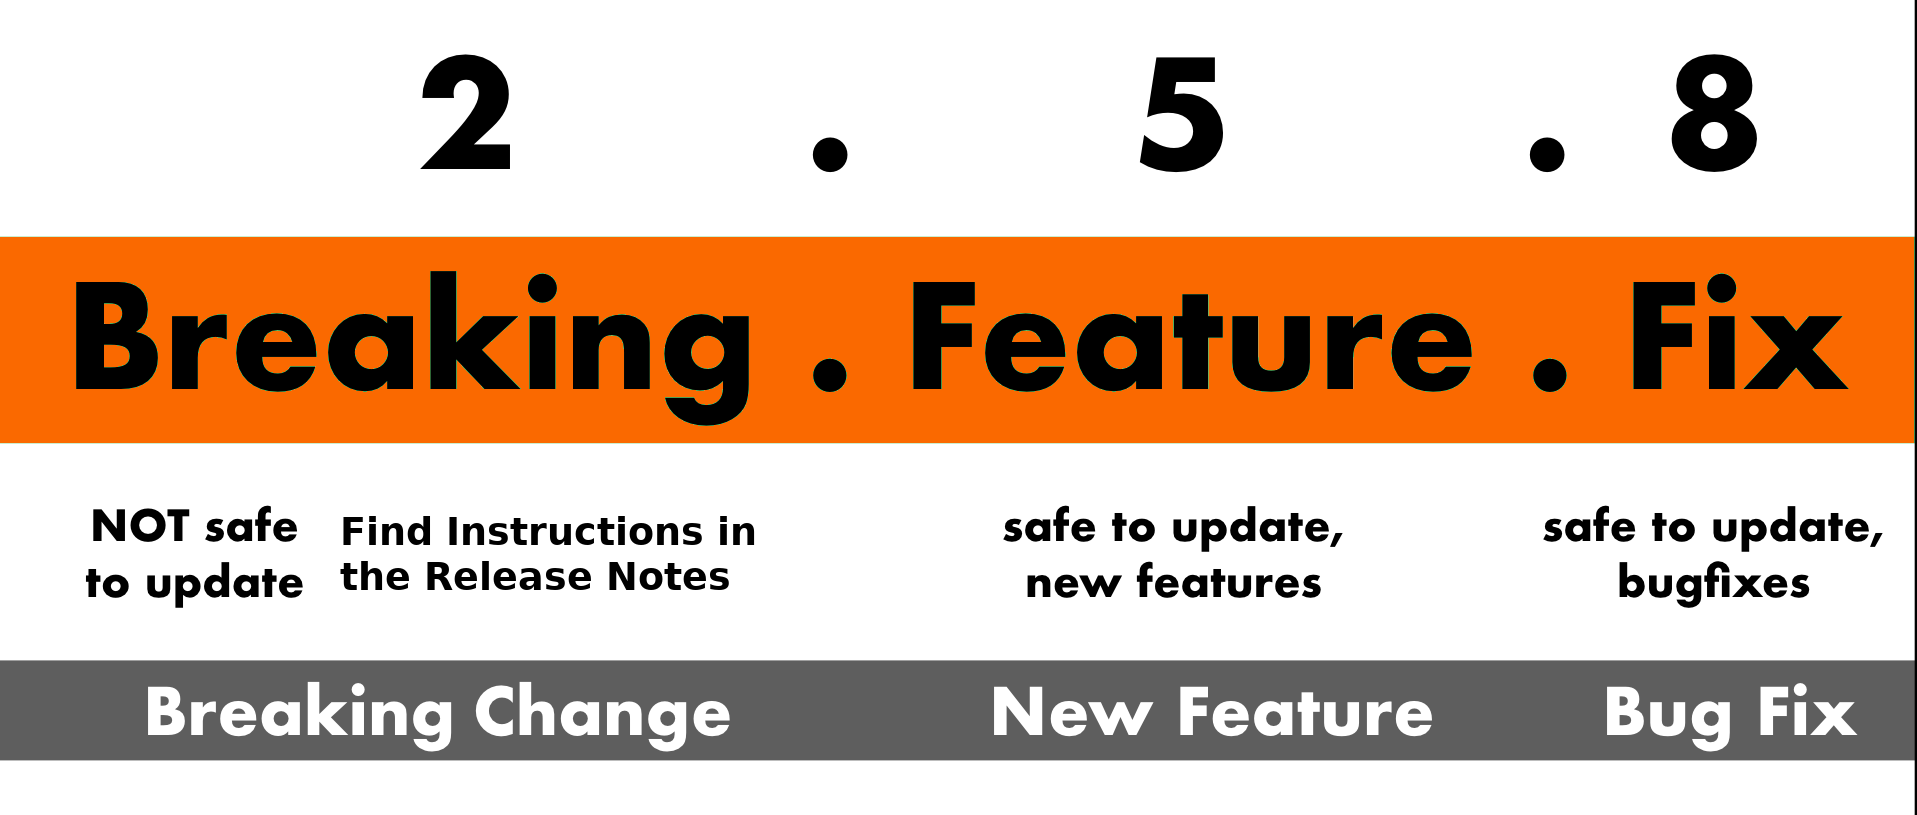
You can always upgrade without worries if the PATCH or MINOR version have just changed. If the MAJOR version has changed, check the release notes to avoid unexpected issues as a new MAJOR version comes always with breaking changes or at least with a new module behavior.
Follow the installations steps below and consider the provided release notes for the MAJOR version upgrade. In detail: if you’re upgrading from 1.x.y to 4.x.y, ensure to check ALL Major Version Release Notes up to the version you’re upgrading too. In this example, check the release notes for 2.0.0, 3.0.0 and 4.0.0.
If you’re upgrading regularly and keeping all our modules / addons / widgets updated, you run in less upgrade effort than doing multiple major version number steps. You can add/subscribe yourself to release notifications in our github repositories to get informed about new releases.
NOTE: The WHMCS root directory is the folder which contains the “configuration.php” file.
Configuration
Addon Activation
To access the addon modules, users with WHMCS version 8.0+ should navigate to the WHMCS Admin Area, then go to System Settings and select Addon Modules.

Activate the ISPAPI DomainChecker Addon, give the module “Full Administrator” Access Control right.
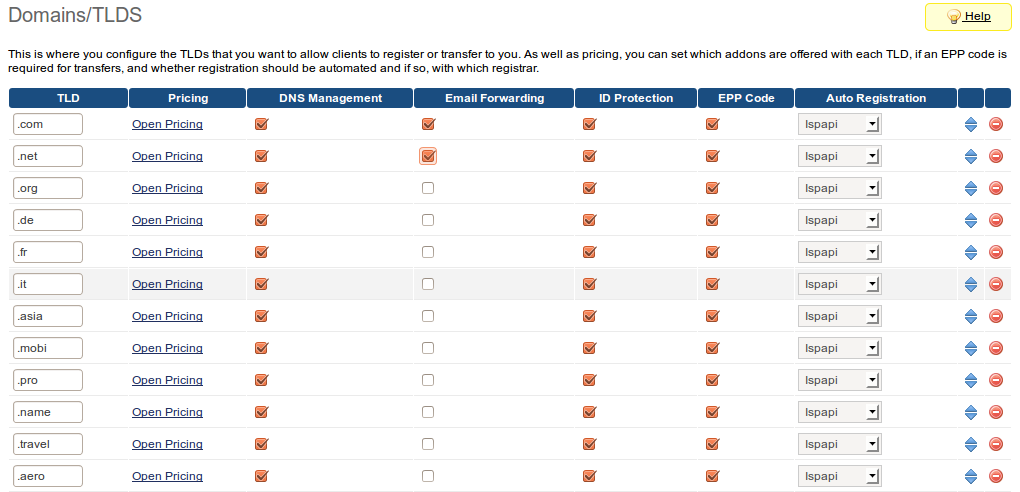
Regular Domain Pricing
Under Setup > Products/Services > Domain Pricing, you will be able to configure and select the registrar for all the TLDs you want to sell.
Be aware that high-performance domain availability checks using our registrar API will only be provided with the ** All Supported Brands registrar. Just in case we do not support a certain TLD, we fallback to the WHMCS’ WHOIS Lookup.
Use the Registrar TLD Sync Feature to import our TLDs and Prices which is available since WHMCS v7.10.
Aftermarket Domains
Enabling Aftermarket Domains Feature
- Navigate to
CNIC Domain Search > Features. - Toggle the Aftermarket option to
ONto enable support for Aftermarket domains in your Domain Search.
Using Aftermarket Domains with WHMCS
To integrate Aftermarket domains with WHMCS, follow these steps:
- Ensure premium domain support is enabled in WHMCS.
Manage your Settings
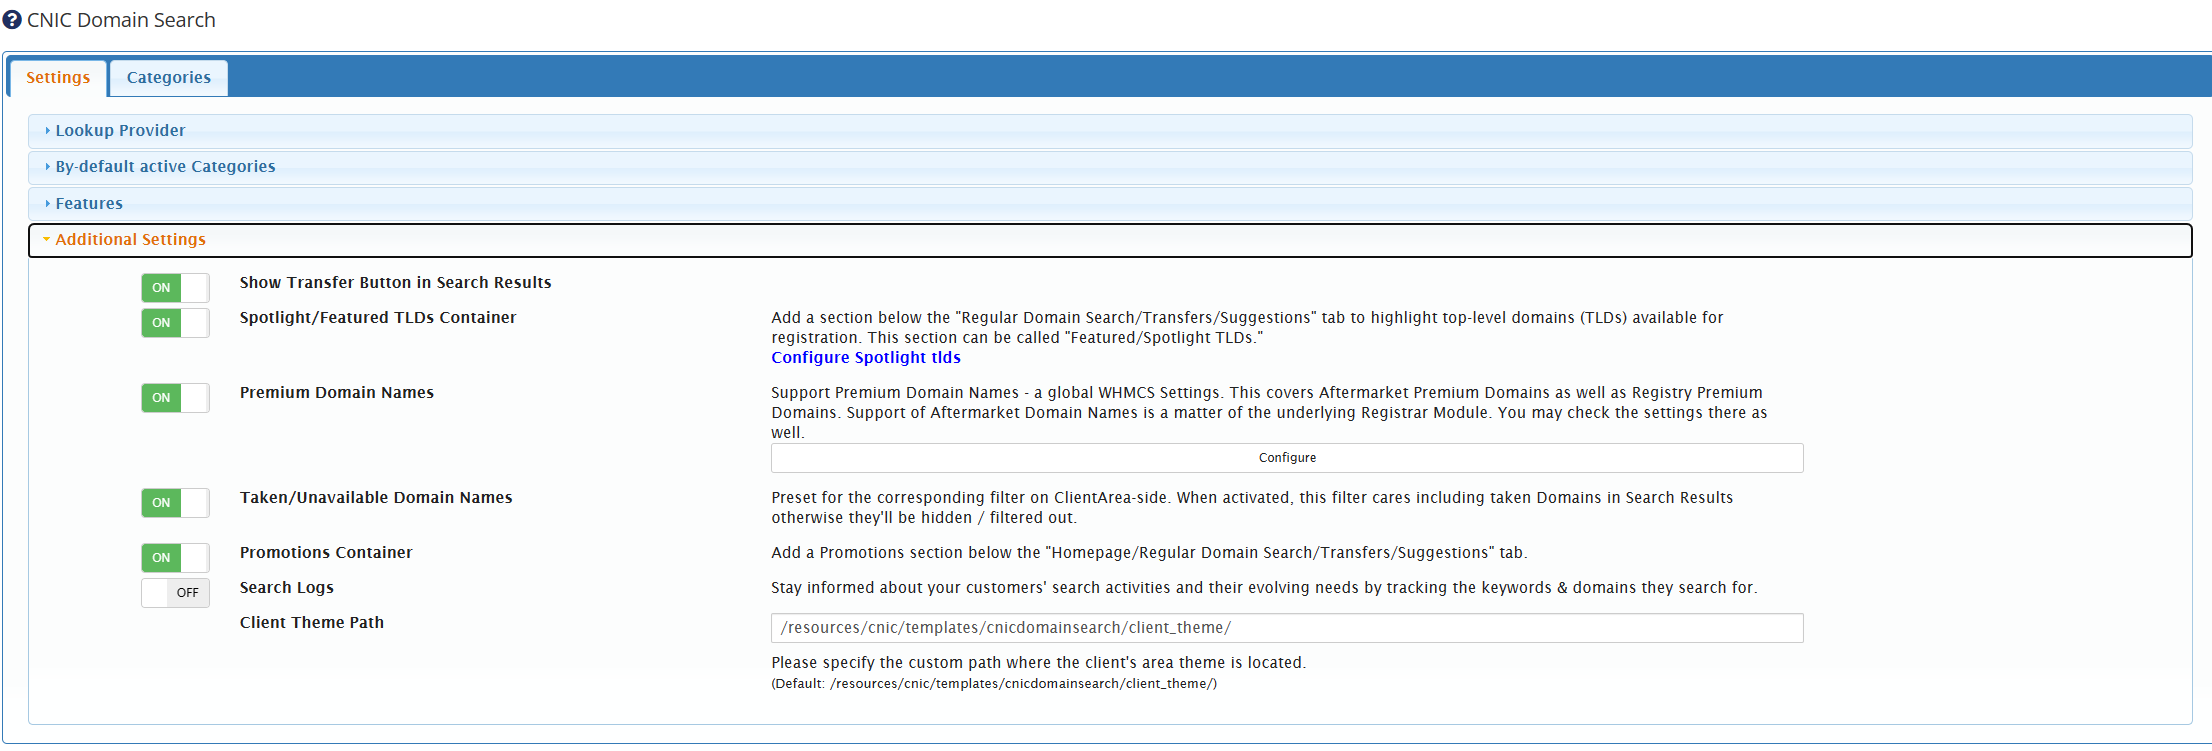
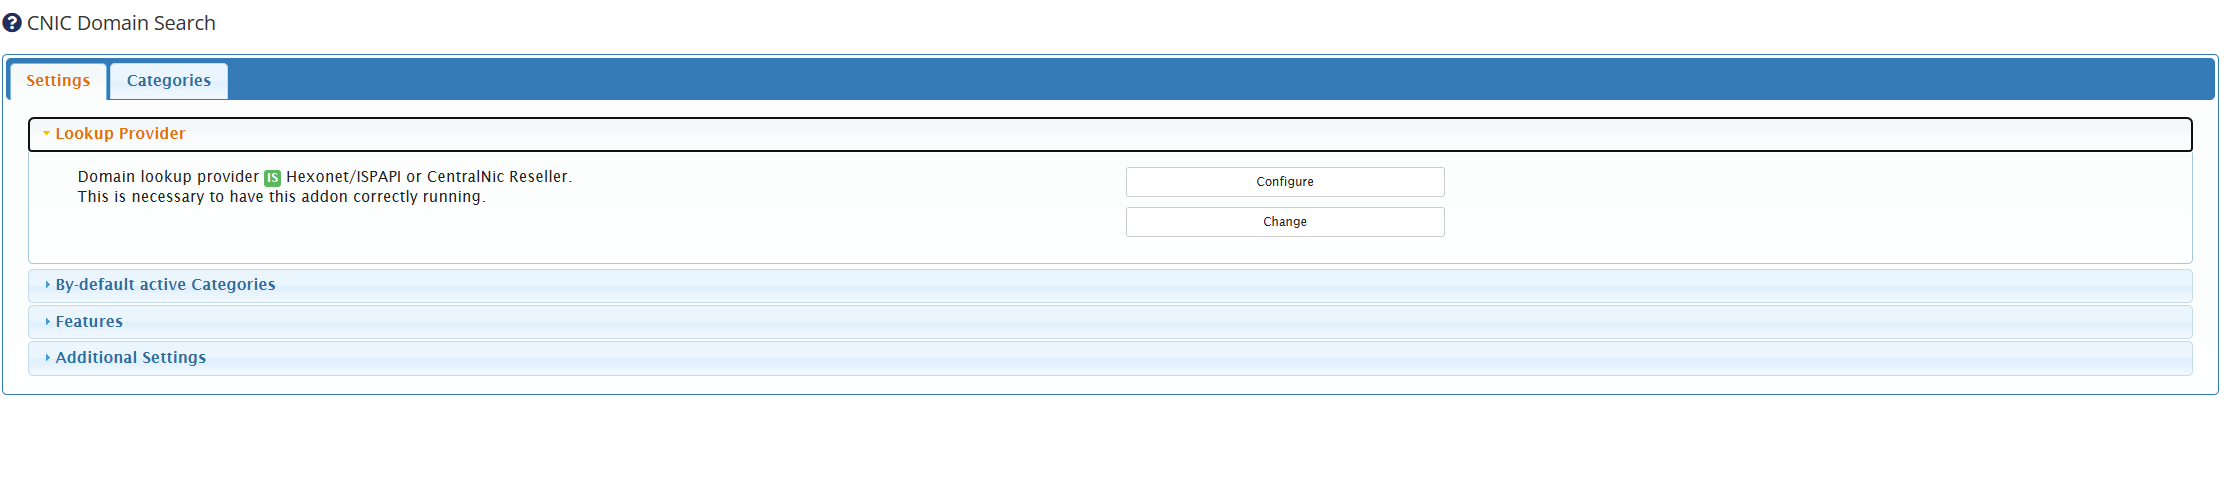
To configure your default settings, which will serve as the initial settings for your clients, follow these steps:
Navigate to the “Addons” section in your WHMCS admin area.
Select “CNIC Domain Search” from the available addons.
-
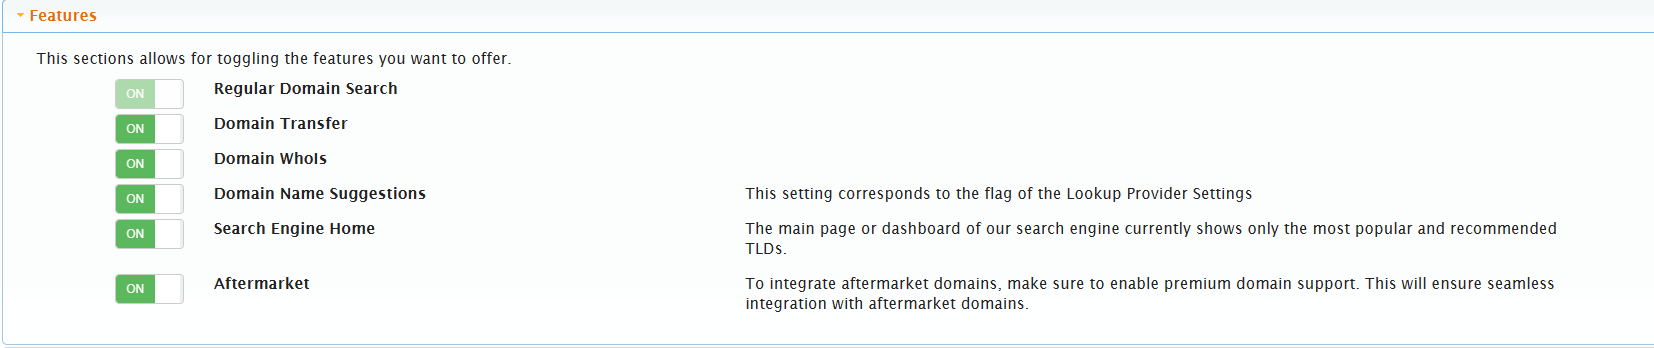
In the CNIC Domain Search configuration panel, you can adjust the following settings:
- Choose the lookup provider.
- Activate the default TLD categories.
- Set the visibility of taken domain names.
- Set the visibility of premium domain names and specify the desired markup.
- Enable or disable specific feature tabs such as Home, Suggestions, Transfer, and Whois.
- Show or hide the promotions feature.
- Show or hide the spotlight/featured TLDs feature.
- Show or hide the transfer button in search results.
- Modify the default theme path location.
- Enable or disable search logs.
It’s important to note that clients have the ability to temporarily modify some of these settings in their client area according to their preferences.
The module offers domain search results based on four different modes:
- Regular: Conduct a regular search with the configured categories (default mode).
- Suggestions: Generate domain name suggestions using our API.
- Transfer: Take advantage of our unique bulk domain transfer feature.
- Whois: Perform domain WHOIS lookups using the CNIC Domain Search addon.
- Aftermarket: Elevate Your Online Brand with Aftermarket Gems!
By managing these settings, you can tailor the functionality and features of the CNIC Domain Search addon to suit your specific requirements.
Manage your Categories
In order to configure your Categories, go to Addons > CNIC Domain Search For new installations, click on “Import Default Categories“ button.
For updates, your previous configuration should be working. Still, you can import the default categories by clicking the “Import Default Categories” button. (Your current configuration will be overwritten!)
This Import use the prices configured in the “Domain Pricing” page as base and considers the categories defined by WHMCS and also the configured order of the domain extensions. If you did not know about it: You can drag’n’drop the rows of the “Domain Pricing” page. Remember to configure each currency accordingly. Also note that IDN extensions have to be configured there in IDN format, not in punycode.
If you want to customize the WHMCS default categories, read this.

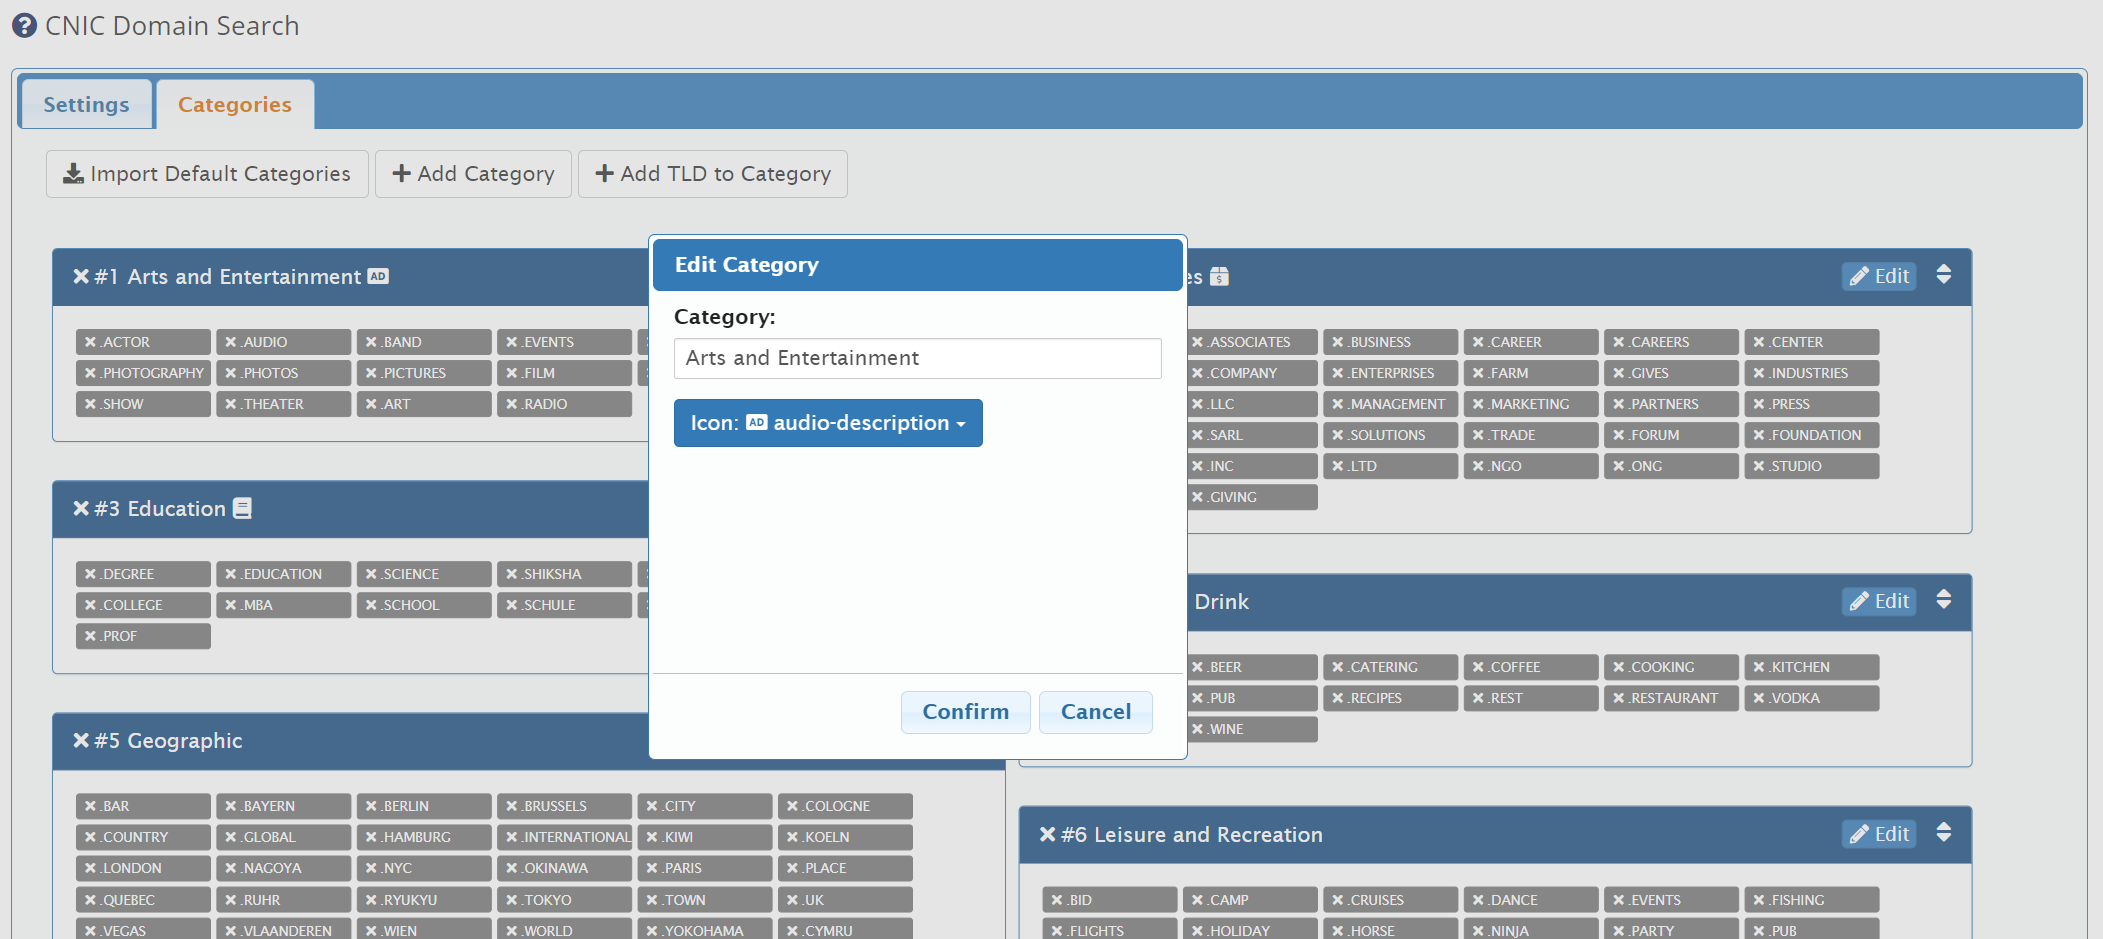
In that overview you can:
- reorder a TLD by drag’n’drop
- move a TLD from one category to another one by drag’n’drop
- add a new category
- select a category icon
- delete a category
- edit a category
- see TLDs that are not assigned to a category
Translations
Translate your TLD Categories by:
- Add the respective language file under
/lang/overrides. Well described here. - Add your translation per Category
e.g. for file /lang/overrides/german.php
$_LANG['domainTldCategory']['Popular'] = "Beliebt";
$_LANG['domainTldCategory']['Arts and Entertainment'] = "Kunst und Unterhaltung";
Search Logs
By default, the logging of user search keywords is disabled in WHMCS. However, if you choose to enable it, the search keywords will be recorded and can be viewed in the Activity Log section.
If you prefer to implement your own custom logging mechanism for search keywords, you can create a function called “cnic_logSearch” with the following parameters:
- $terms: A string representing the search keywords.
- $mode: A string representing the mode of the search e.g. Regular Search, Suggestions, or Transfer
- $time: A string representing the timestamp of the search.
- $ip: A string representing the IP address of the user.
- $clientid: A string or null value representing the client ID associated with the search.
Here is an example of how to define the “cnic_logSearch” function in PHP:
/**
 * Logs the search keywords.
 *
 * @param string $terms
 * @param string $mode
 * @param string $time
 * @param string $ip
 * @param string|null $clientid
 */
if (!function_exists("cnic_logSearch")) {
    function cnic_logSearch($terms, $mode, $time, $ip, $clientid)
    {
        // Add your custom implementation here
    }
}
Redirect the WHMCS Search
For getting the native WHMCS Domain Search replaced with our Module, there are two solutions available, please select one. For both of them, ensure your web server has url rewrite enabled (-> Apache: mod_rewrite).
#cd /etc/apache2/sites-available/
> a2enmod rewrite
# Enabling module rewrite. To activate, run now:
> service apache2 restart
NOTE: With Apache 2.4 things have changed. Please check the Apache2 Upgrade Guide for differences between 2.2 and 2.4++ configurations and how to review / clean them up.
By Apache Configuration
To redirect the WHMCS domainchecker.php to mydomainsearch.php, add the following Apache configuration into your <VirtualHost> section:
RewriteEngine On
RewriteBase /

RewriteCond %{REQUEST_METHOD} POST
RewriteCond %{THE_REQUEST} ^POST\ /domainchecker\.php
RewriteRule ^domainchecker\.php$ /mydomainsearch\.php [P]
By .htaccess File
To set the CNIC Domain Search Engine Add-On as the default domain search for WHMCS, please follow these steps:
- Open your preferred text editor.
- If the file “.htaccess” doesn’t already exist in the root directory of your WHMCS installation, create a new file and name it “.htaccess” (including the leading dot).
- Copy and paste the following code into the .htaccess file:
<IfModule mod_rewrite.c> RewriteEngine On RewriteBase / RewriteCond %{REQUEST_METHOD} POST RewriteCond %{THE_REQUEST} ^POST\ /domainchecker\.php RewriteRule ^domainchecker\.php$ /mydomainsearch.php [P] RewriteRule ^domainchecker\.php$ /mydomainsearch.php [L,R=301] </IfModule> - Save the changes to the .htaccess file.
By adding this code to the .htaccess file, you will set the CNIC Domain Search Engine Add-On as the default domain search for WHMCS. Ensure that you save the modified .htaccess file to activate the changes.
To enable static file caching, please follow these steps:
- Locate the .htaccess file in your website’s root directory.
- Open the .htaccess file using a text editor.
- Add the following code to the file:
<IfModule mod_expires.c> ExpiresActive On <FilesMatch "(?i)^resources/cnic/templates/cnicdomainsearch/.*\.(html|css|json|png|jpe?g|gif)$"> ExpiresDefault "access plus 1 month" </FilesMatch> </IfModule> - Save the changes to the .htaccess file.
- Refresh your website to apply the caching settings.
By adding this code to the .htaccess file, your website will benefit from static file caching for the search engine addon, which can improve its performance and load times.
Note: Ensure that your web server is configured to consider .htaccess files. For Apache, you can use the “AllowOverride FileInfo” configuration. Avoid using “AllowOverride All” as it may introduce security risks.
Enabling WHMCS Module Log for Troubleshooting
If you encounter any failures while using our addon, don’t worry! You can easily retry the failed process by following these steps:
- Go to Utilities in the WHMCS menu.
- Select Module Queue from the options.
- It’s recommended to turn on Logging before retrying in case there are any issues. You can do this by enabling the Logging feature.
- Click on the “Retry” button to give the process another try.
- Afterward, you can review the logs to check for any error messages or details. Make sure to turn off logging once you’re done.
By following these best practices, you can efficiently handle any process failures in WHMCS.
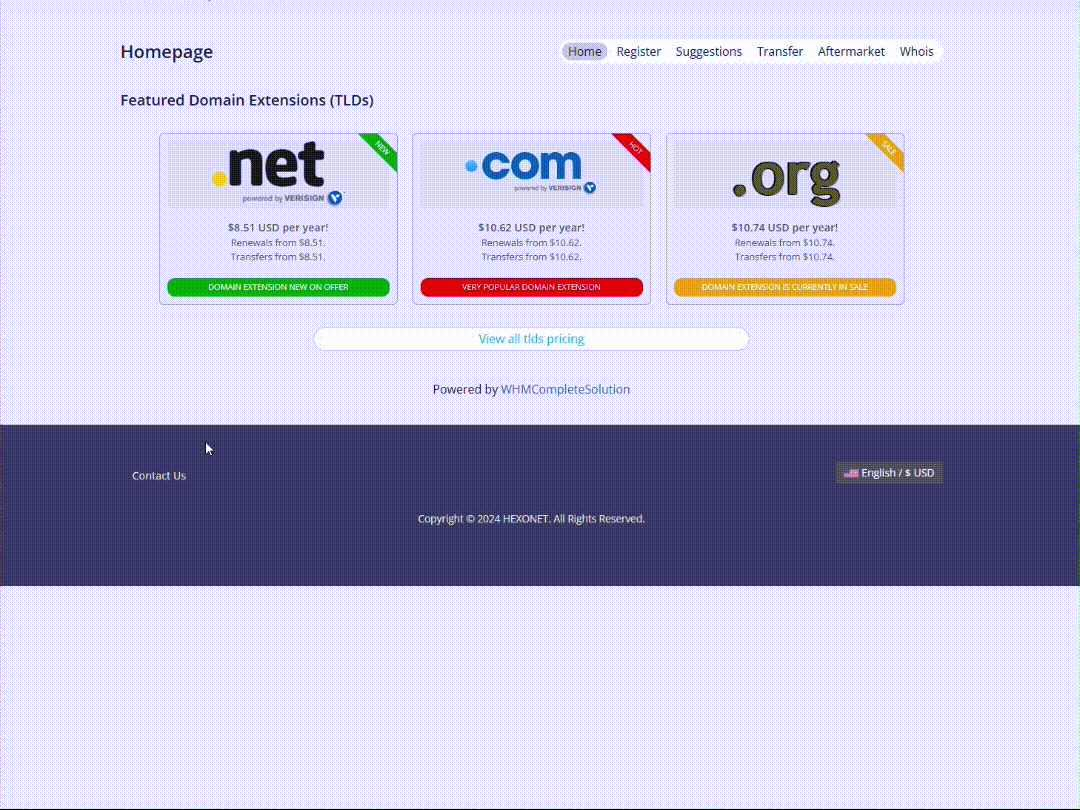
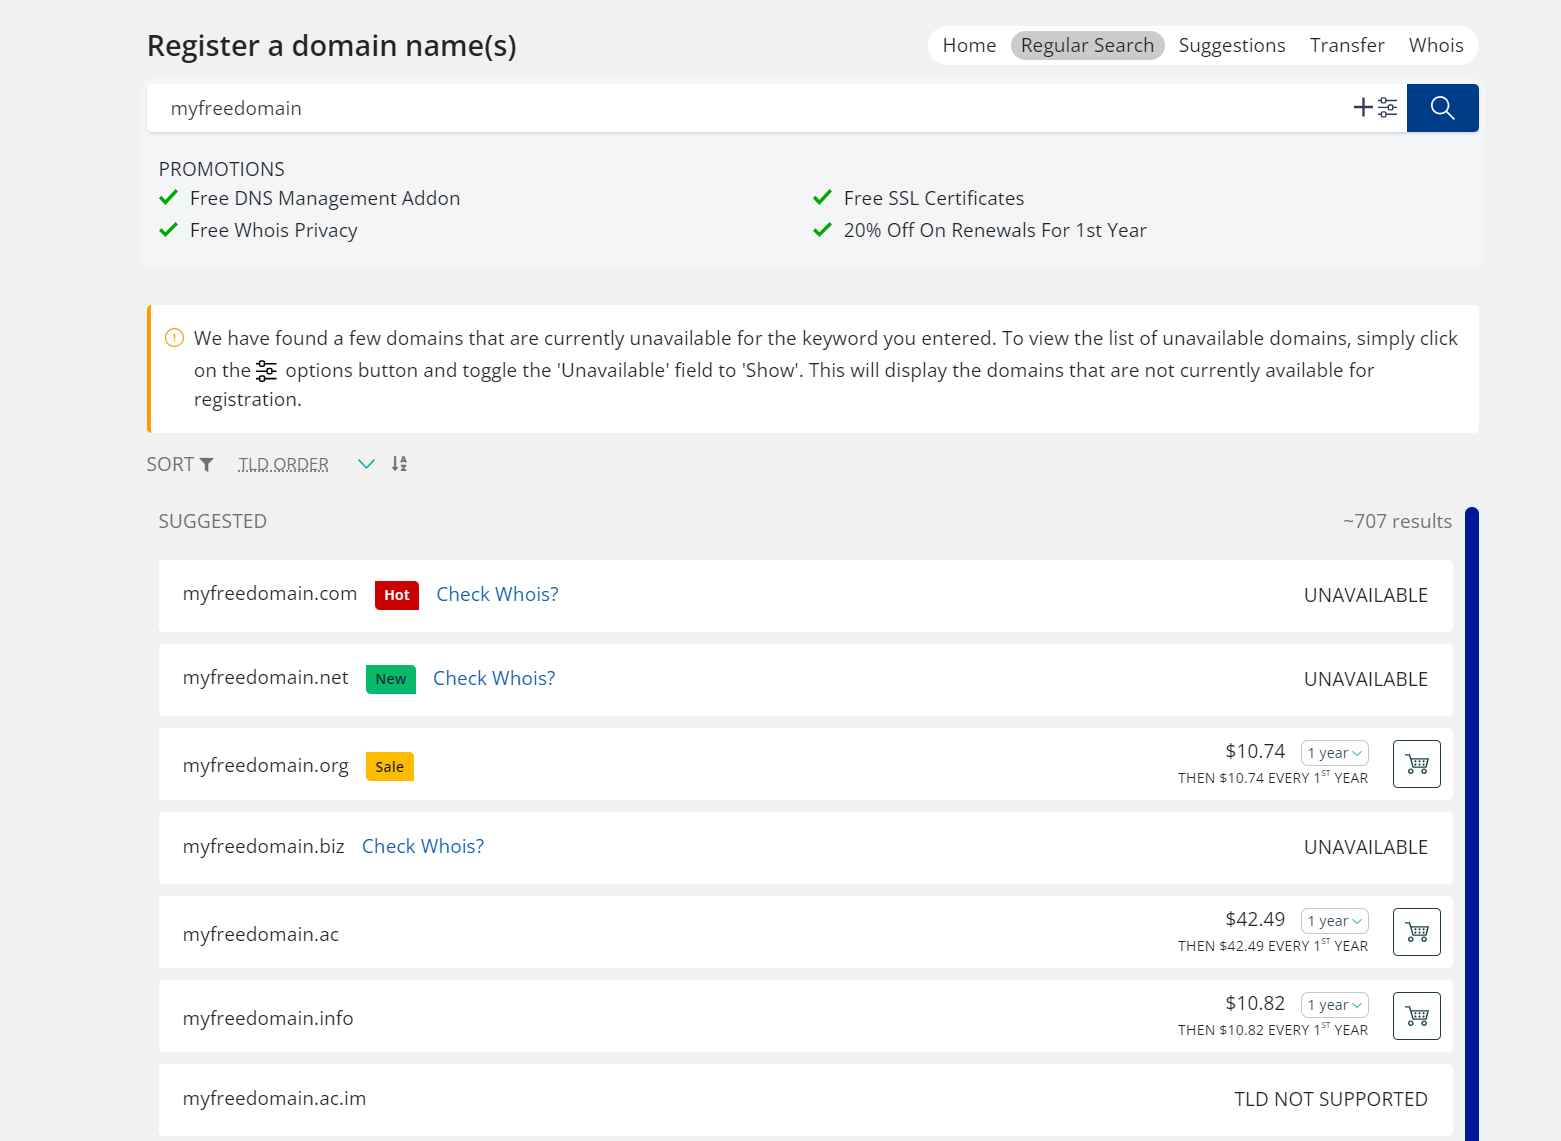
Test your installation
Go to your homepage, fill the search field with a domain and click the “Go” button. If the result looks like the following screen-shot, your installation is a success and you are now ready to start selling domains with your new CNIC Domain Search Addon.

Perform a Search Using a GET Request
Sometimes, you may need to initiate a search by sending a URL or GET request. Our module fully supports this functionality, allowing you to perform searches through various means. This feature comes in handy when you want to create a specialized landing page for a specific top-level domain (TLD) or integrate your WHMCS-based Domain Search into another web page or portal seamlessly.
Example:
URL: www.yourdomain.com/mydomainsearch.php?action=register&searchTerm=test.com
In this example, by including the desired search term “test.com” in the URL, the search field will be automatically populated in the regular search tab. However, the user still needs to manually trigger the search by pressing the search button.
GET Parameters
| Parameter | Description | Tab |
|---|---|---|
| searchTerm | provide your search string | All |
| bulk | show bulk domains input field | All |
| options | show advanced options of search engine | Except Transfer Tab |
| sort | sort results by specific filter: TldName, DomainName, TldOrder | Regular Search |
| sortDir | Change the sort direction by choosing either: ASC/DESC | Regular Search |
| action | Specify search engine tab as: | All |
| home,register,suggestions,transfer,whois |
Customisation
The Search Engine addon is designed to provide high flexibility for customizing the theme. You can modify the styling and HTML to personalize the CNIC Search Engine according to your preferences. Here are some important points to keep in mind while customizing the theme:
DOM Classes
The following classes are used internally, so it’s crucial to maintain their names when customizing the DOM:
-
selectSortListDir: This class is used for the sort filter direction icon. -
Badge-intentDanger_1Tpoo: This class is used for TLD(s) with a hot badge. -
Badge-intentPromotional_sbT5N: This class is used for TLD(s) with a sale badge. -
Badge-intentNew: This class is used for TLD(s) with a new badge.
Make sure to retain these class names in your customizations for proper functionality and visual consistency.
Styling Variables
To ensure the expected behavior of the addon, it’s important to maintain the variable names in your stylesheet. The following variables are used for specific purposes:
-
--background-ribbon-color: This variable sets the background color for badges on TLDs in the spotlight section. -
--tld-group-hot-bg: This variable sets the background color for badges on TLDs marked as hot. -
--tld-group-sale-bg: This variable sets the background color for badges on TLDs marked as on sale. -
--tld-group-new-bg: This variable sets the background color for badges on newly introduced TLDs. -
--badge-label: This variable sets the styling for badges on TLDs in the spotlight section.
To maintain consistency and ensure the desired visual effects, it’s recommended to keep these variable names intact while making modifications to the stylesheet.
Feel free to unleash your creativity and customize the Search Engine addon to match your unique style and branding. Enjoy the flexibility and create an exceptional user experience with the CNIC Search Engine.
Note: To ensure that your theme changes take effect immediately and bypass any caching mechanisms, remember to update the version number in the resources/cnic/templates/cnicdomainsearch/client_theme/theme.json file.
Displaying Promotions
If you wish to showcase promotions on your search engine, follow these steps to customize the text displayed for each promotion:
Locate the language file resources/cnic/templates/cnicdomainsearch/client_theme/languages associated with your search engine.
Open the language file for editing.
Look for the following language keys:
promotions_descr_list_1promotions_descr_list_2promotions_descr_list_3promotions_descr_list_4
Add your desired text for each promotion by modifying the corresponding language keys.
Note: Removing text from any of these language keys will result in the removal of that specific promotion. Therefore, ensure that you do not remove any of these language keys from the file, as it may impact the expected functionality.
By customizing the text in the language file for these promotion keys, you can effectively control the content displayed for promotions on your search engine.
Relocating the Theme
To move the theme to a different location other than the default, follow these steps:
Locate the client_theme directory in the
resources/cnic/templates/cnicdomainsearch/path.- Move the entire client_theme directory to your desired location.
- You can rename the directory if needed, but ensure that the internal structure remains intact.
- Update the path in the CNIC Domain Search addon configuration to ensure correct functionality.
By relocating the client_theme directory to a new location, you can customize the theme’s storage location according to your requirements. Just remember to maintain the internal structure of the directory and update the configuration path in the CNIC Domain Search addon accordingly.
Customizing Text in Different Languages
To modify the text displayed on the search engine for different languages, follow these steps:
Locate the language files in the
resources/cnic/templates/cnicdomainsearch/client_theme/languagesdirectory.Choose the language file you want to customize. We provide four different language options: English, German, Portuguese, and Arabic.
Open the chosen language file for editing.
Update the text values in the language file while ensuring that you retain the ##variable## placeholder in the text key. Keeping the ##variable## intact is crucial for the search engine to function correctly.
Modify the appropriate language keys to change the displayed text and incorporate any necessary variable placeholders.
To reflect the changes immediately, make sure to update the version number in the theme.json file.
By following these instructions, you can effectively customize the text content in the language file while ensuring the proper functioning of the search engine.
** Supported Brands: CentralNic Reseller (“CNR”) and Hexonet (“ISPAPI”)