SSL Certificates
WHMCS Provisioning Module and Addon for HEXONET & CentralNic Reseller SSL certificates
Introduction
The CNIC SSL Module is a combination of an addon and a provisioning module.
The SSL addon provides a user friendly interface to automatically import SSL certificates as WHMCS products. In addition, it gives the possibility to update prices based on current cost and configurable margins.
The SSL provisioning module connects to the configured registrar module and allows you to register and maintain SSL certificates over HEXONET or CentralNic Reseller.
Supported Features
The CNIC SSL Module supports the following functions and features:
- Supported Brands: HEXONET and CentralNic Reseller
- SSL Provisioning Module
- Support for both productive and test (OT&E) environments
- Create, renew and revoke certificates
- Support for Email, DNS and File based domain validation methods
- Support for certificates with multiple domains (SAN - CentralNic Reseller only)
- SSL addon
- Import available SSL certificates
- Bulk price update by using a profit margin
- Multicurrency support
- Import product logos and descriptions
- Unified handling of different certificate providers
Requirements
In our system requirements, we recommend avoiding PHP versions that have reached their End of Life (EOL), as indicated in red on the PHP Supported Versions page.
To ensure compatibility with WHMCS, please follow these steps:
- Check the supported PHP versions for your desired WHMCS version using our WHMCS/PHP Matrix.
- Determine the required IonCube Loader version for your WHMCS version from the WHMCS/IonCube Loader Matrix.
- Identify the compatible MySQL version for your chosen WHMCS version using the WHMCS/MySQL Matrix.
Please note: We ensure compatibility with the latest WHMCS version and the maximum versions of the listed software dependencies. While our modules may still function with older PHP versions like PHP 7.4, we don’t provide support for them and cannot guarantee their continued compatibility. If you have questions or need assistance, please reach out to us.
For HEXONET:
- Latest ISPAPI Registrar Module. This module can be downloaded here. Our SSL Cert Module does not support the WHMCS built-in HEXONET provider module!
- HEXONET Live or Test Account must be configured in the ISPAPI Registrar Module. Account creation is always free:
For CentralNic Reseller:
- Latest CentralNic Reseller Registrar Module. This module can be downloaded here. Our SSL Cert Module does not support the WHMCS built-in CentralNic Reseller provider module!
- CentralNic Reseller Live or Test Account must be configured in the CentralNic Reseller Registrar Module. Account creation is always free: Register
Installation / Upgrade
Download the ZIP archive including the latest release version here.
Extract/copy all contents from the zip archive to your WHMCS installation root directory, while keeping the folder structure intact.
Upgrading
When upgrading: Please make sure to back-up your existing CNIC bundle to prevent any data losses.
- Backup folders to a safe path
modules/registrars/ispapimodules/registrars/cnicmodules/addons/cnicdnsmodules/addons/cnicdomainimportmodules/addons/cnicmigrationmodules/addons/cnicssl_addonmodules/addons/cnicdomainsearchmodules/servers/cnicsslmodules/widgets/ispapi*.php // just delete these ones if presentmodules/widgets/hexonet_summary.php // just delete this one if presentmodules/addons/ispapidomaincheck (old domain search)resources/cnic
And then delete these folders from your WHMCS instance.
- Extract the zip archive into the root folder of your WHMCS instance. (Upgrade completed!
 )
)
IMPORTANT Ensure to read the Release Notes carefully before Upgrading! Our Release numbers follow semantic versioning and thus we follow the version syntax: MAJOR.MINOR.PATCH. Please ensure to backup your current version’s folder to have a fallback possibility you can use, just in case there’s something wrong with our new version.
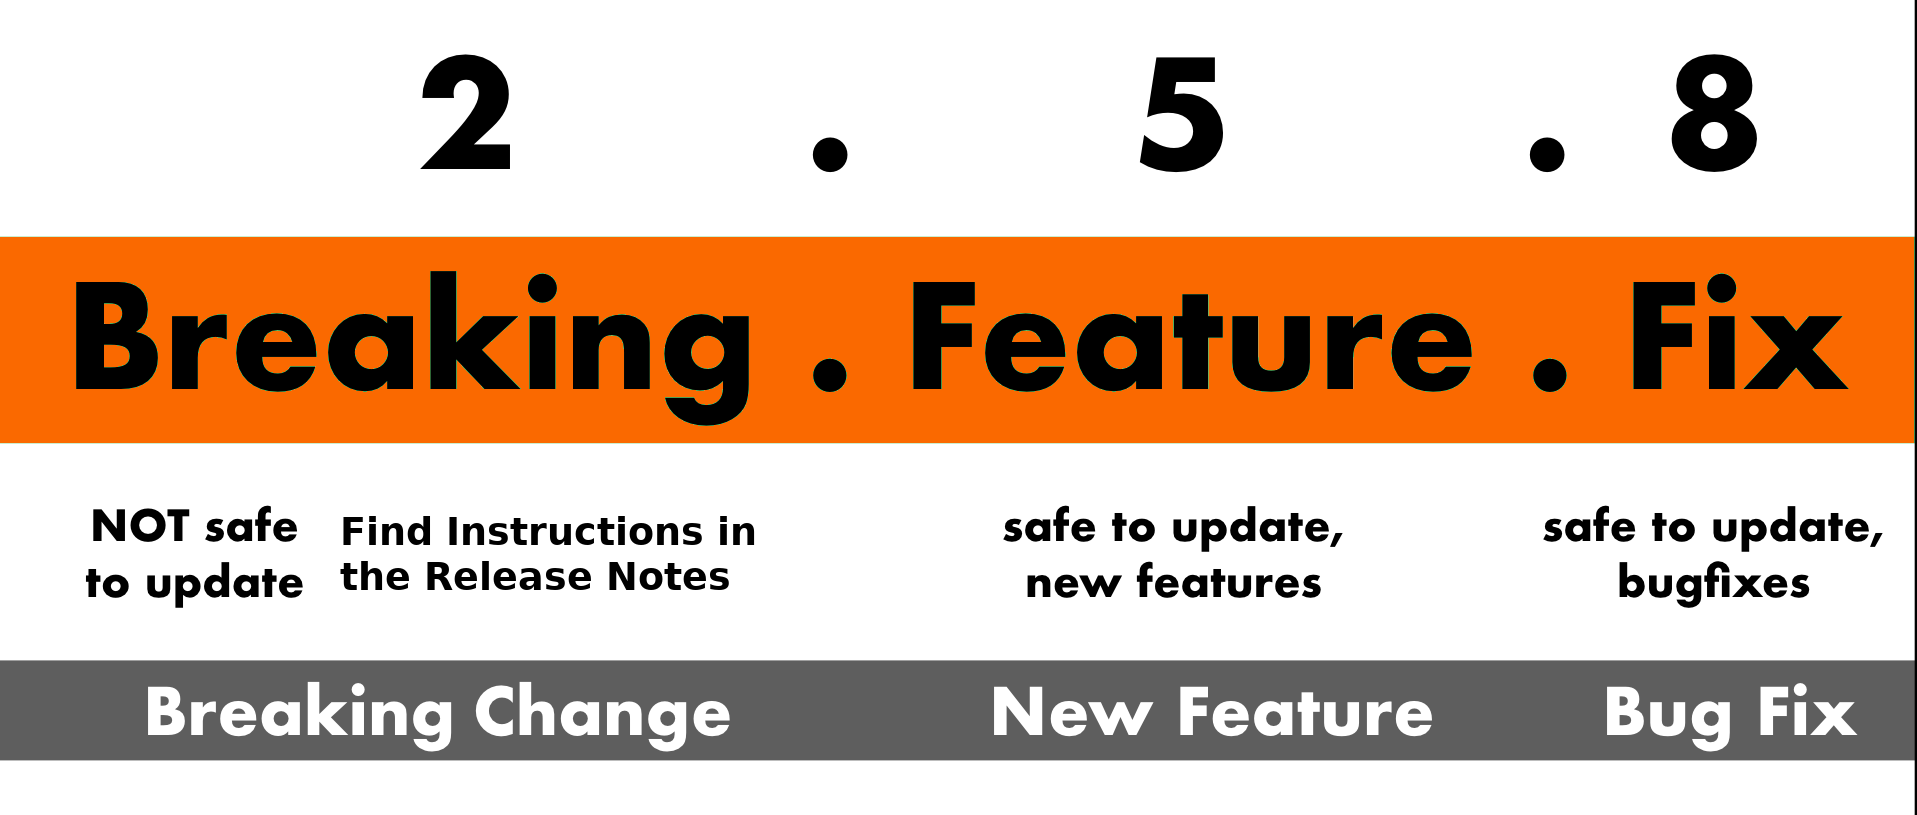
You can always upgrade without worries if the PATCH or MINOR version have just changed. If the MAJOR version has changed, check the release notes to avoid unexpected issues as a new MAJOR version comes always with breaking changes or at least with a new module behavior.
Follow the installations steps below and consider the provided release notes for the MAJOR version upgrade. In detail: if you’re upgrading from 1.x.y to 4.x.y, ensure to check ALL Major Version Release Notes up to the version you’re upgrading too. In this example, check the release notes for 2.0.0, 3.0.0 and 4.0.0.
If you’re upgrading regularly and keeping all our modules / addons / widgets updated, you run in less upgrade effort than doing multiple major version number steps. You can add/subscribe yourself to release notifications in our github repositories to get informed about new releases.
CentralNic Reseller API Upgrade
If you were using an older version of this module and still have legacy certificates, you will need to trigger the certificate migration to the new API v2. To check if you have any legacy certificates, log in to your CentralNic Reseller Web Interface and navigatre to SSL > Certificates [LEGACY]. Please note that only active certificates will be migrated.
To migrate legacy certificates, you must open the CNIC SSL Addon. Migration will then happen automatically. If you do not have the Addon installed or enabled, please follow the instructions below.
Grant User Permissions
- Login to the CentralNic Reseller Control Panel (OT&E, LIVE).
- Click on your username (top right).
- Click on ‘User management’ from the dropdown menu.
- Click on the user you use on your WHMCS system to configure its permissions.
-
Give the following read, write and delete permissions:
- Certificate (for CNIC SSL Addon)
Please ensure that the specified permissions are granted to the user linked with your WHMCS system.
SSL Addon
Addon Activation
For users with WHMCS version 8.0+, Navigate to
WHMCS Admin Area>System Settings>Addon ModulesFor users with WHMCS version 7.3+, In the WHMCS Admin area, go to
Setup>Addon Modules
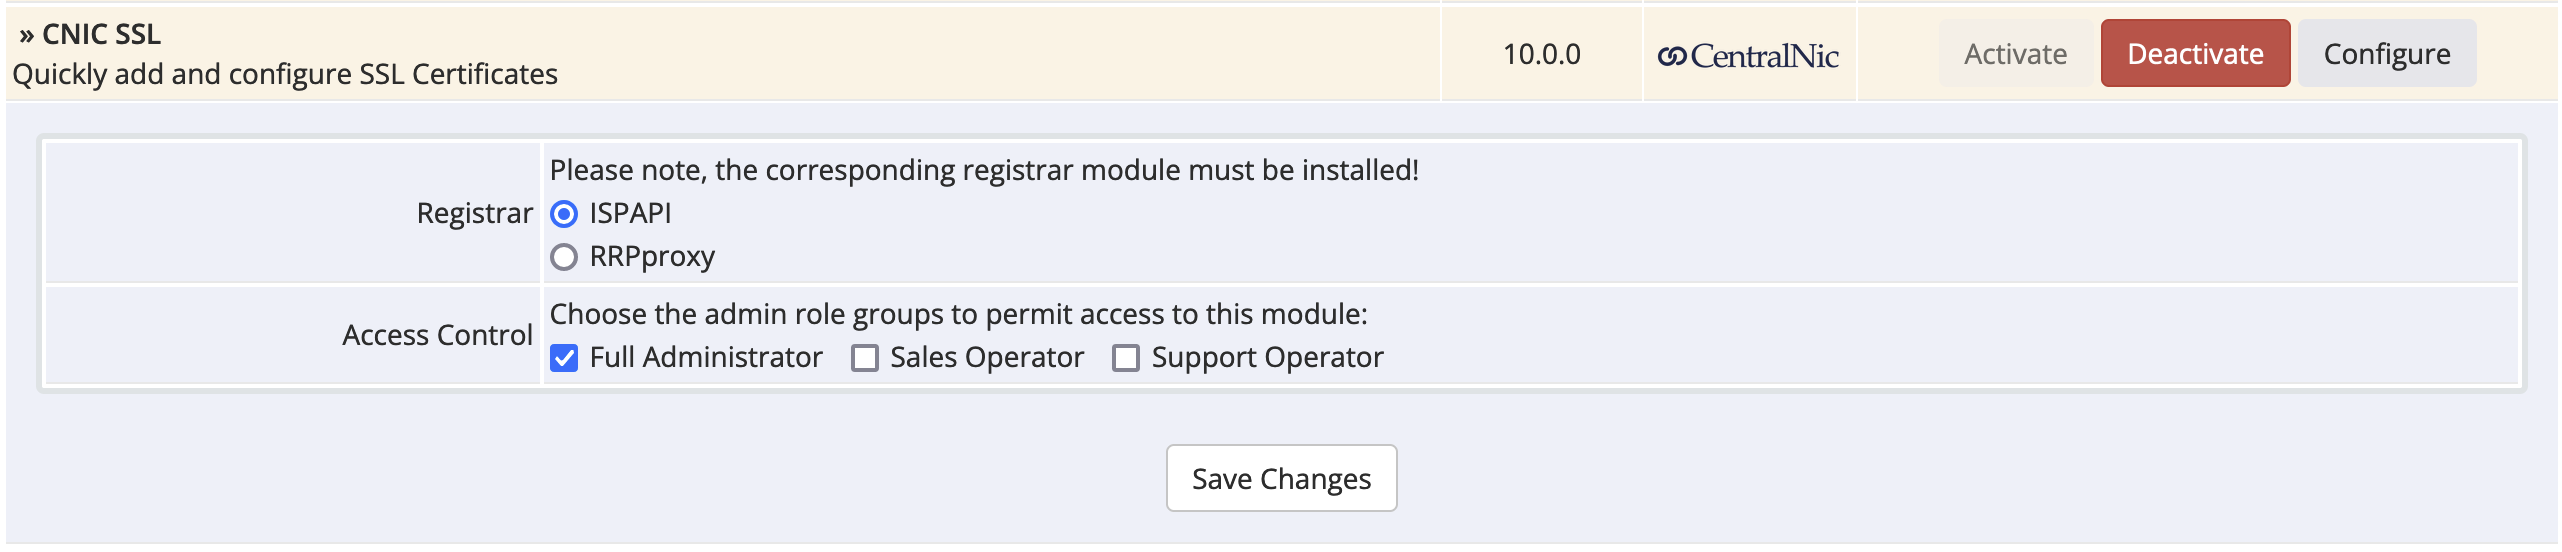
- Activate the
CNIC SSL Addon - Choose the registrar you want to use (additional module and accounts required! see Requirements)
- Give the module “Full Administrator” Access Control right.
- Save changes
You are now ready to create SSL certificate products in WHMCS. You can do so manually, or automatically by using our convenient addon.
Automatic Product Import & Pricing Sync
This will allow you to import any desired certificate as WHMCS product. Any existing product will be updated with current information.
- Open the
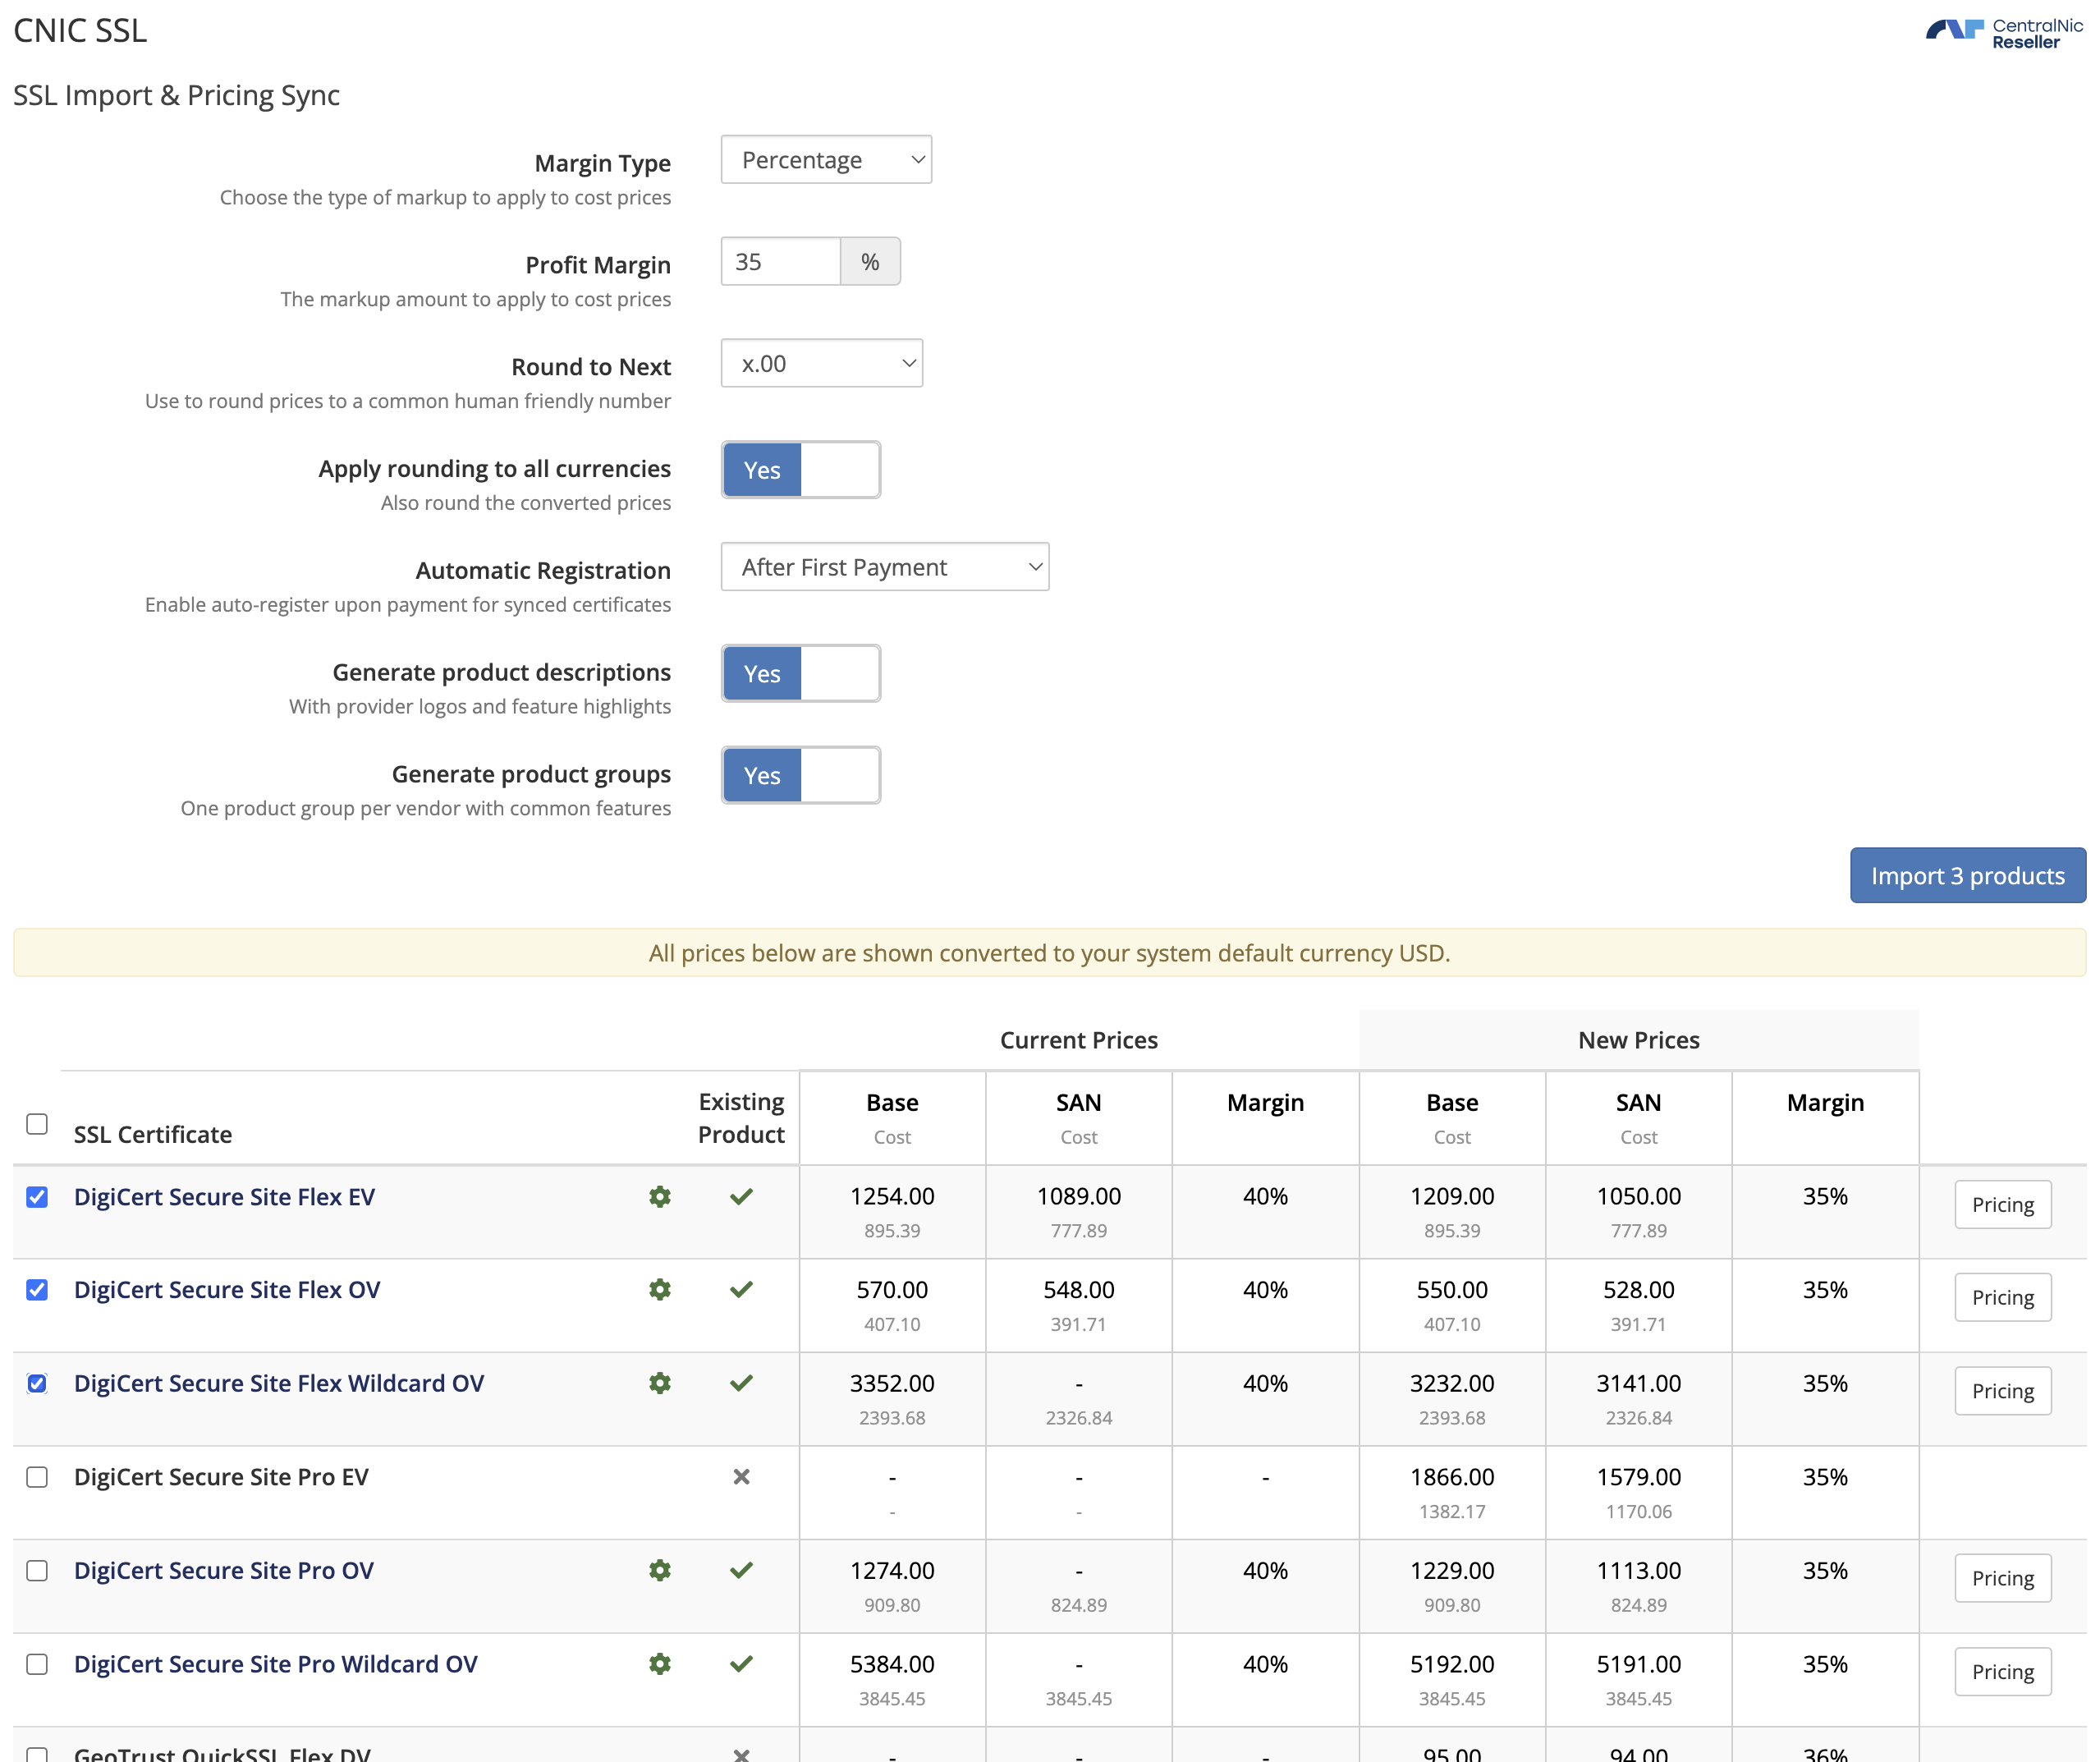
CNIC SSLAddon in the WHMCS Admin Area. - Fill out the form to your liking.
-
Margin type: Percentage or Fixed Amount. -
Profit margin: percentage value or amount in your default currency. -
Round to Next: select the desired rounding value. -
Apply rounding to all currencies: if active, the rounding will be applied to the prices for currencies. -
Automatic Registration: select the desired automatic registration behavior for the products. -
Generate product descriptions: this will add provider logos and feature highlights to the imported products. The recommended Order Form Template to leverage this information is Supreme Comparison. -
Generate product groups: this will create one product group per certificate provider with group features. If disabled, all products will be assigned to the same product group. Existing products are not affected.
-
- Tick the checkboxes on the products you wish to import or update.
- Press the Import button. Existing products will be updated, missing products will be automatically created.
Managing SSL Products
Product management can be handled automatically by using the SSL Addon. However it is possible to do so manually, if desired.
Manually create Products
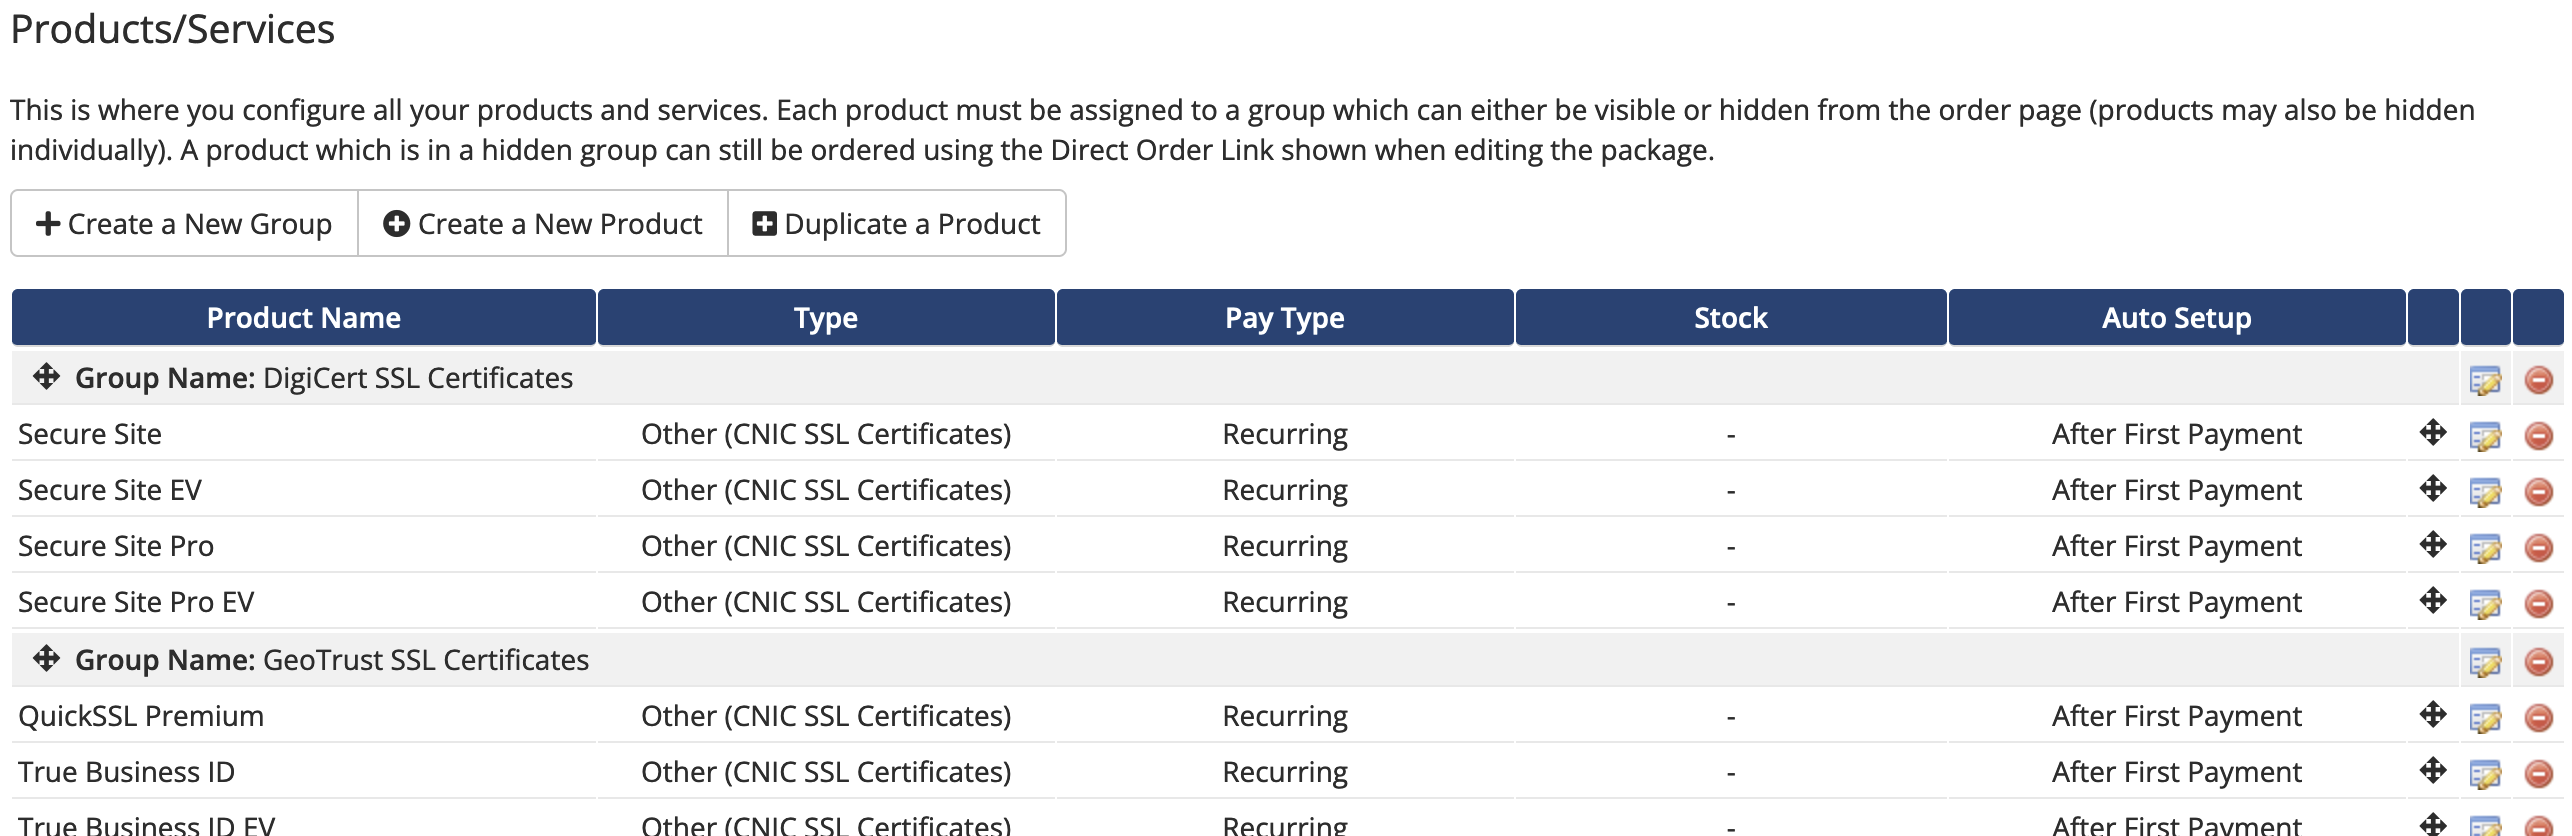
Within the WHMCS Admin area, navigate to Setup > System Settings > Products/Services
Create a new product group. In this example, we will name the new group as “SSL Certificates”.
- Create a new product.
- Set Product Type to “Other”.
- Set Product Group as desired.
- Define a product name.
-
Select
CNIC SSL Certificateas Module.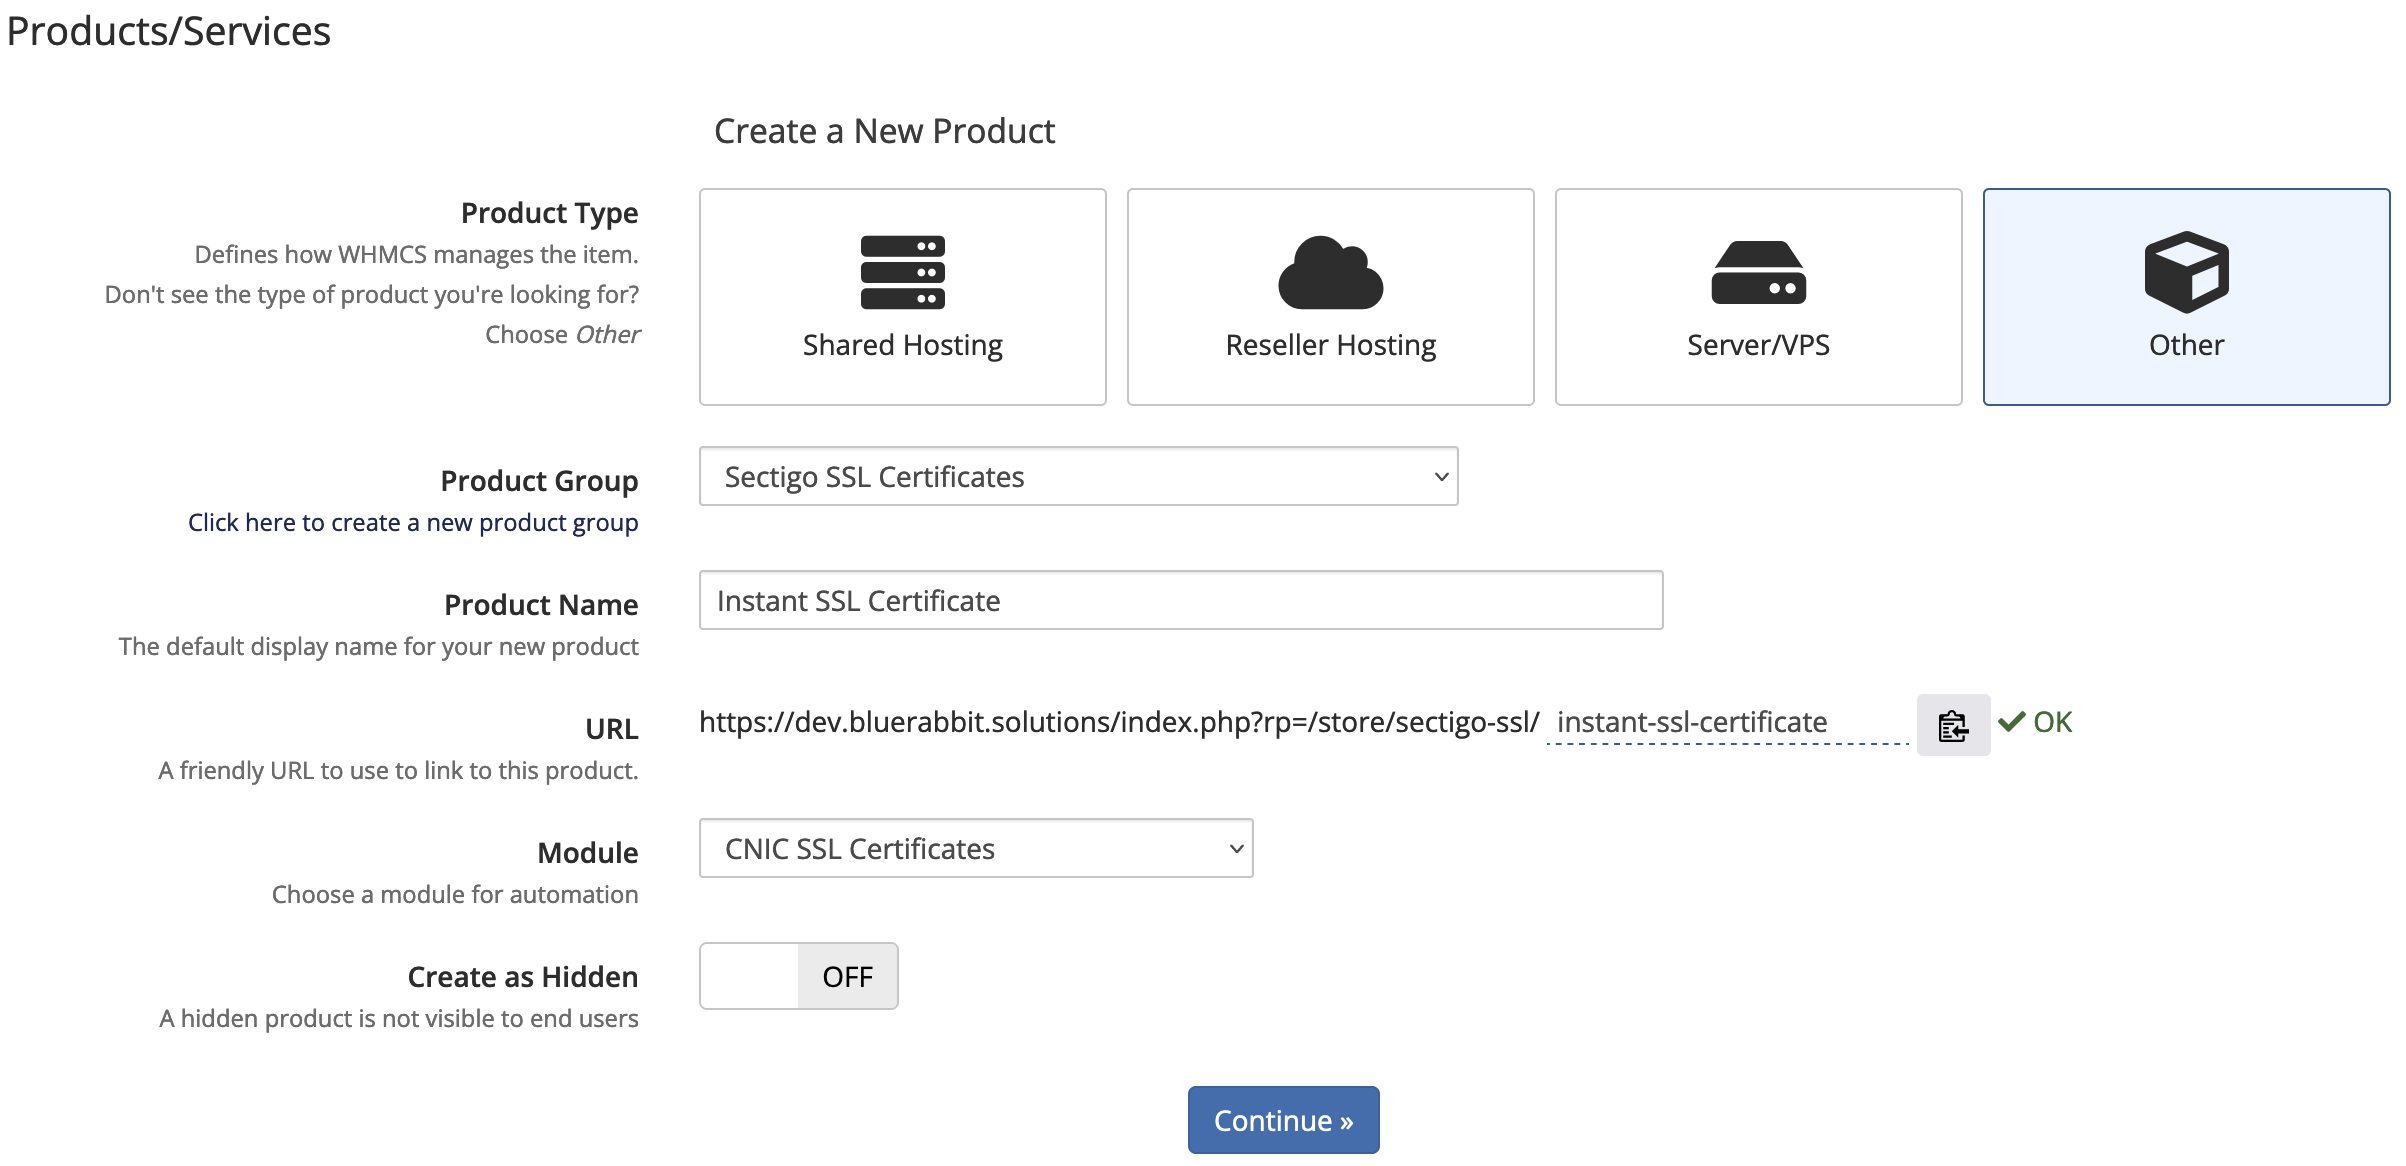
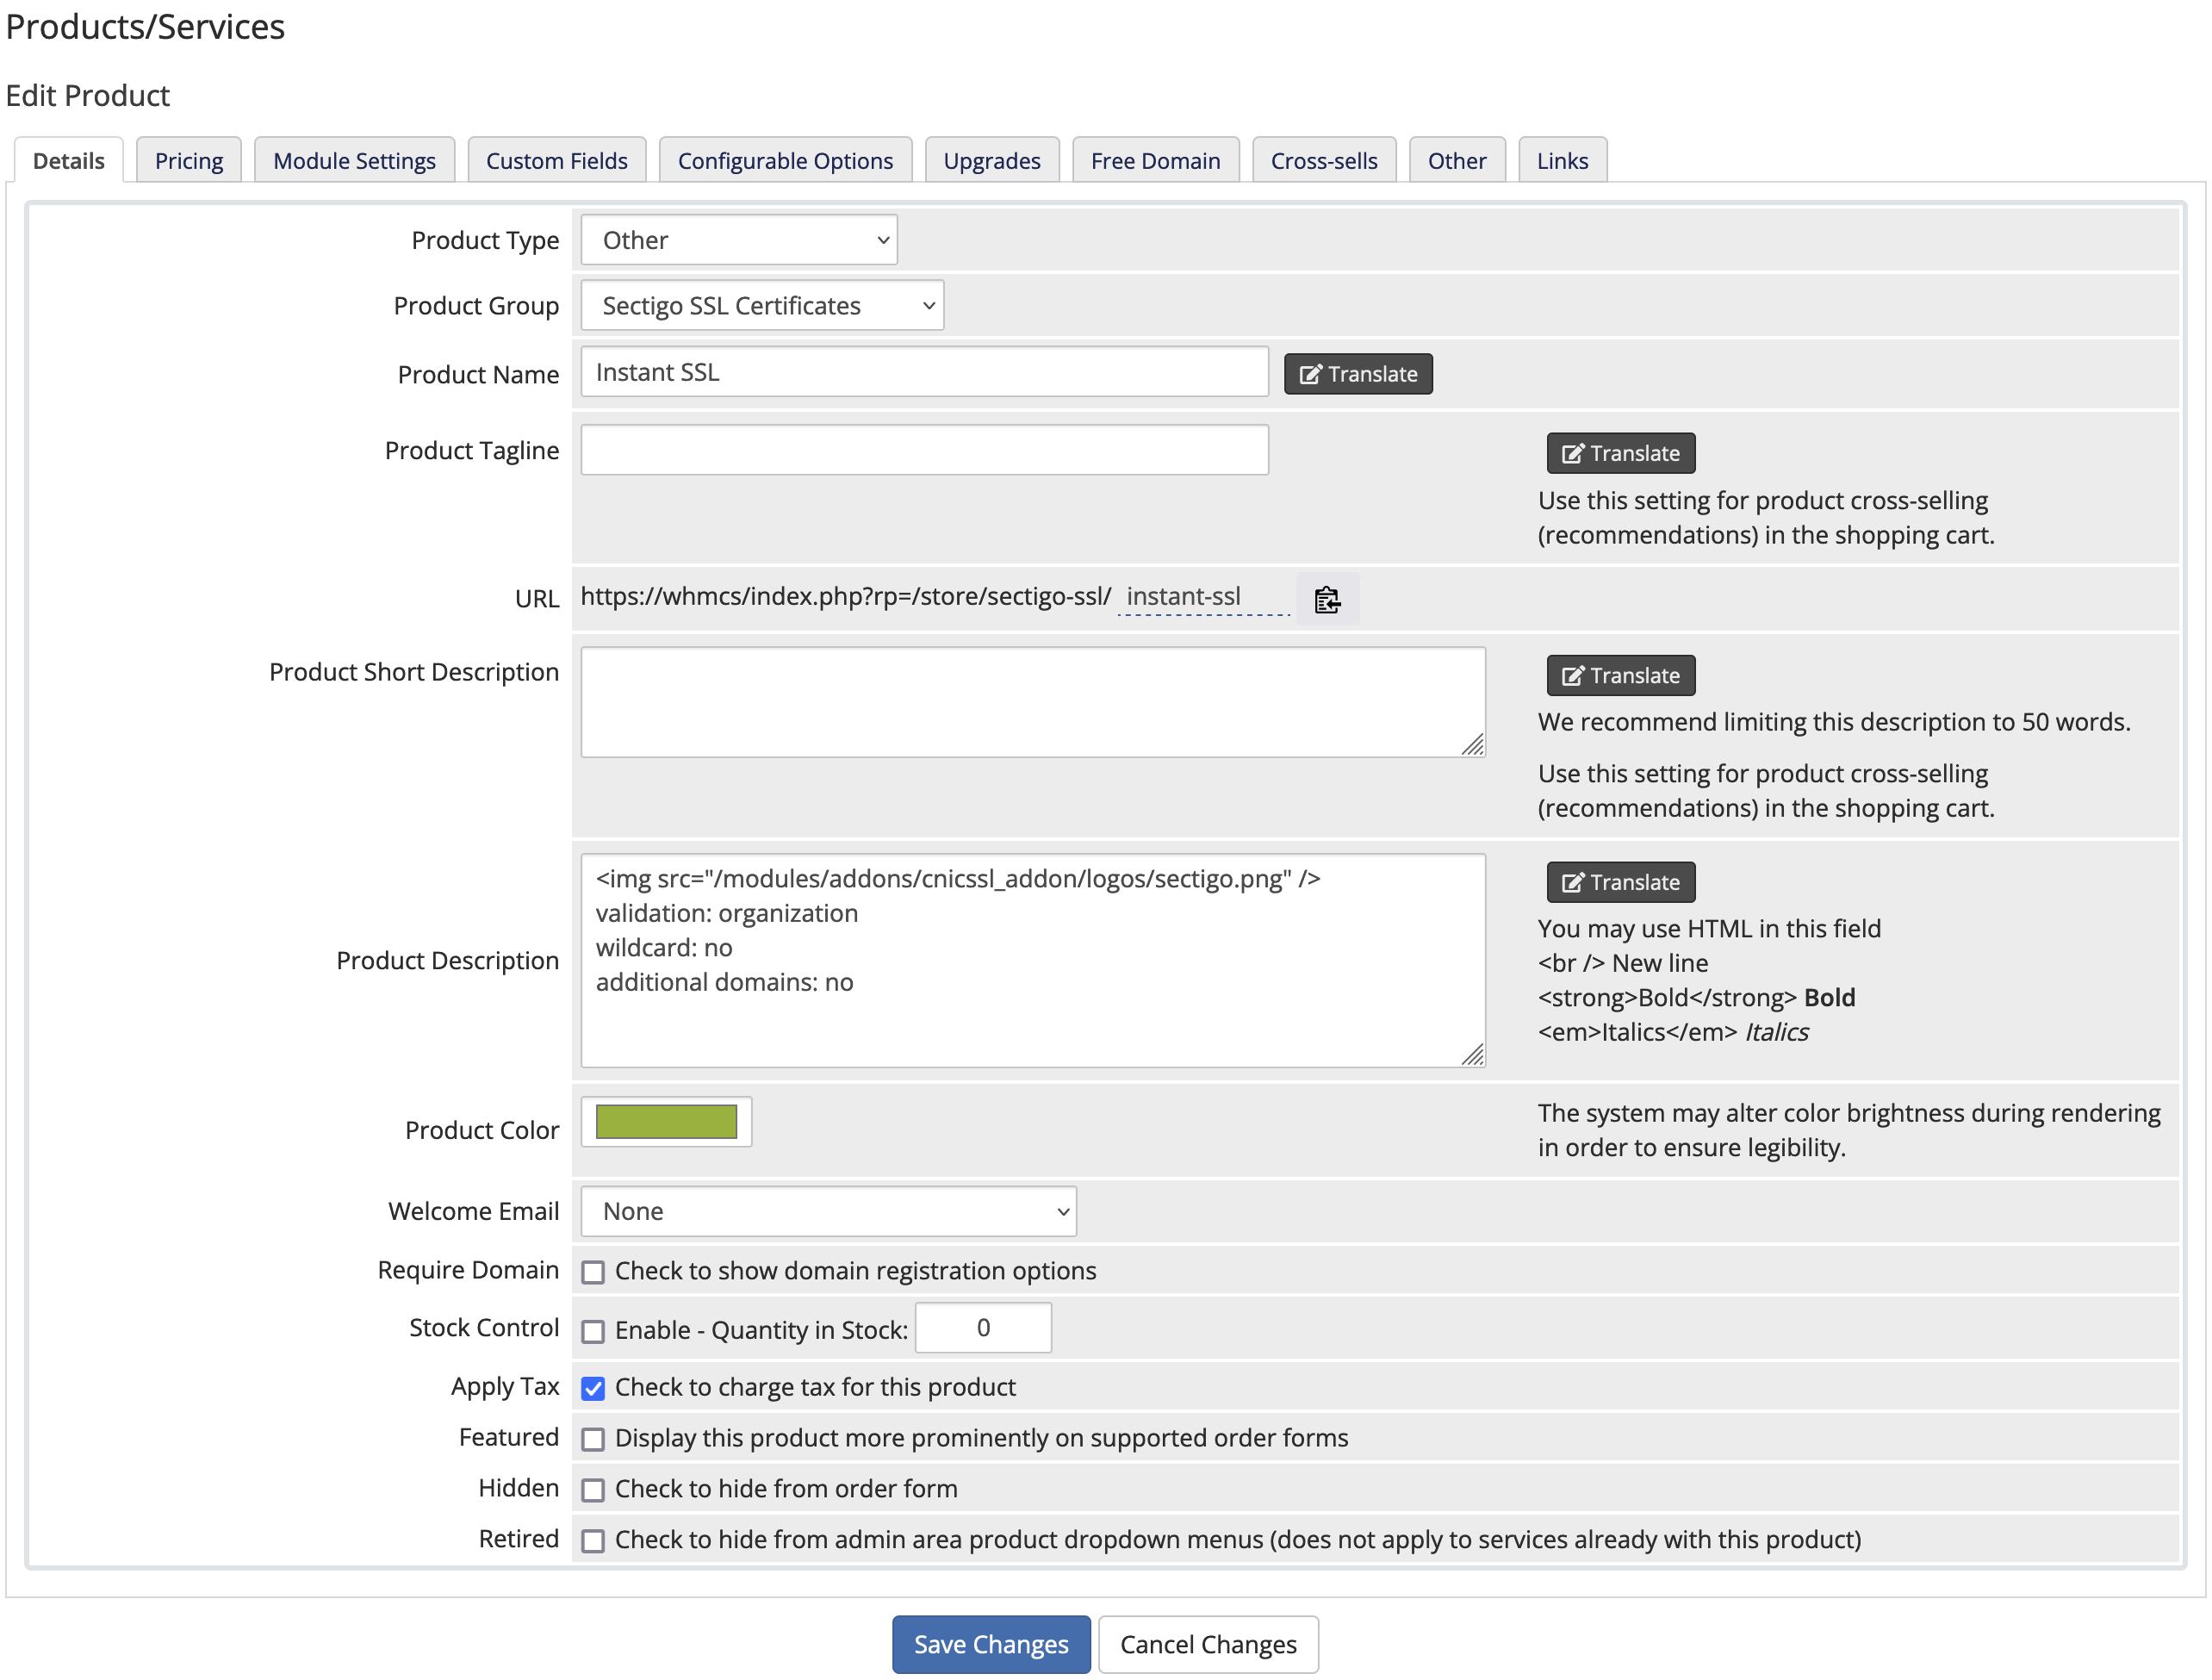
- Open the
Detailstab.- Set a Product Description (optional).
- Ensure the Welcome Email field is set to “None” as the module sends its own email.
-
Ensure the Required Domain field is unchecked.
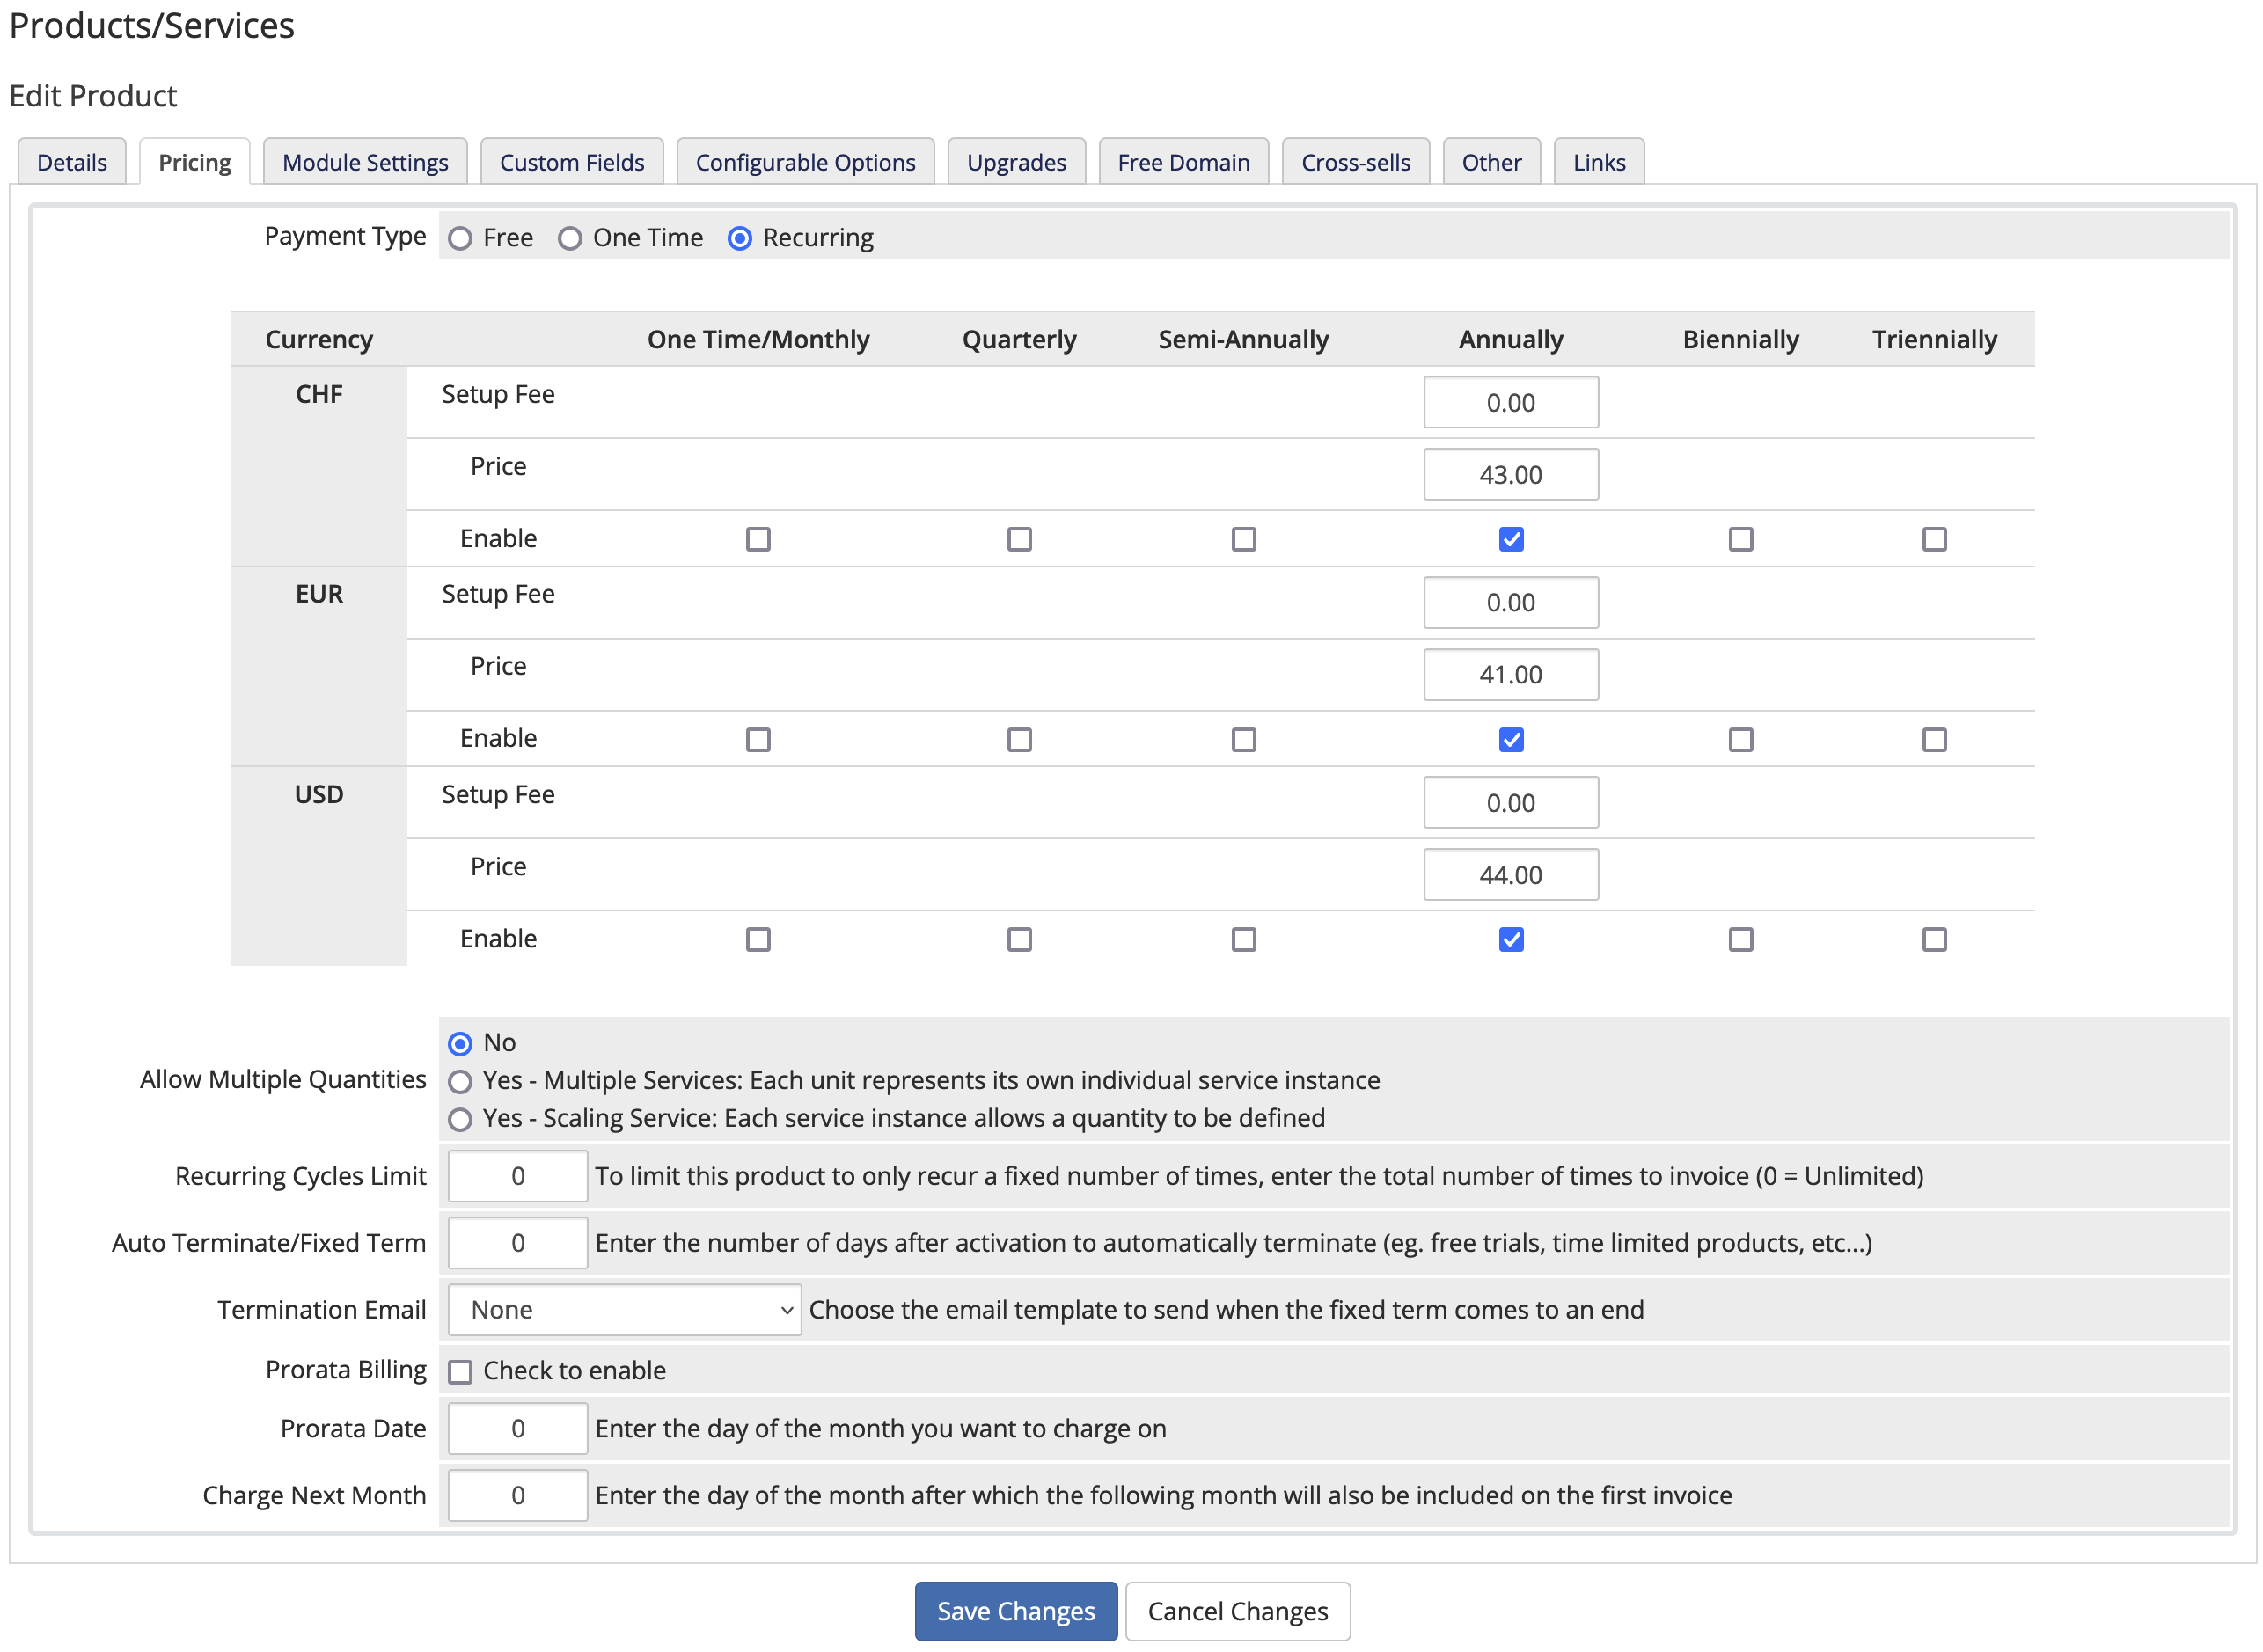
- Open the
Pricingtab.- Set the Payment Type field to Recurring.
-
Set an annual price.
- Open the
Module Settingstab.- Enter Certificate Class.
- For HEXONET: refer to this article for a list of possible certificate classes
- For CentralNic Reseller:
- Log into your Web Interface
- In the Menu, open
SSL > Certificate Prices - The value shown in the
Itemcolumn would be the certificate class you need to specify
-
Set “Automatically setup the product as soon as the first payment is received” to ensure the certificate is paid for before registration.
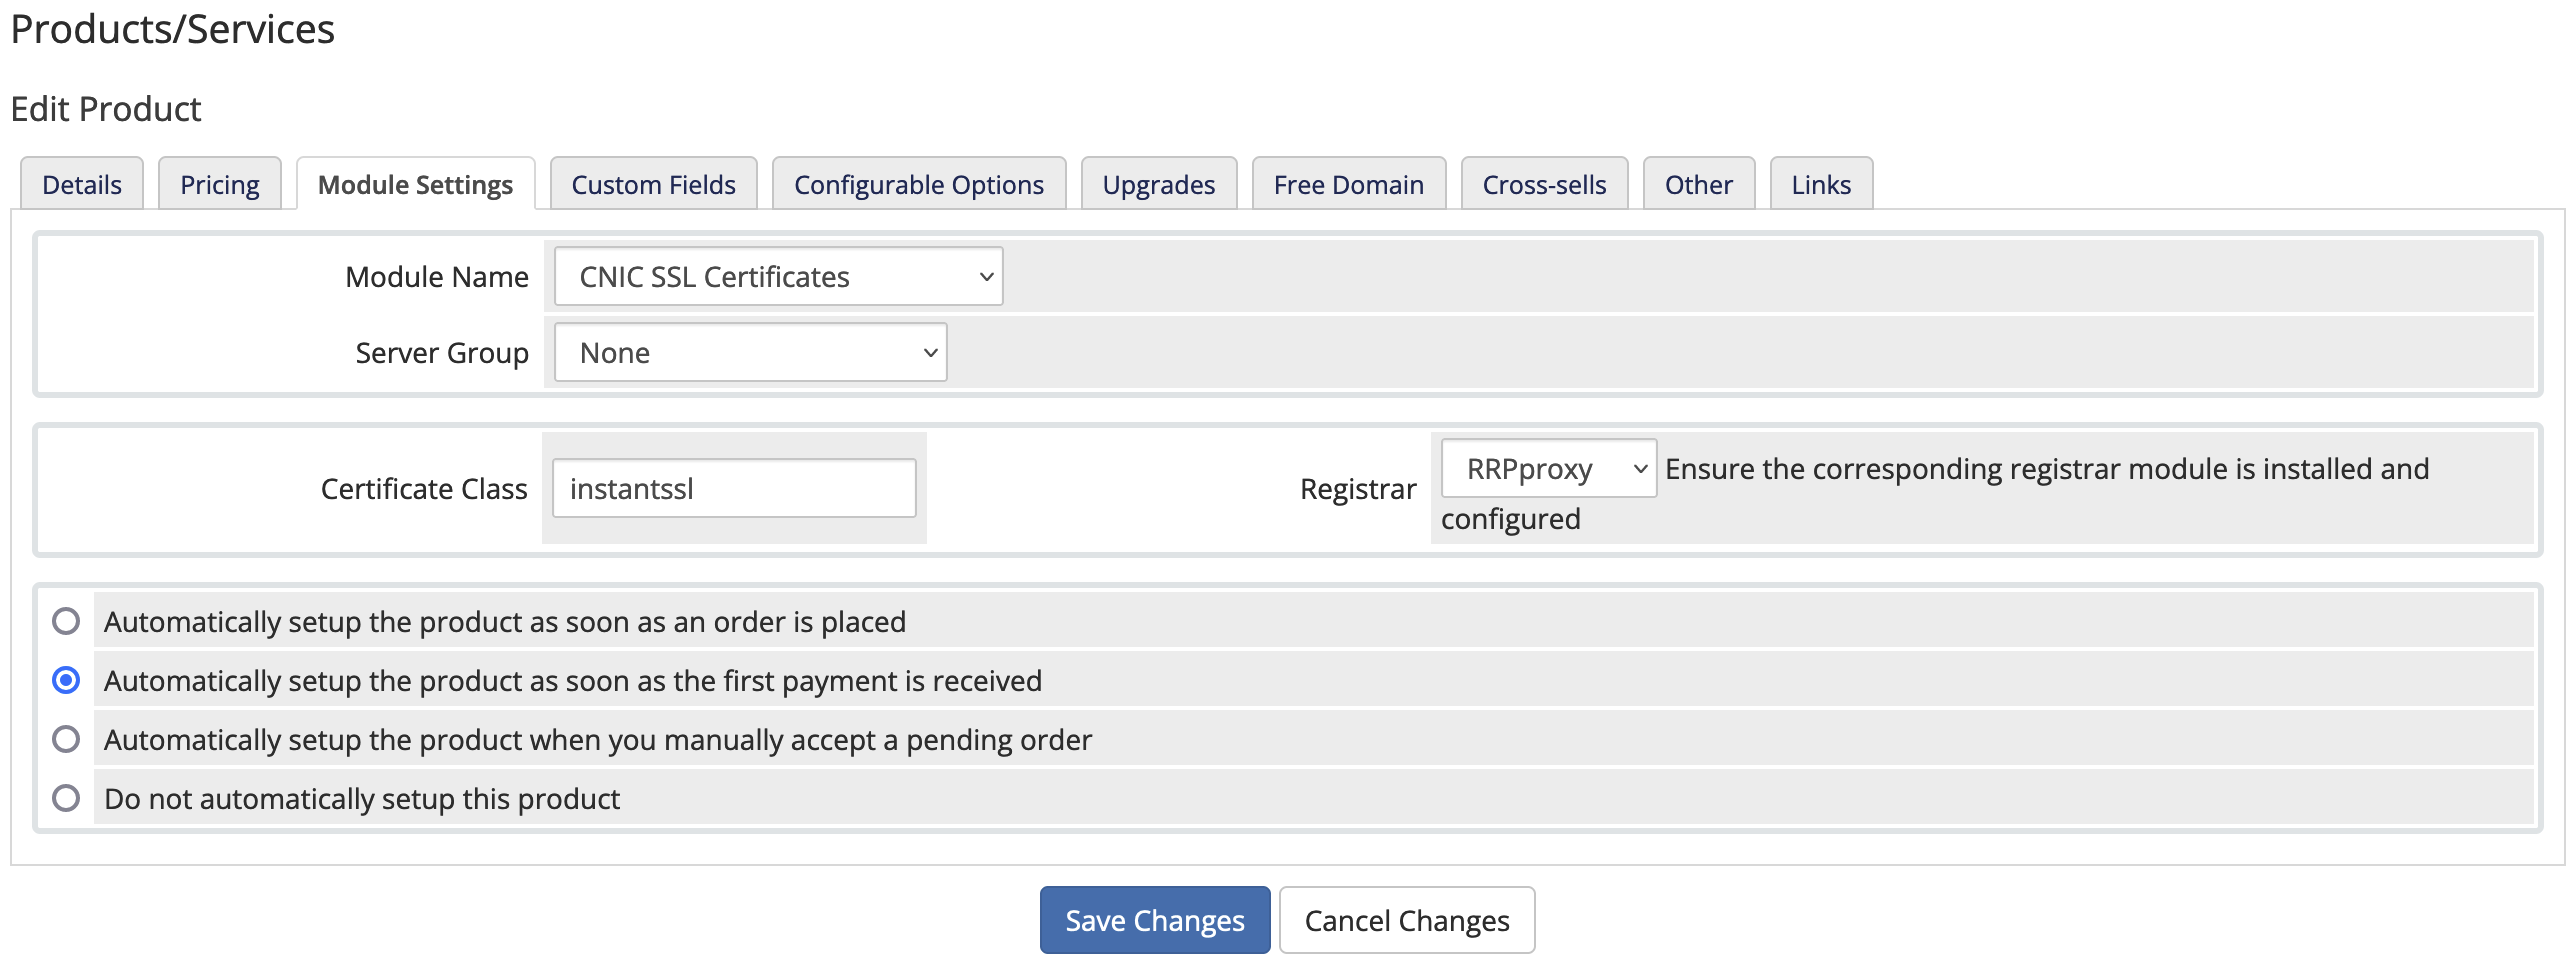
- Enter Certificate Class.
- Click
Save changes.
Manually create Configurable Options (CentralNic Reseller only!)
This allows you to offer additional domains (SAN) with an additional fee to your customers.
Within the WHMCS Admin area, navigate to Setup > System Settings > Configurable Options
- Click
Create a New Group- Give it a name. We recommend somthing like “Certificate name - Options”.
- Assign it to the desired certificate.
- Click
Save changes.
- Click
Add New Configurable Option- Name it “Additional Domains (SAN)” or something similar. This is what the customer will see when ordering.
- Set option type to
Quantity. - Set the maximum allowed additional domains. Most certificates allow up to 24.
- Set
Add Optionto the same name you gave above. - Click
Save changes. - Set the desired annual pricing.
-
Click
Save changesagain.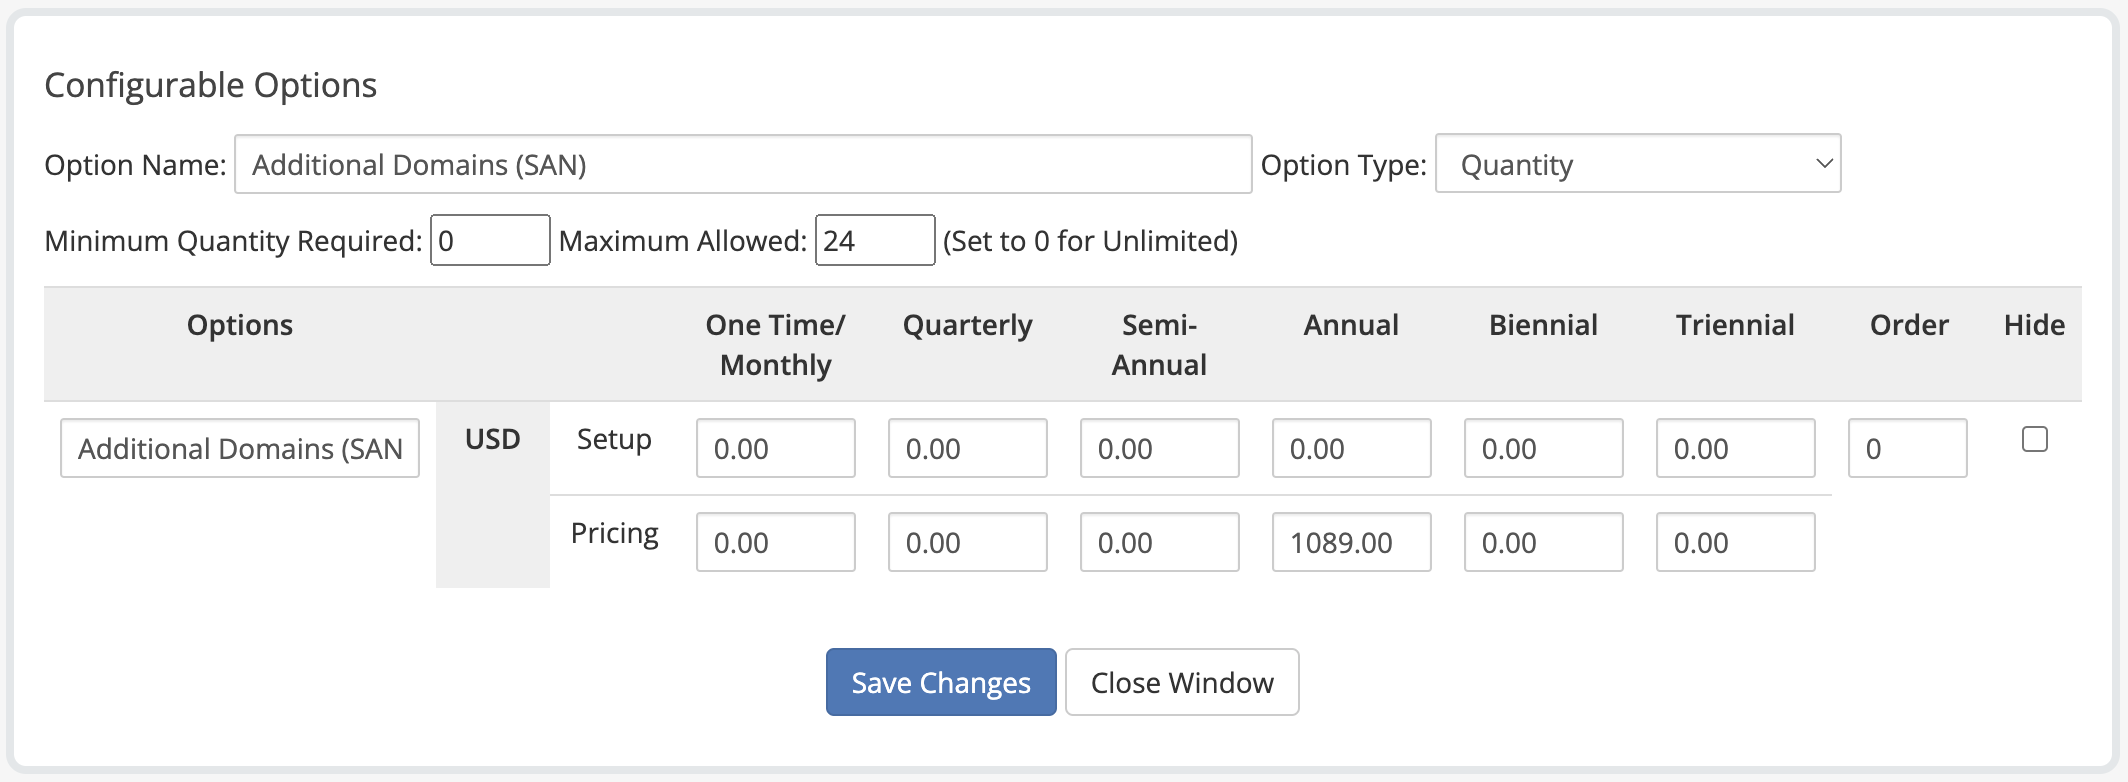
- Close the popup window.
Manage imported Prices
Managing imported certificates can be done at Setup > System Settings > Products/Services and Setup > System Settings > Configurable Options
Customer Experience
Client Area
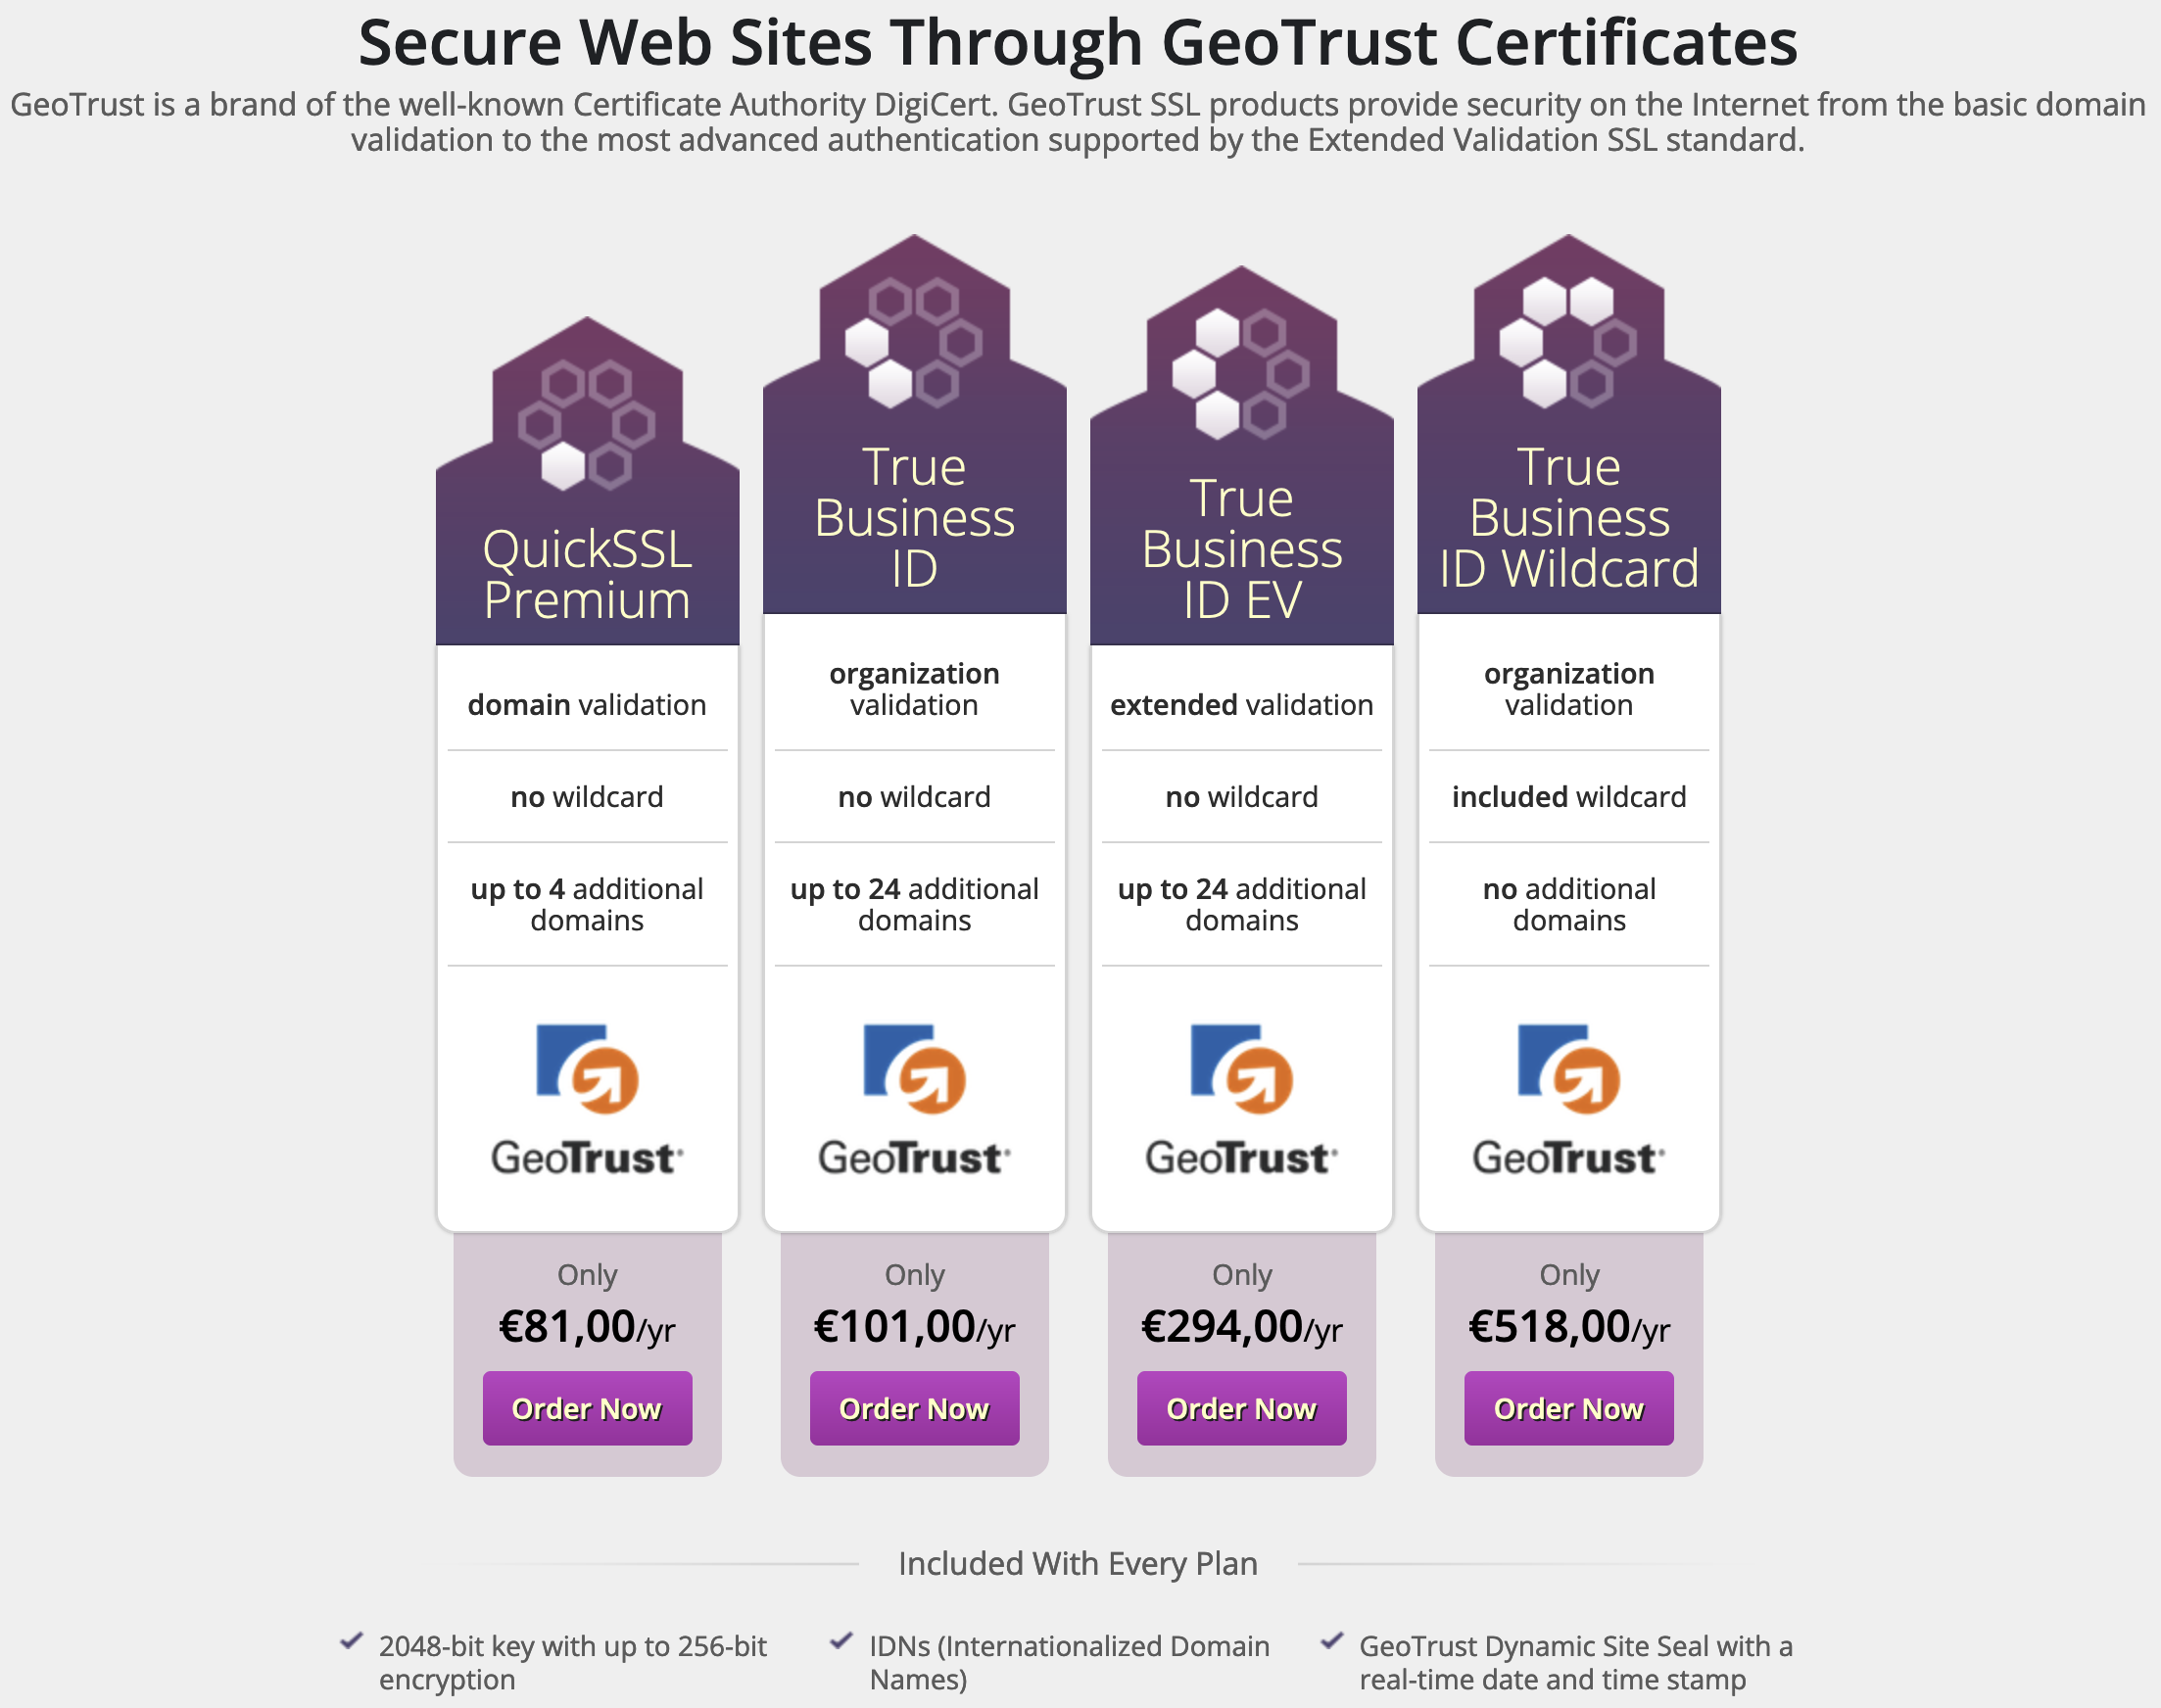
You can check the product groups in the store in your WHMCS Client Area. If you used our Addon to import Product Groups and Products, you will see those pages already configured with a comparison cart, product features, certificate provider logos and so on. You are basically ready to go!
Certificate Ordering Process
This is how a client would proceed to order an SSL certificate.
- Go to the created certificate group on your WHMCS Client Area and “Order Now” the desired certificate.
- Follow the steps in the buying process.
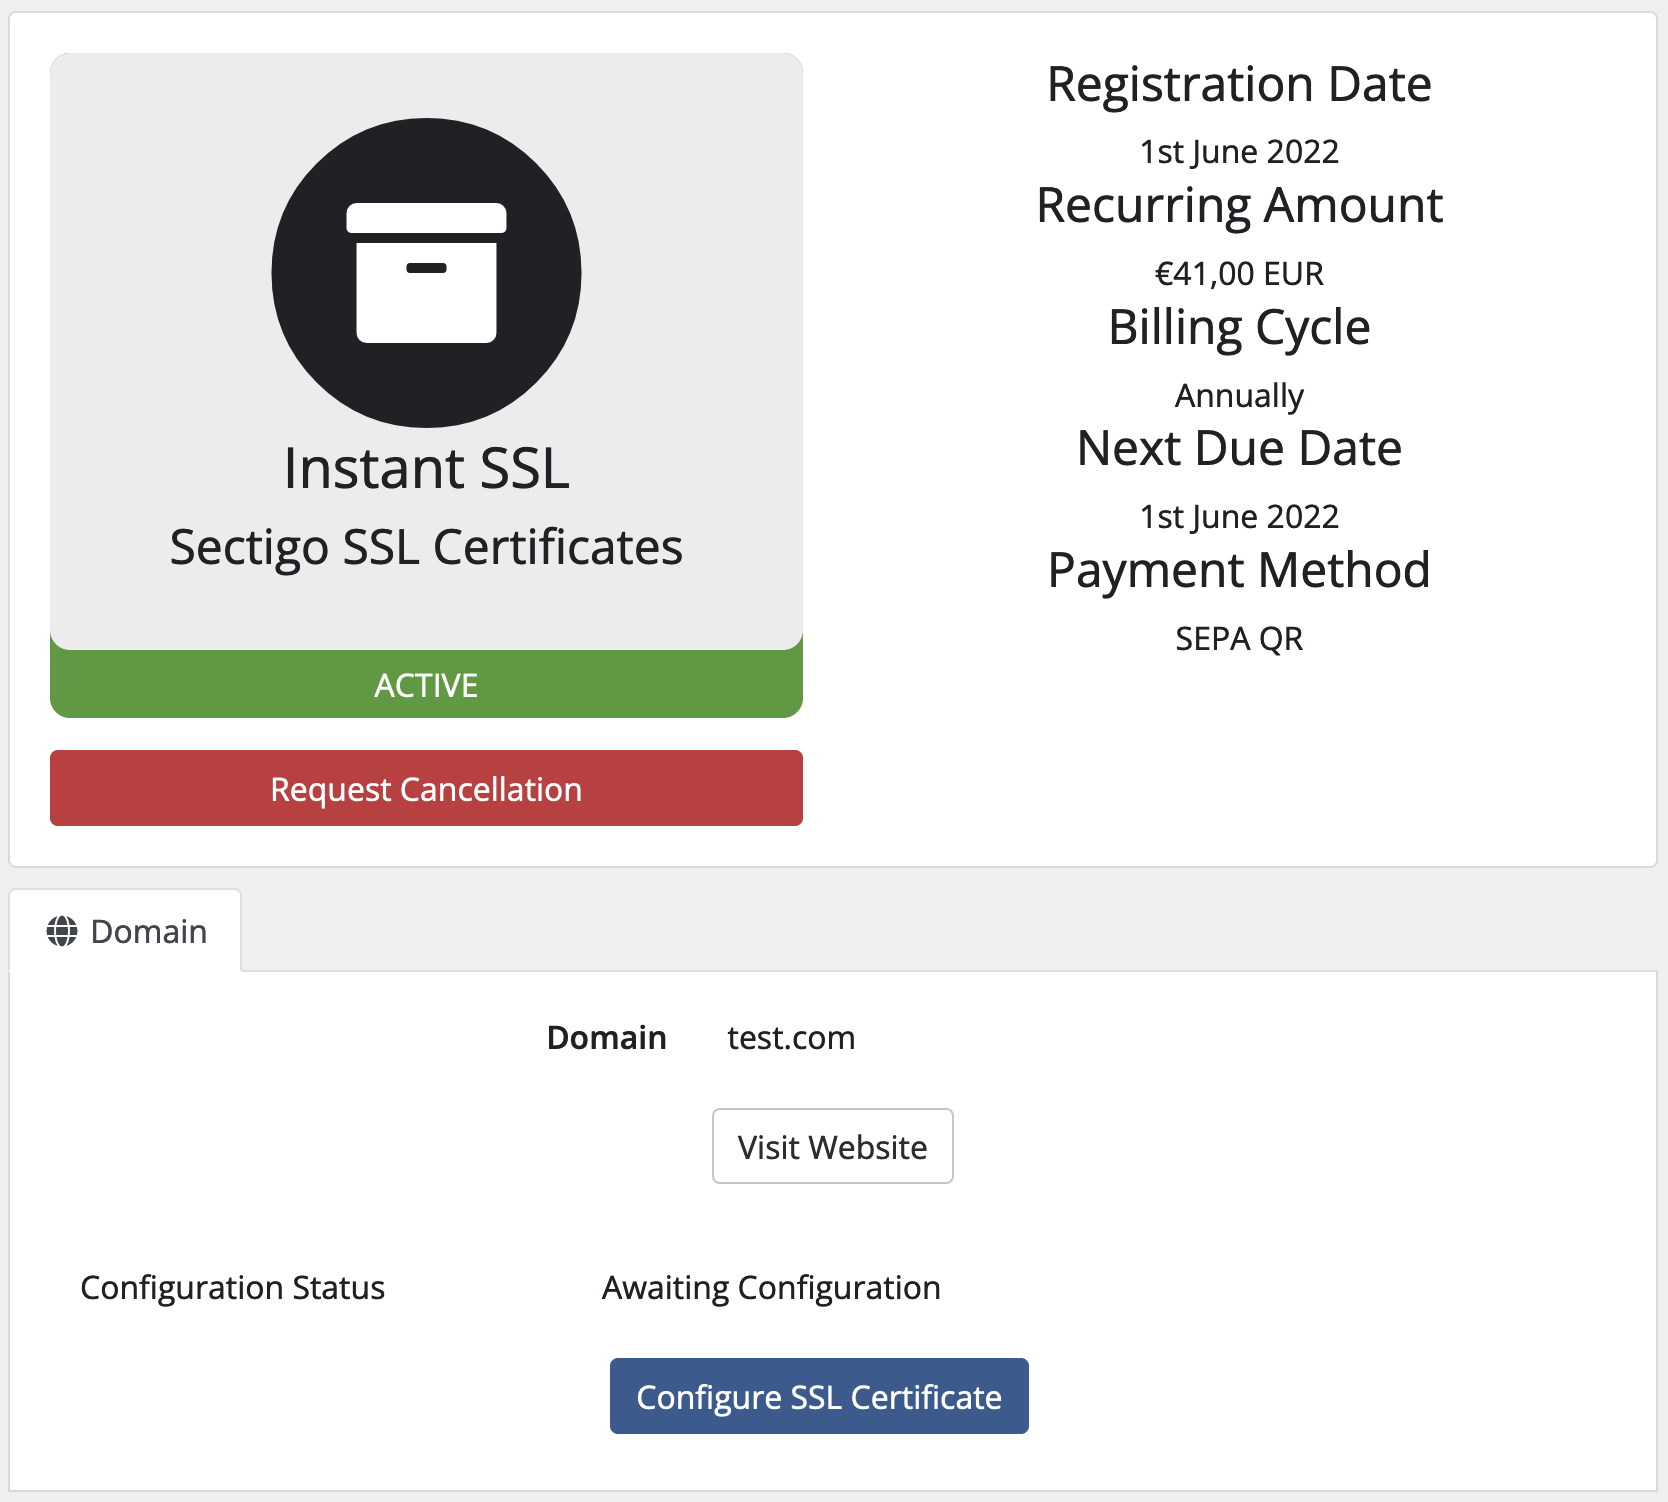
- Once the invoice is paid, you will receive an SSL certificate Configuration email, which contains a link to configure the new certificate.
-
Click this link or to go to the bought SSL certificate product page and click the “Configure SSL Certificate” button.
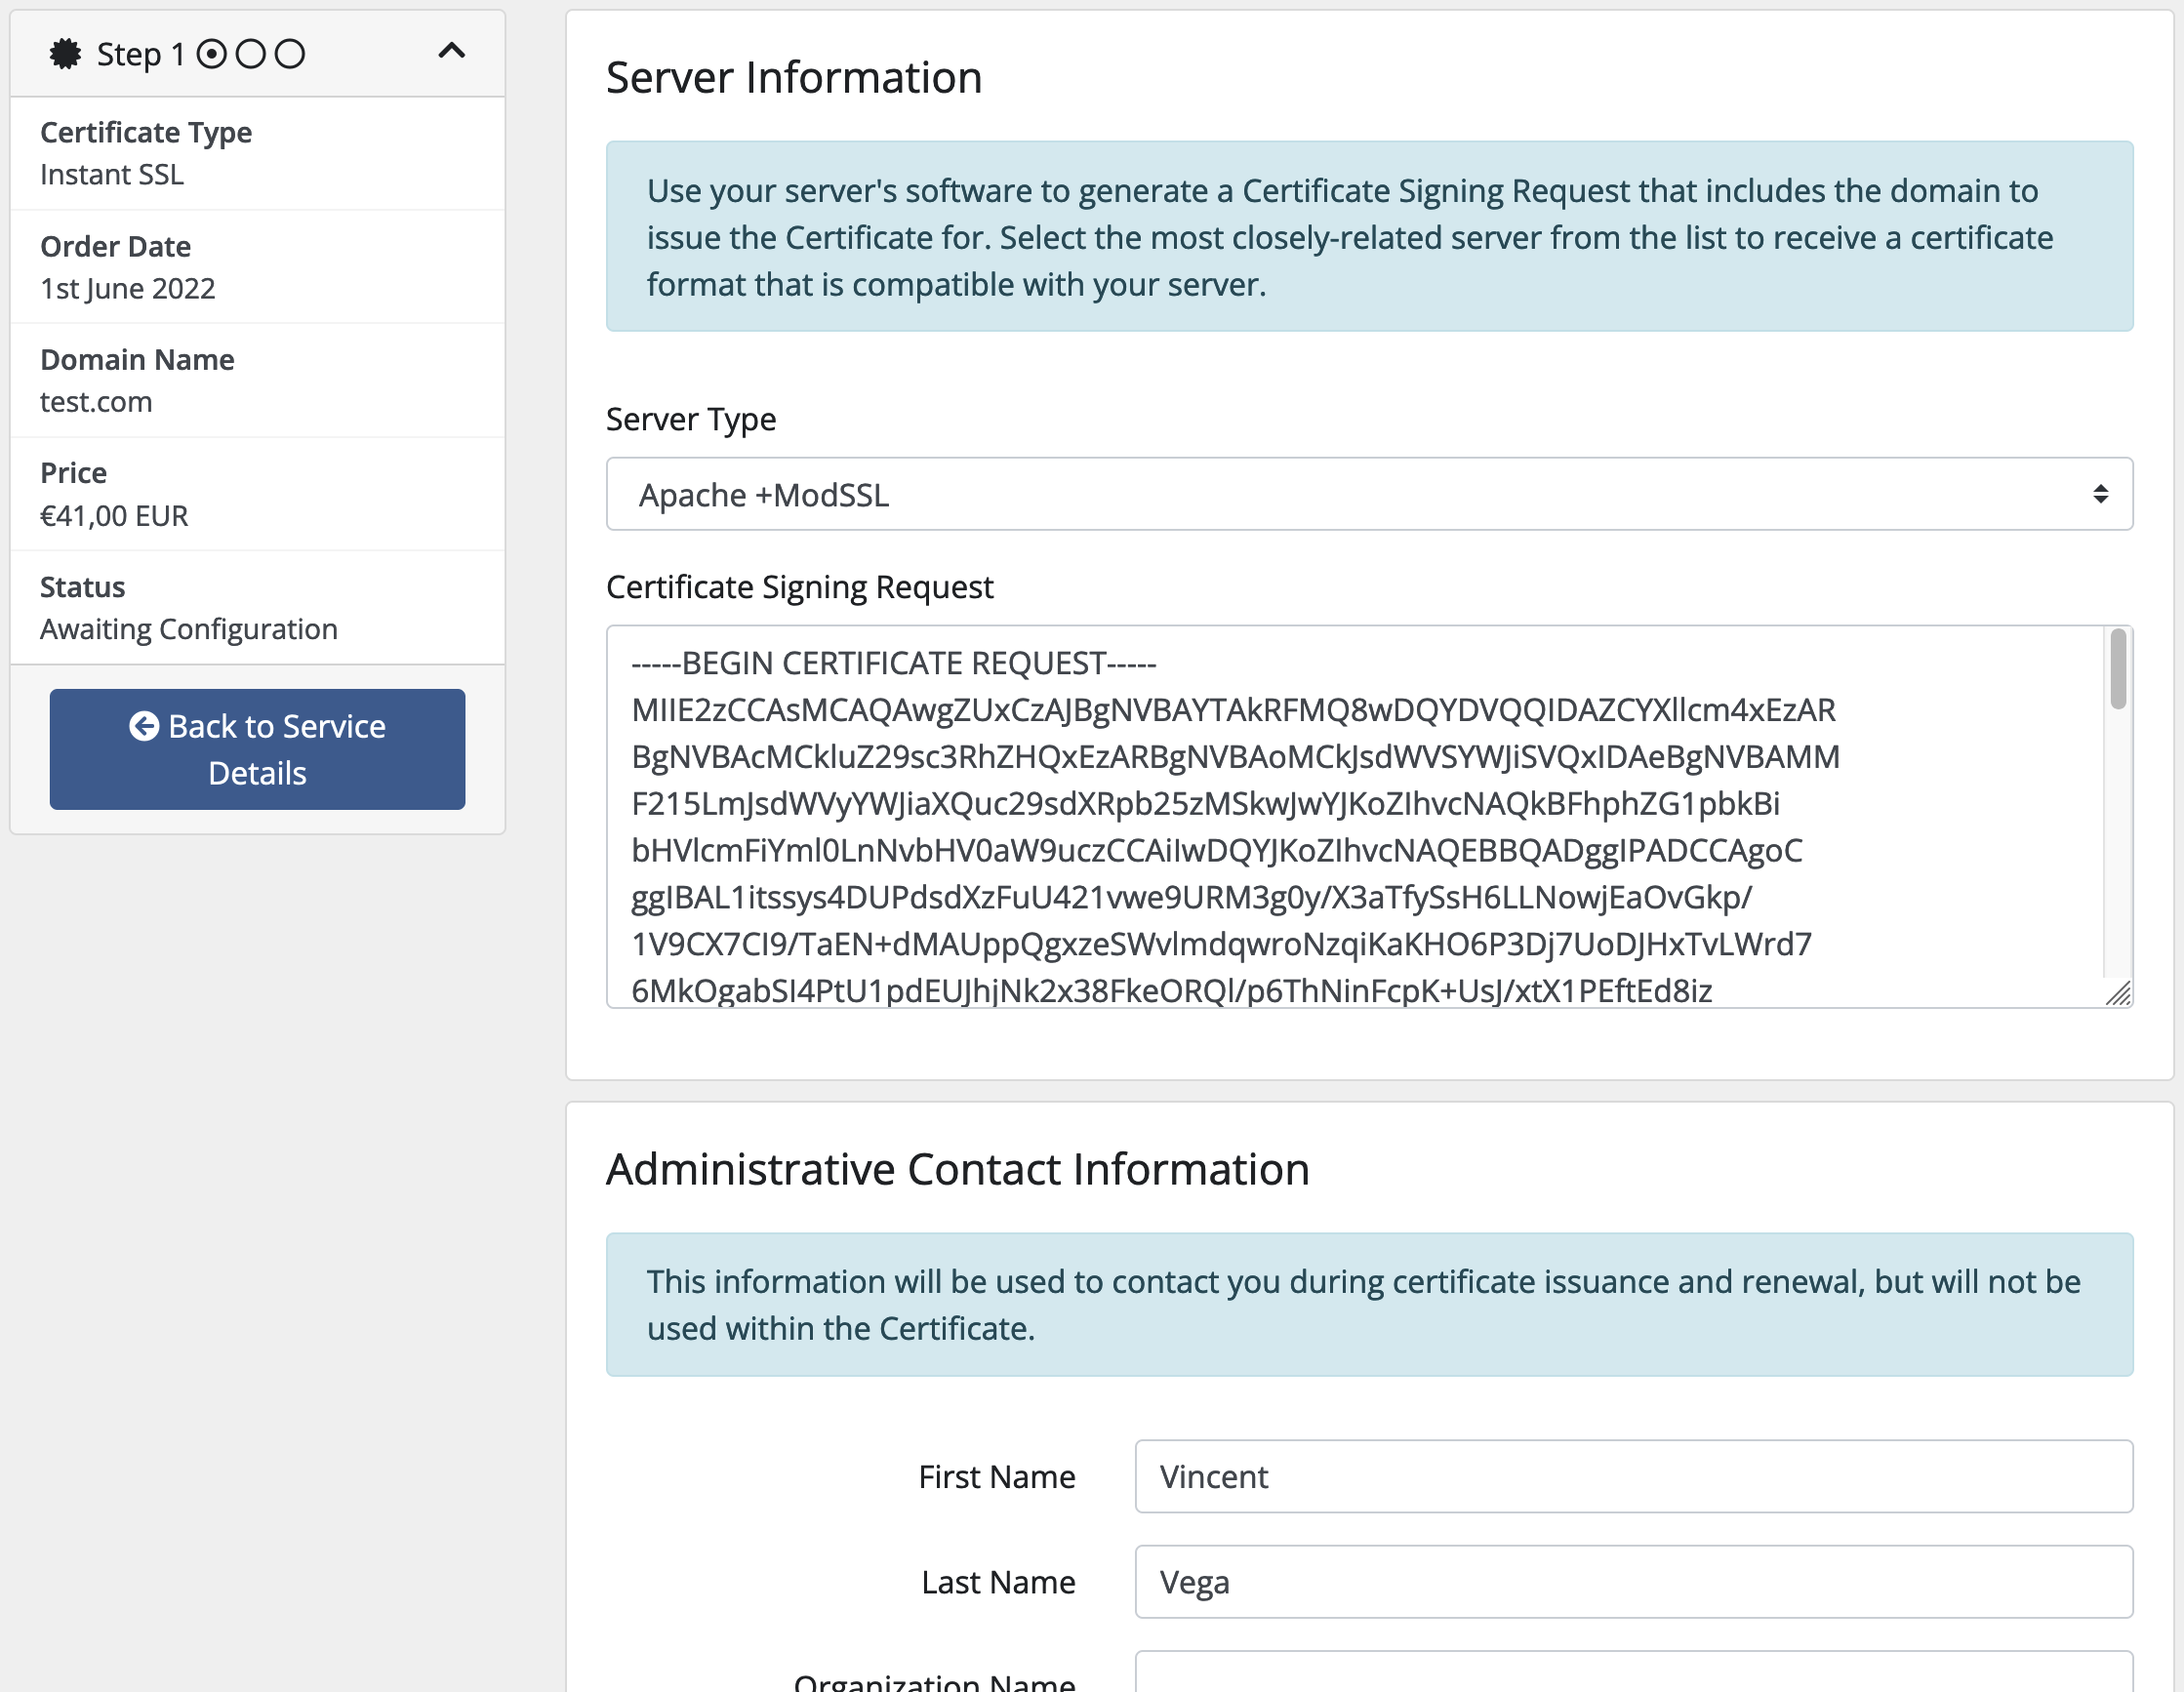
-
On this configuration page, the module will prefill the contact information. The customer must provide the CSR required for requesting the certificate. The certificate will be validated to make sure the desired certificate class can be ordered.
-
On the subsequent configuration page, you will be asked for a Certificate Approver Email. Alternatively, you can choose the
DNSorHTTP Filevalidation methods, if available (not all certificates support all validation methods).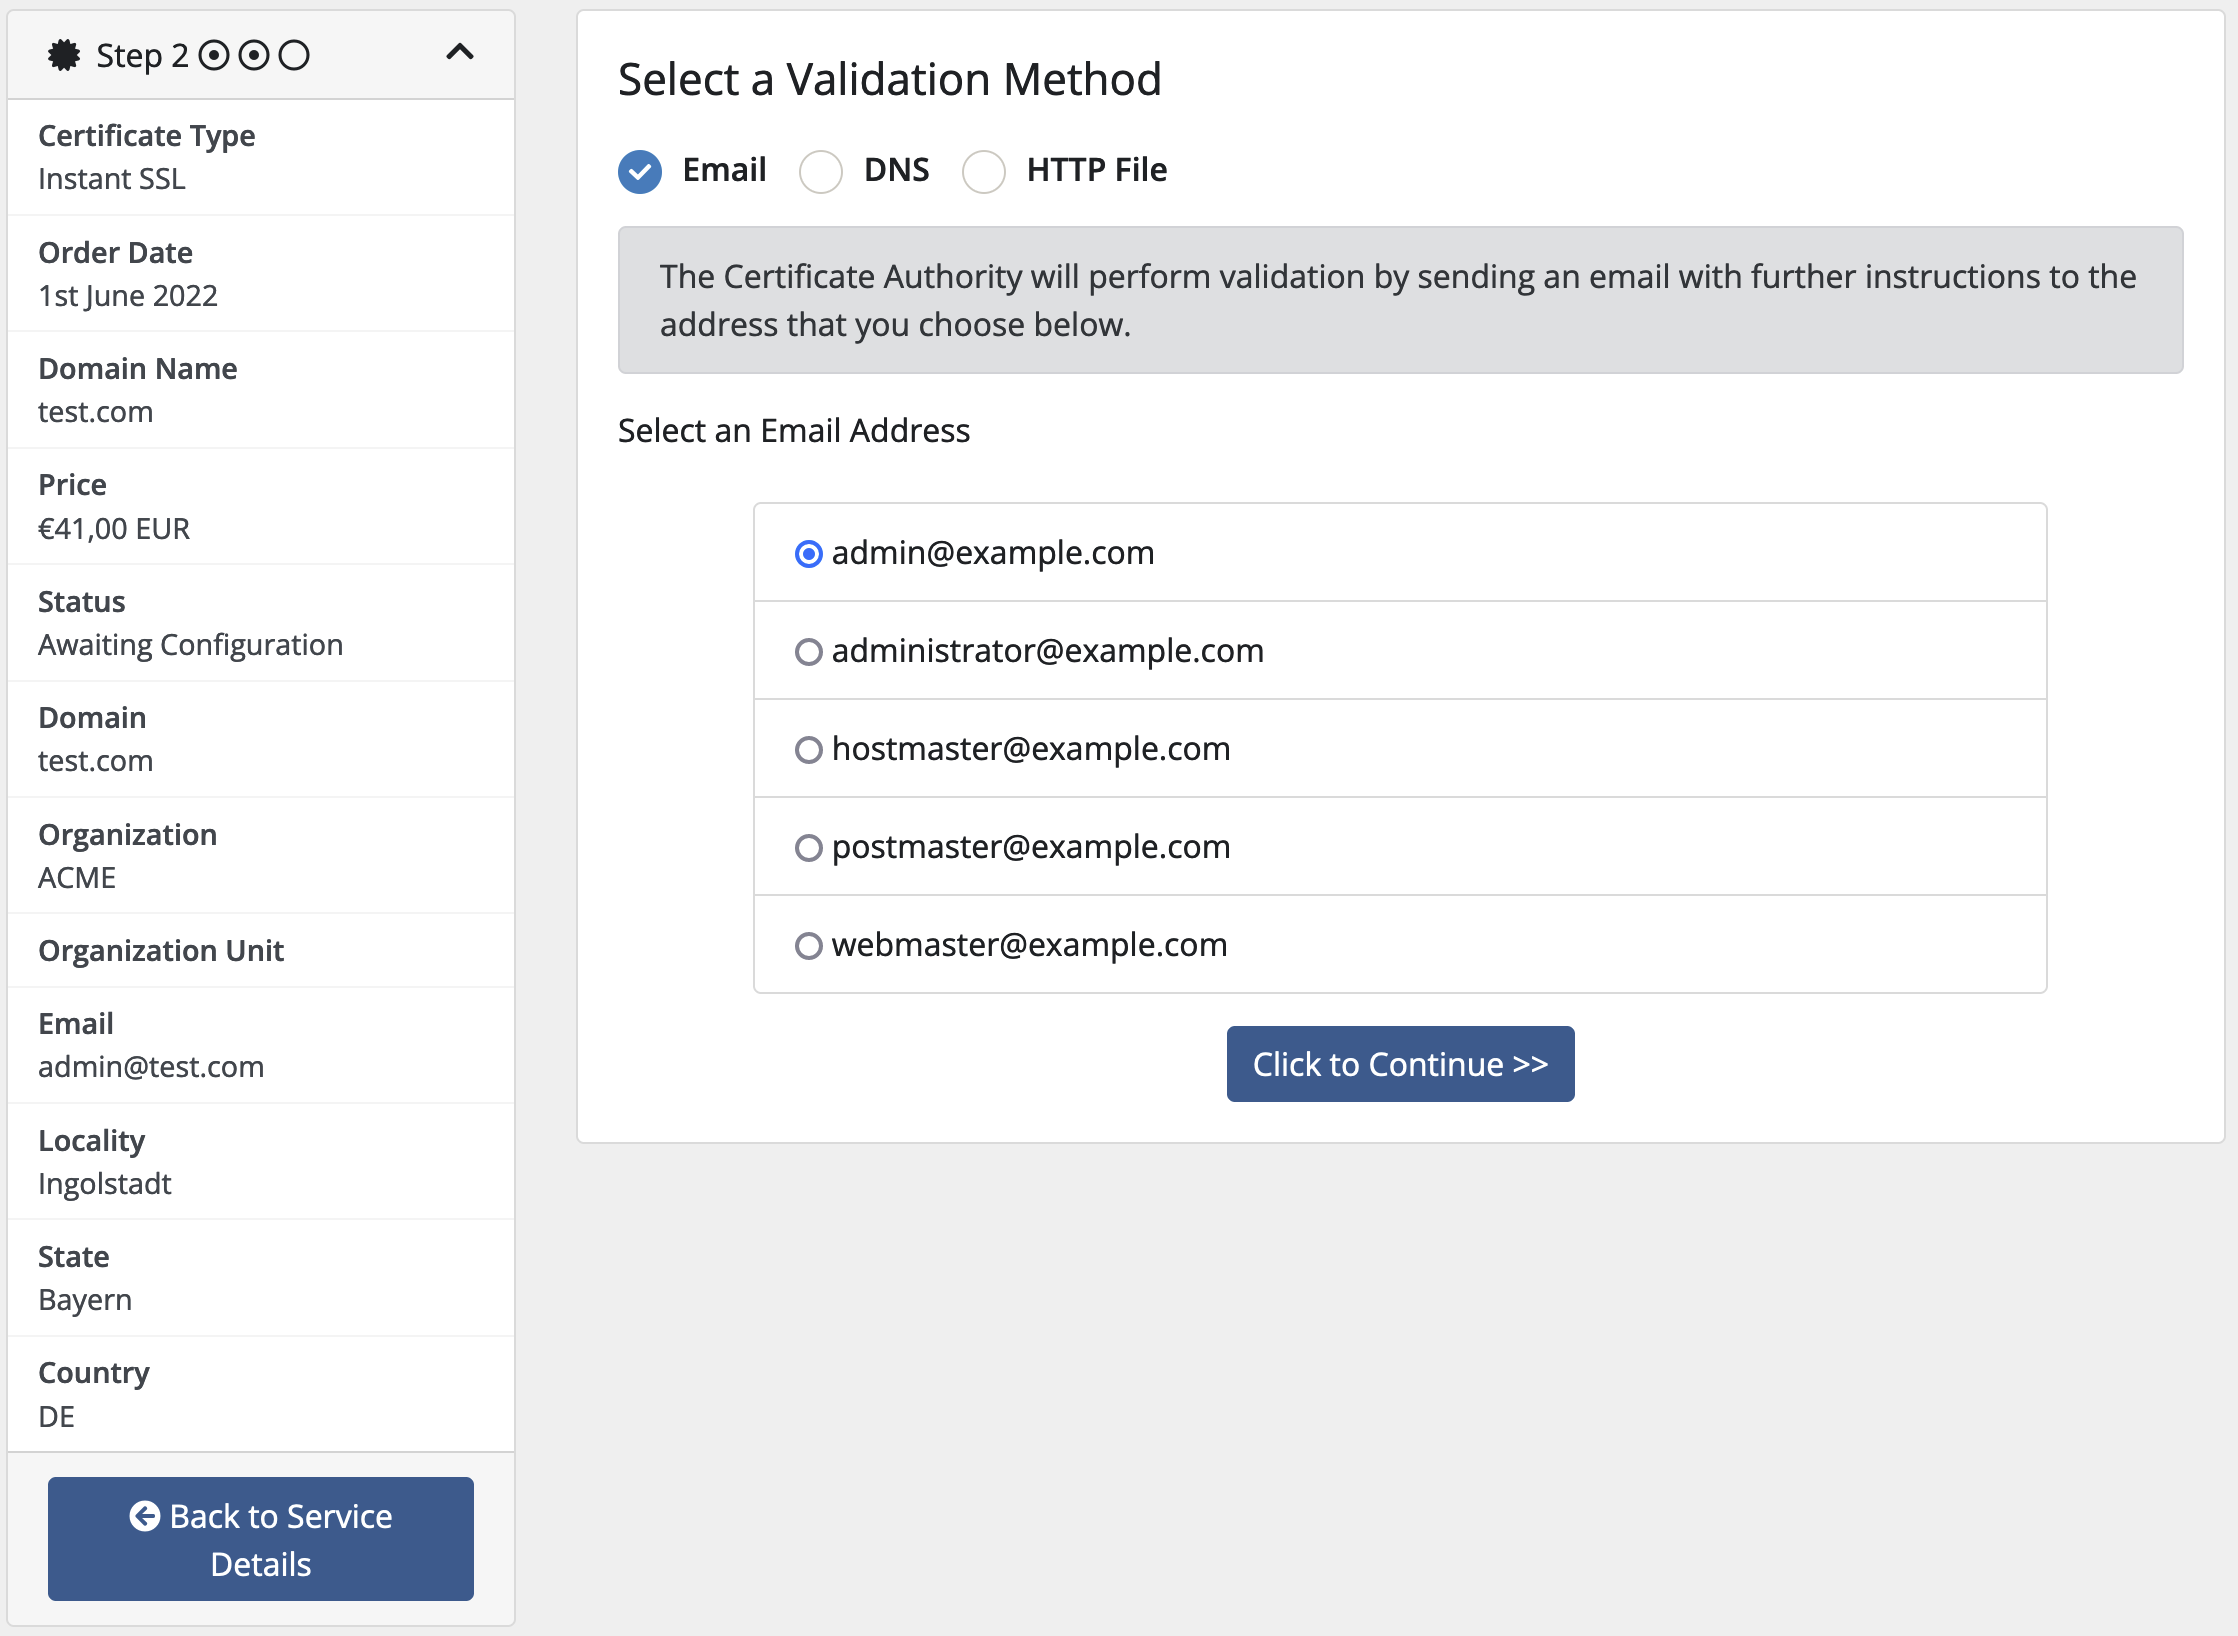
-
The configuration is now completed
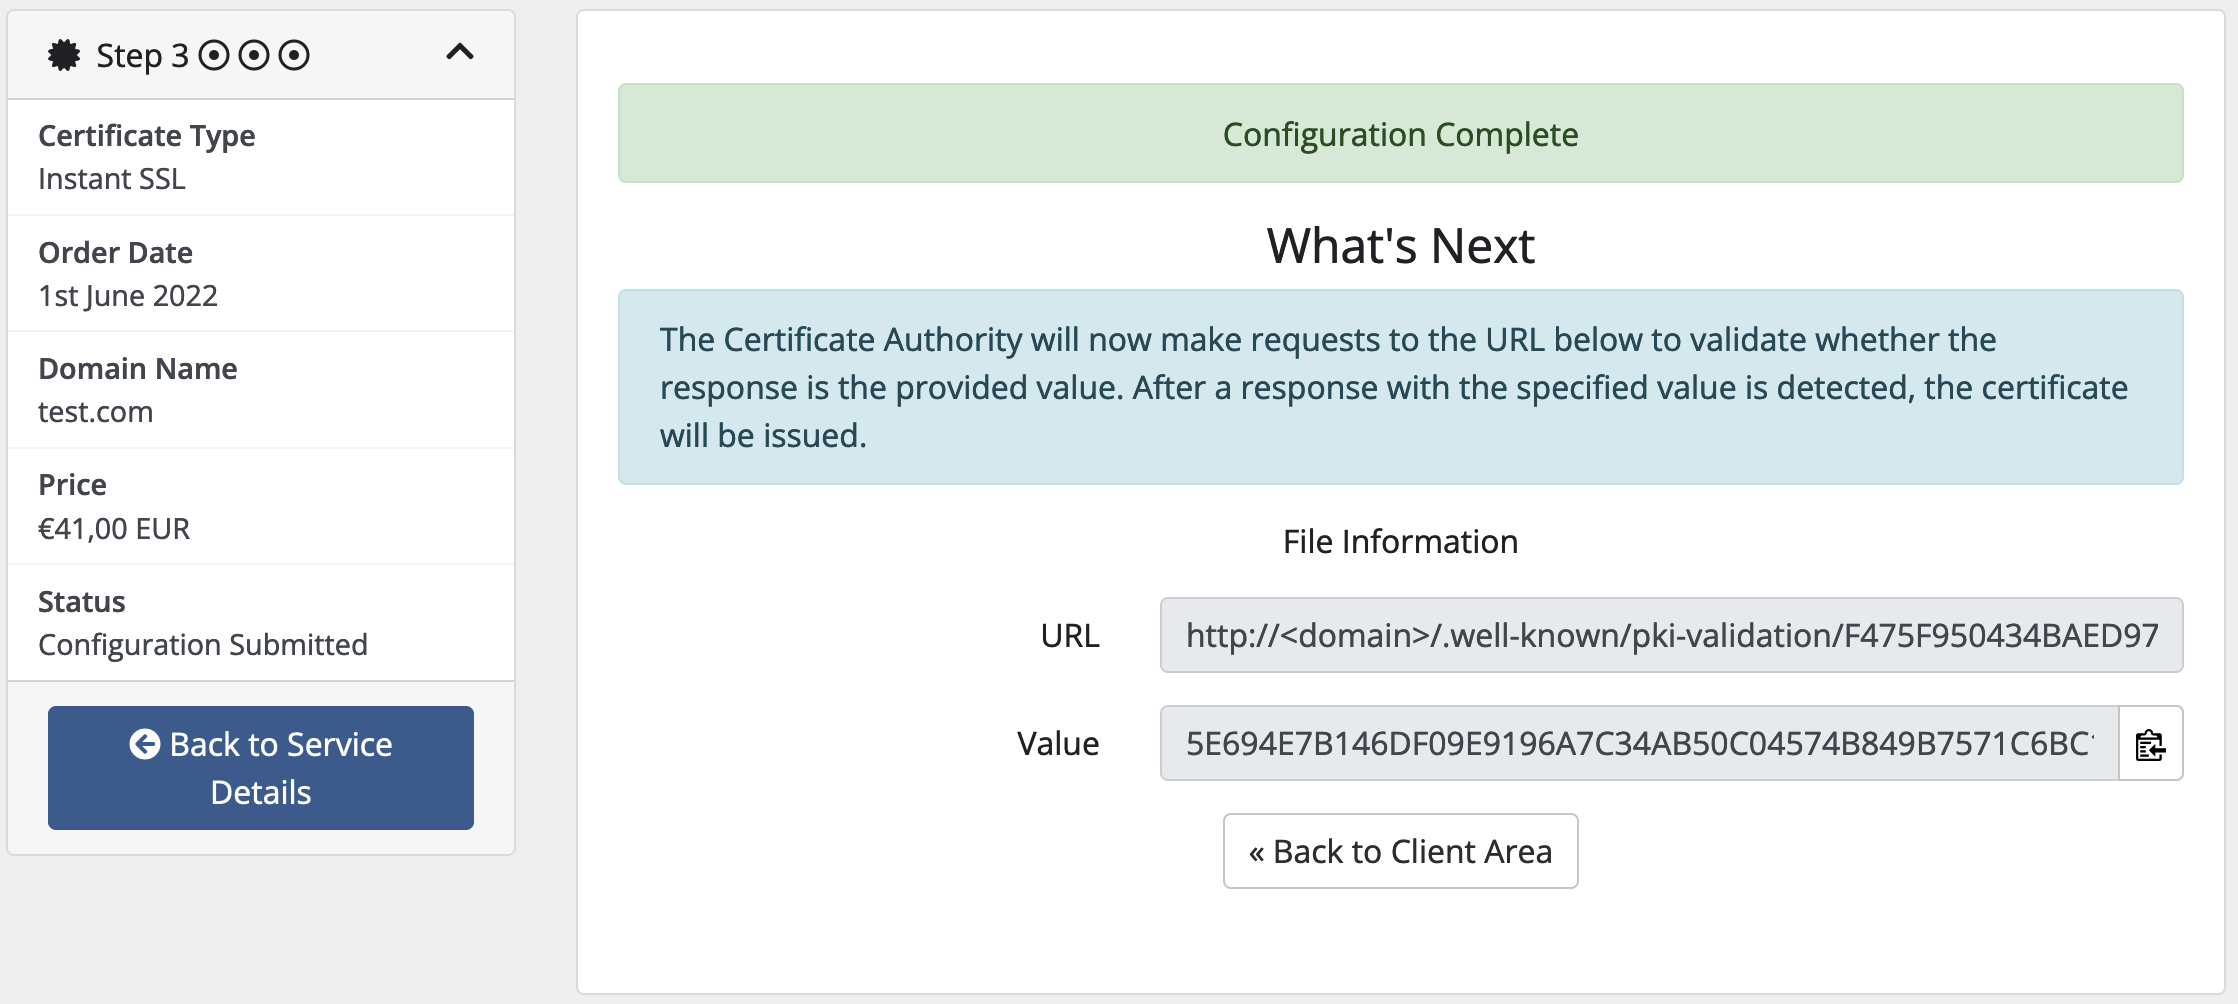
Follow the instructions you will get via e-mail from the Certificate Authority to validate your purchase. If you chose
DNSorHTTP Filevalidation, just follow the instructions that are presented to you in the confirmation screen.- It might take some minutes after validation until the certificate shows up in the client area
To expedite the validation, the customer may click the Trigger Validation Check option in the menu.