Migration Addon
WHMCS-based automatic Domain Migration and Consolidation Addon. The Addon is included in the Software Bundle we offer at github.
Introduction
This tool is made for migrations at point of domain renewal to minimize costs and for optional customer communication within the migration process to avoid transfer rejections.
Features
- Migrate from different registrars to one or multiple registrar brands of the Team Internet Group PLC (HEXONET, CentralNic Reseller, TPP Wholesale, internet.bs) in parallel
- Migrate all TLDs or just a subset of TLDs per losing registrar
- Bulk transfer for domains that can be transferred for free (0Y period) e.g. .qa, .ae, .es, .au, …
- User Interface for configuration and management of domain migrations
- Support for WHMCS Notification System allows for flexible notifications
- Email Notifications to your WHMCS Administrators (or custom email address) about the migration process
- Fully customizable Customer Notification over Email - language and tld-specific Email-Templates supported!
Benefits
- Saving costs: Migrate at the point of domain renewal
- Fully automated, you just need to spend time on installation, configuration and checking logs
How it works
The module intercepts domain renewals, and if a configuration mapping matches, it aborts the renewal and initiates the Migration / Transfer to the gaining registry instead. Still, the domain renewal order itself is left in WHMCS and is used for invoicing the transfer.
By default, Only Domains in Status Active, Expired and Grace Period (Expired) are considered by the migration tool. For all other cases the renewal will be processed normally. You can configure the module to also ignore domains in Expired and Grace Period (Expired) status.
The necessary EPP/Authorization codes are retrieved either from the configuration or dynamically through the losing registrar’s module.
If a domain is locked, it will be unlocked for the transfer process automatically.
In addition this tool can inform your clients by mail about the process.
Migration Best Practices
Customer Communication in advance is the key and better than using our migration tool client mail-out functionality. Get in touch with your clients directly and inform them about the provider change. Our tool would inform them where the migration happens - at the expiration date of the domain name. This doesn’t leave you much time for communication and fixing transfer issues - That’s the reason why we suggest to inform your customers earlier. The losing registrar will send an email per domain transfer to your customer allowing to accept or reject it. Important is that your customers are informed so that the risk of rejected transfers are minimized.
Automatic unlocking of domain names right before initiating the migration / transfer doesn’t work for some registrars. Find known cases documented here. We suggest to unlock domains then manually if this issue case applies to your situation.
A good idea might be to configure the due date for renewals to give a customer enough time for paying the renewal invoice. Our tool will only be invoked at expiration date in case the invoice is (marked as) paid. That’s basically how WHMCS Core behaves - a Renewal will just be forwarded to the underlying registrar if paid. We intercept at that point and reject the renewal in favour of a migration/transfer in case your custom configuration of our migration tool identifies the appropriate domain name / TLD as a migration case.
Best case would be to have a development / QA system that is connected to the OT&E environment of the losing registrar and the gaining registrar to test how our tool works. This allows you to identify in advance upcoming issues or in general topics that might need your attention. Still, you can skip that part if not available on your side or if one of the registrars does not offer an OT&E environment.
Premium Domains: As of a bug WHMCS solved with v7.8, any premium domain registered before v7.8 has incomplete data in the database and therefore a renewal won’t be working. This also applies when trying to transfer. Please get in touch with us.
Installation / Upgrade
Download available via WHMCS Marketplace or via GitHub.
Don’t touch files where the filename starts with dist.*. That are default files and templates, partially used as fallback or within automated tests. Follow the below instructions to get this tool correctly up and running.
Finally, navigate to Configuration > System Settings > Addon Modules in your WHMCS Admin Area, then click on Activate next to the CNIC Migrator listing.
Re-Configure WHMCS
Re-Configure WHMCS in direction of the gaining registrar:
- Ensure the gaining registrar’s registrar module is installed, activated, configured and working!
- Ensure the Configuration in Domain Pricing Section is already re-configured in direction of the gaining registrar. Ensure ALL TLDs that are assigned to the losing registrar and whitelisted for migration are reassigned to the gaining registrar!
Upgrading
When upgrading: Please make sure to back-up your existing CNIC bundle to prevent any data losses.
- Backup folders to a safe path
modules/registrars/ispapimodules/registrars/cnicmodules/addons/cnicdnsmodules/addons/cnicdomainimportmodules/addons/cnicmigrationmodules/addons/cnicssl_addonmodules/addons/cnicdomainsearchmodules/servers/cnicsslmodules/widgets/ispapi*.php // just delete these ones if presentmodules/widgets/hexonet_summary.php // just delete this one if presentmodules/addons/ispapidomaincheck (old domain search)resources/cnic
And then delete these folders from your WHMCS instance.
- Extract the zip archive into the root folder of your WHMCS instance. (Upgrade completed!
 )
)
IMPORTANT Ensure to read the Release Notes carefully before Upgrading! Our Release numbers follow semantic versioning and thus we follow the version syntax: MAJOR.MINOR.PATCH. Please ensure to backup your current version’s folder to have a fallback possibility you can use, just in case there’s something wrong with our new version.
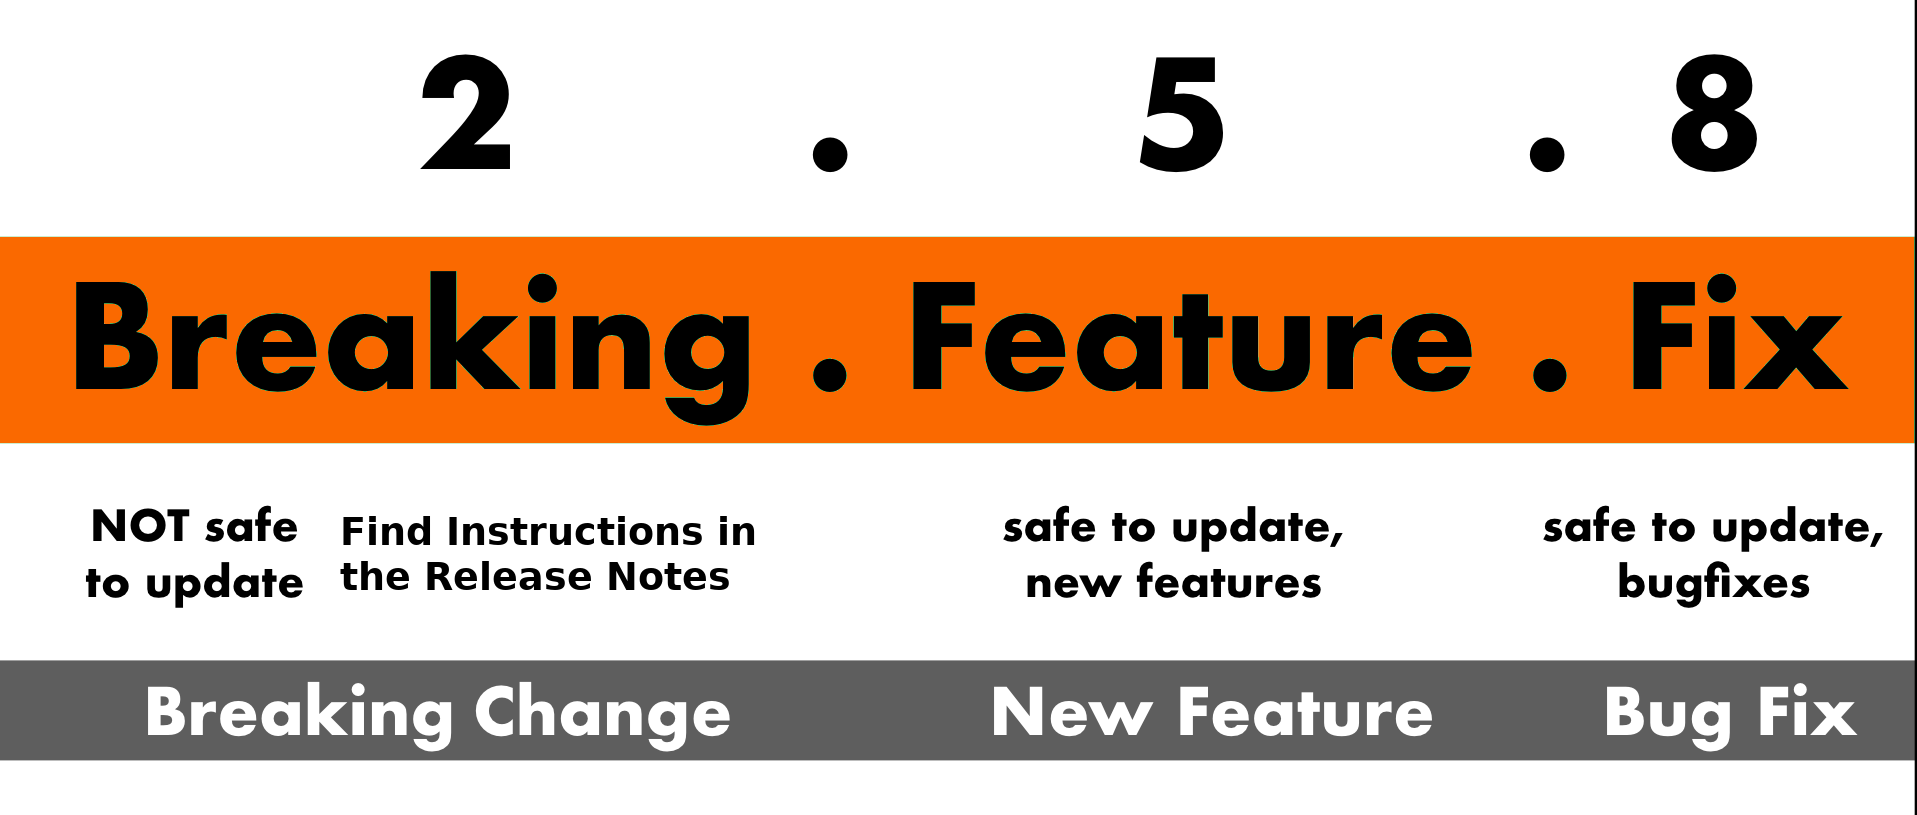
You can always upgrade without worries if the PATCH or MINOR version have just changed. If the MAJOR version has changed, check the release notes to avoid unexpected issues as a new MAJOR version comes always with breaking changes or at least with a new module behavior.
Follow the installations steps below and consider the provided release notes for the MAJOR version upgrade. In detail: if you’re upgrading from 1.x.y to 4.x.y, ensure to check ALL Major Version Release Notes up to the version you’re upgrading too. In this example, check the release notes for 2.0.0, 3.0.0 and 4.0.0.
If you’re upgrading regularly and keeping all our modules / addons / widgets updated, you run in less upgrade effort than doing multiple major version number steps. You can add/subscribe yourself to release notifications in our github repositories to get informed about new releases.
Configuration
Addon configuration
For users with WHMCS version 8.0+, Navigate to
WHMCS Admin Area>System Settings>Addon ModulesFor users with WHMCS version 7.3+, In the WHMCS Admin area, go to
Setup>Addon Modules
Activate the CNIC Migrator Add-on, give the module “Full Administrator” Access Control right.
| Setting | Default | Description |
|---|---|---|
| Send mails to admins | Enabled |
Notify WHMCS admins about transfer activity. We recommend leaving this enabled. |
| Send mails to clients | Disabled |
Notify clients about transfer activity. |
| Log activity | Enabled |
We recommend leaving this enabled for easier diagnostics. |
| WHMCS Instance ID | WHMCS |
Used for distinguishing different WHMCS instances in logging. |
| Renew if expired | Enabled |
Renew expired domains at current registrar instead of migrating. |
| Reseler name |
Company Name from WHMCS General Settings |
This will be used in notification e-mails. |
| Reseler URL |
URL from WHMCS General Settings |
This will be used in notification e-mails. |
| Reseler email |
Email Address from WHMCS General Settings |
This will be used in notification e-mails. |
| Access Control | None |
Set this to the admin groups that should have access to the addon. |
Define mappings
In the WHMCS Admin Area, navigate to Addons > CNIC Migrator, then click on the Mappings tab.
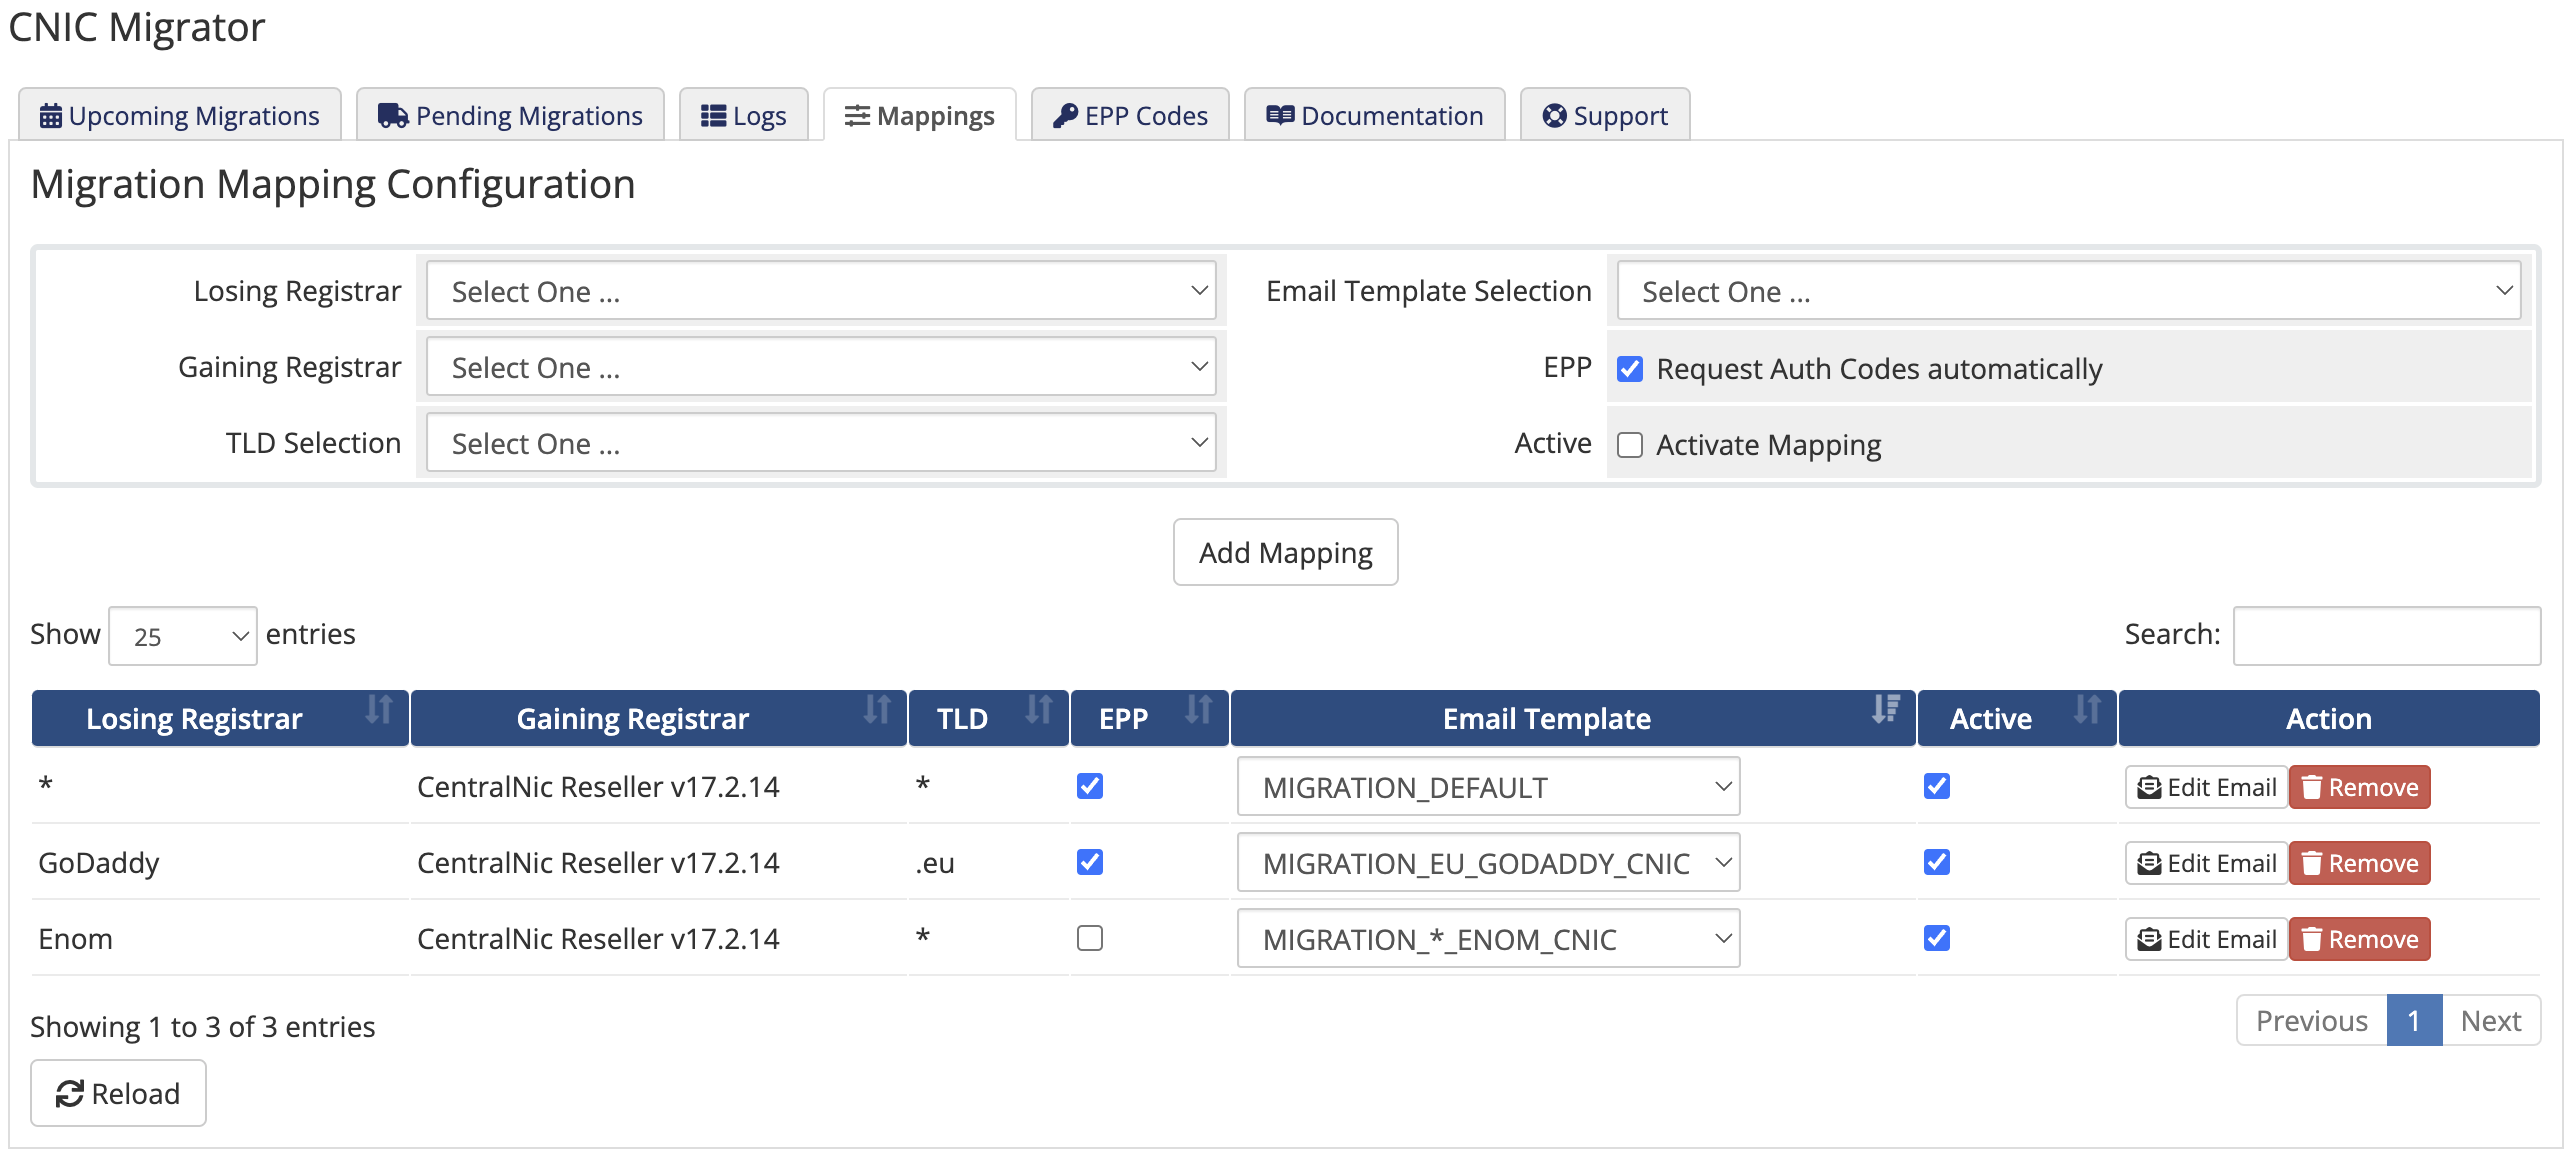
Here you can define your desired mappings, specifying the desired losing and gaining registrars, any specific TLD, and wether the migrator should automatically retrieve the EPP auth codes via the losing registrar’s WHMCS module. You can also specify which e-mail template you want to use for client notifications.
EPP/Authorization Codes
The migrator will attempt to retrieve the EPP code automatically via the losing registrar’s module.
Some registrars however, do not support this functionality. Their module will return an error, but send the code out to the current registrant’s email address instead. So, not reliable for real-time processing. A good example is the registrar Enom.
As a workaround, you should get hold of the EPP codes manually (for example by requesting it and having your customer send you the code they recieve via e-mail). Then, you can specify those EPP codes beforehand in the EPP Codes tab in the Addon. You may also upload a CSV file containing a list of domains with their respective EPP codes.
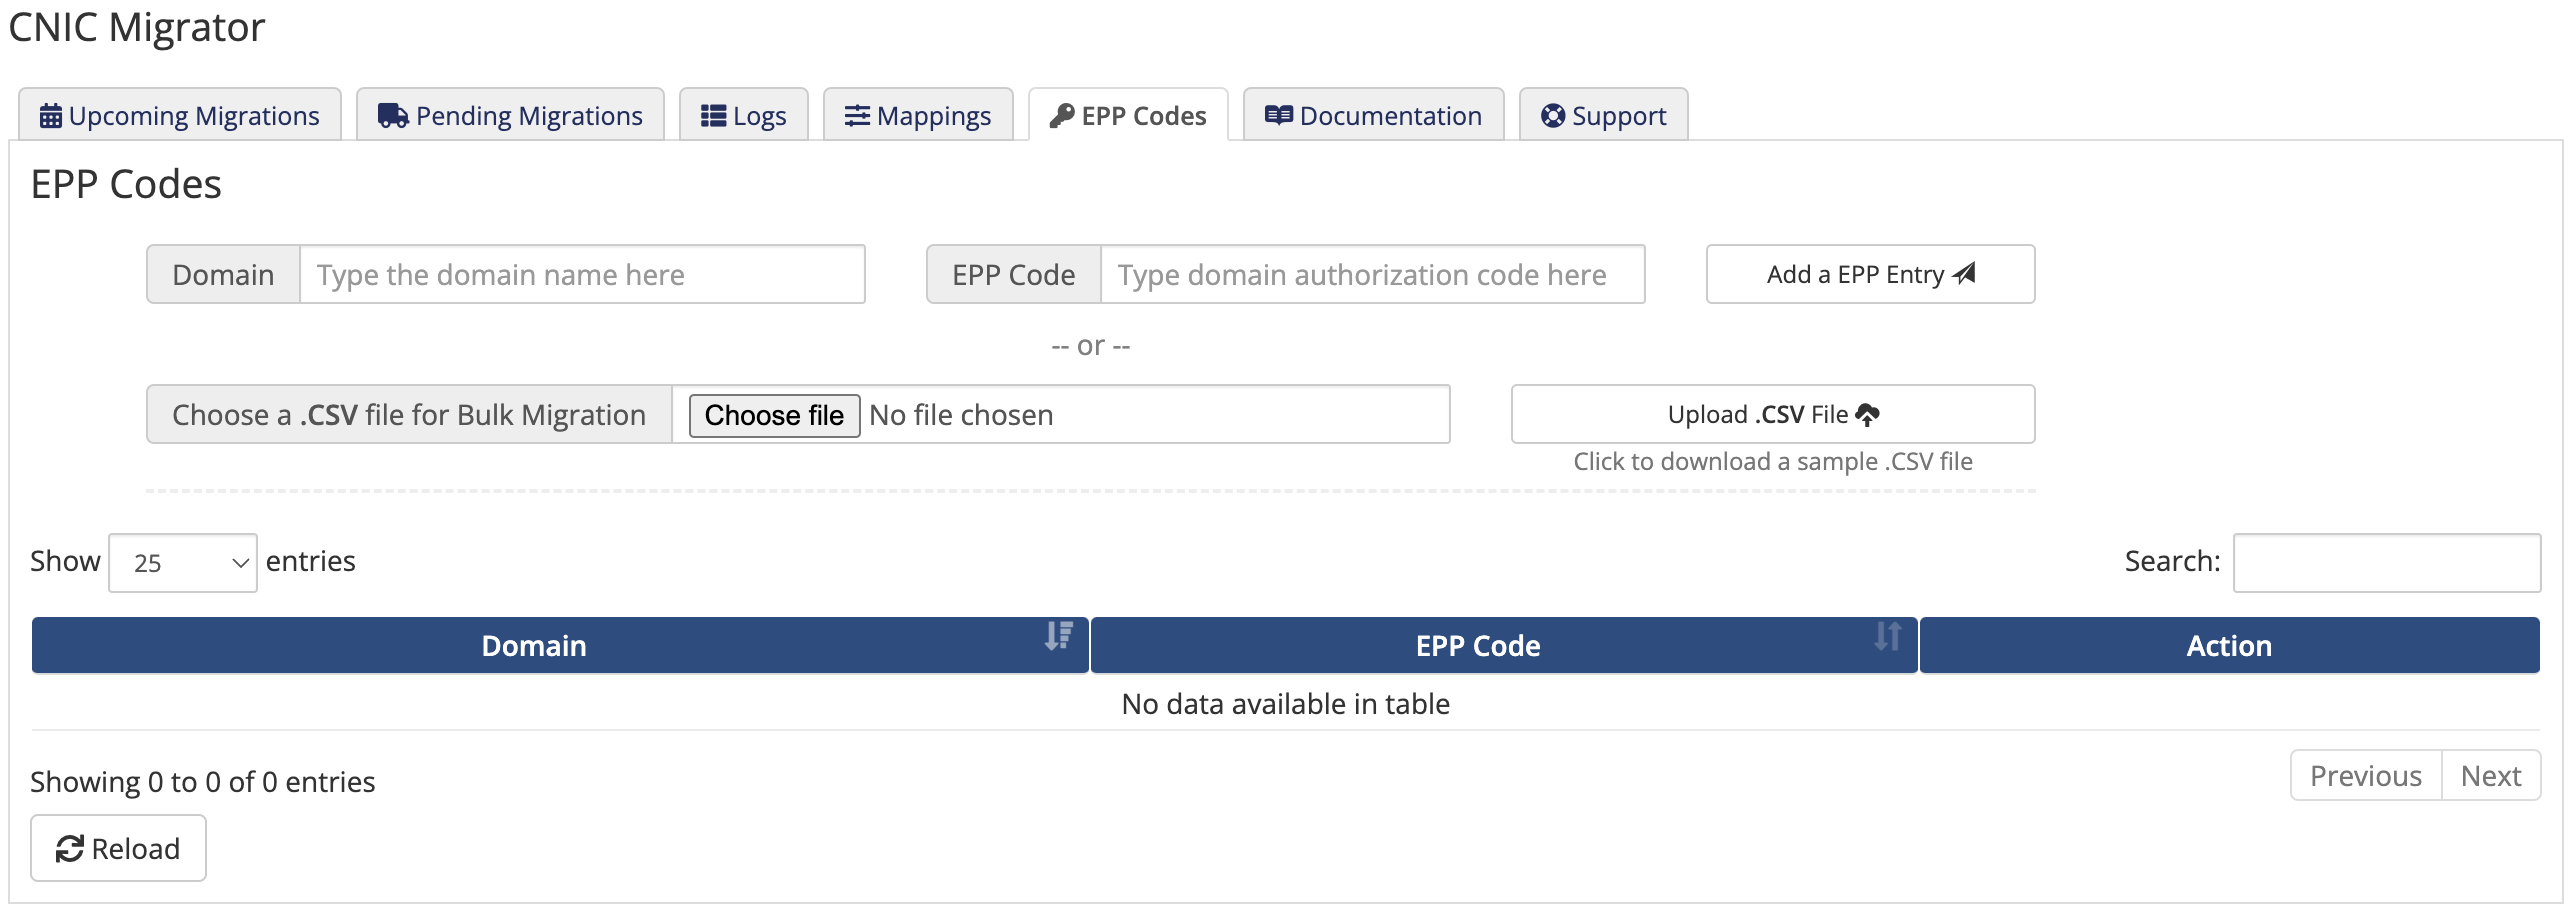
When initiating a transfer, the migration addon will first check if any EPP code has been specified for the related domain, and then fallback to the losing registrar’s registrar module functionality, if enabled in the mappings.
Email Notifications
This migration tool also takes care about sending emails to your clients explaining them what is going on to avoid domain transfer rejections as far as possible. This is by default turned off to leave you the possibility to reach out to your customers using a different way. Still, you can turn that on to let this migration tool do that work. This can be done by enabling the Send mails to clients option in the addon configuration.
By default this tool is also sending mails to you, the reseller, to allow a bit of monitoring. This can also be turned off over Send mails to admins setting.
Client Email Templates
This migration tool comes with a MIGRATION_DEFAULT email template in english that will be used for mail-out to your clients. When adding a new mapping, or editing an existing one, you can select the *Generate new* option, which will generate a new template.
You may customize and translate any template via the WHMCS built-in Email Templates functionality.
Later, you can check the System Email Message Log in WHMCS for mails sent to your clients and view them.
Email Templates Customization
How to proceed:
- In the WHMCS Admin Area, go to
System Settings - Open the
Email Templatespage - You will find the templates in the
Domain Messagessection and marked asCUSTOM. - Edit the template you want to customize.
The templates allow the use of variables. This follows the principles of Smarty Syntax to use e.g. {$someVariable}. The following variable names are available for the client email templates:
-
{$id}: The internal ID of your domain in WHMCS (indexed no.) -
{$domain_name}: The Internationalized Domain Name -
{$gainingRegistrarLabel}: A speaking label of the gaining registrar -
{$losingRegistrarLabel}: A speaking label of the gaining registrar -
{$resellerLabel}: Your/Reseller’s Label e.g. Reseller Pty Ltd -
{$resellerContactEmail}: Your/Reseller’s contact email address -
{$resellerContactURL}: Your/Reseller’s web page URL for a contact form or similar -
{$client_name}: Name of your client -
{$signature}: Your/Reseller’s signature
If you need something in addition, let us know.
Logging
If logging is enabled in the addon settings, it will happen in a variety of ways.
Addon Logging
In the Logs tab, you will find detailed logs about each transfer or renewal process initiated by the addon.
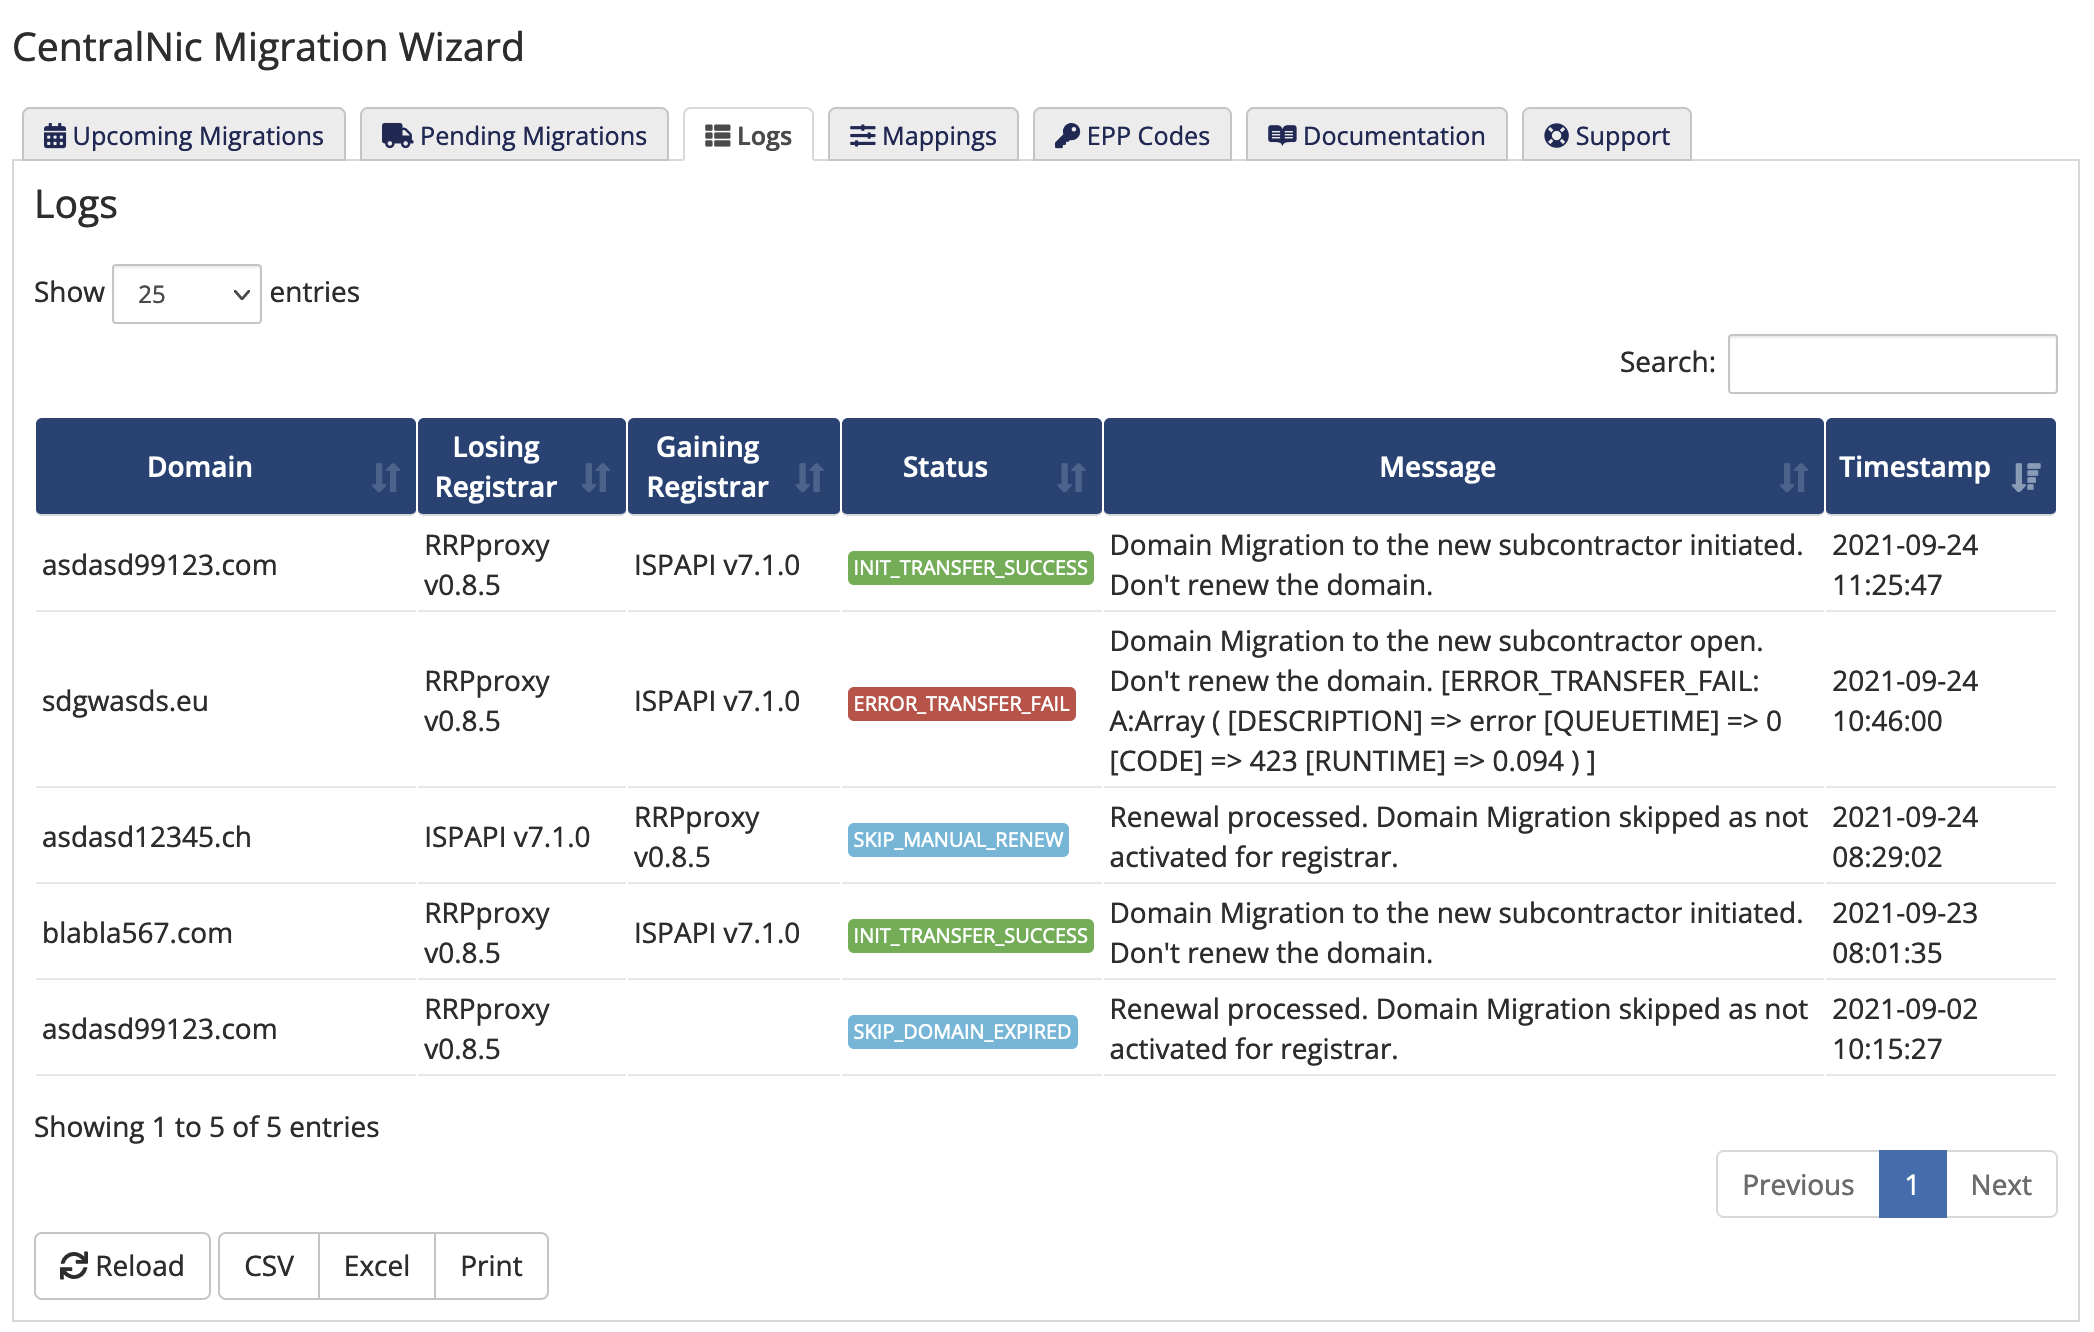
The table is entirely searchable and sortable, and can be exported as CSV or Excel file if desired.
System Activity Log
In addition to the addon logging, some basic logging will be done in the WHMCS System Activity log. The messages will be prefixed by [cnicmigration].
WHMCS Notification System
- In the WHMCS Admin Area, navigate to
System Settings > Notifications, then click onCreate New Notification Rule.
- Give it a name and select the
API > Custom API Triggerevent. - Set the
Trigger IdentifiertoExact Matchwithcnic.migration.logas value. - Last but not least, select and configure the desired notification provider.
Feedback Messages
Transfer initiated
Whenever our Migration Tool was able to initiate a Transfer in direction of the gaining Registrar, it will still abort the Renewal as this is the idea behind the migration approach. You can customize the message used to cancel the Renewal in WHMCS and to display in Domain Synchronization Report in the language files, for example modules/addons/cnicmigration/lang/english.php
$_ADDONLANG = [
    "defaultSuccessMsg" => "Domain Migration to the new subcontractor initiated. Don't renew the domain.",
];
In our logs it will show like:
-
[INIT_TRANSFER_SUCCESS]: Initiating the Transfer succeeded.
Even though we are talking about a success message here, it will still be displayed as an Error Result by WHMCS. We can’t change this.
Transfer skipped
Wherever a domain is not being transferred and instead still renewed at its current registrar, this could have one of the following reasons that are being logged:
-
[SKIP_DOMAIN_STATUS]: the domain status did not allow a transfer -
[SKIP_DOMAIN_EXPIRED]: the domain is expired and the addon is configured to renew expired domains at their current registrar -
[SKIP_NO_MATCH]: the registrar and/or tld are not configured for migration (see Define mappings) -
[SKIP_MANUAL_RENEW]: the domain was manually renewed at the current registrar
Transfer not initiated
Whenever our Migration Tool is running into an error, it still aborts the renewal. Still the transfer is then not initiated as of the error occurred. This will be shown to your clients when it comes to the Domain Synchronization Mail.
You can configure the feedback messages in the language files, for example modules/addons/cnicmigration/lang/english.php
$_ADDONLANG = [
    "defaultErrorMsg" => "Domain Migration to the new subcontractor open. Don't renew the domain.",
];
The migration tool will append an error identifier to make it more transparent which kind of error might have happened, e.g. Domain Migration to the new subcontractor. Don't renew the domain.[ERROR_CONFIG].
-
[ERROR_CONFIG:...some reason...]: Issue with module configuration. Further Details provided. -
[ERROR_DOMAIN_DATA]: Domain Data couldn’t be loaded over WHMCS - should never happen -
[ERROR_AUTH_CODE:...some reason...]: Getting the EPP/Authorization code of the domain did not work. Further Details provided. -
[ERROR_REG_MODULE]: Loading the gaining registrar’s registrar module failed or the module is not activated or not integrating theTransferDomainmethod -
[ERROR_TRANSFER_FAIL:...some reason...]: Initiating the Transfer failed. Further Details provided.
Uninstall
After Migration has finished - this might take a while of course, cleanup as follows:
- Disable the addon in the WHMCS Admin Area under
System Settings > Addon Modules - Delete the folder
modules/addons/cnicmigration
… et voila!
Troubleshooting
Find here some cases brought up to our hands:
-
resellerclubcrm module ending in an PHP Error - backtrace is pointing to language files. Even though this got escalated to the Module Devs, they just provided a workaround and not a new release. So fyi: Edit the file
$YOUR_WHMCS_INSTANCE/modules/addons/resellerclubmods_core/modlang/English_admin_lcdrm.phpand insert above the line 25 the below code:$_ADMINLANG = array();Such manual changes will be lost when upgrading your resellerclub core parts.
-
Illegal mix of collations error when opening the addon in the WHMCS Admin Area. This can happen on older WHMCS installations where database updates between WHMCS upgrades did not go smoothly, leaving some tables in a different collation. To solve this issue, it is necessary to convert the affected tables to the correct default collation, with a command like this:
ALTER TABLE tblexample CONVERT TO CHARACTER SET utf8 COLLATE utf8_unicode_ci;Where
tblexampleshould be replaced by the affected table. IMPORTANT: please backup your database befor making any changes! More information can be found in this WHMCS article